Creating a great website doesn't just mean having a great design and then building it in one of the state-of-the-art CMS platforms like Webflow. An essential thing for having a successful website (if we measure success by the number of leads and customers it brings you) is to set up proper website analytics, so you can measure the results the marketing website is getting.
Even though this might sound pretty basic, it's often surprising how many websites don't have proper analytics systems setup, resulting in marketers being unable to have analytical data to measure (and improve) the website performance, or even not to have clear attribution data of which channels are driving more traffic/revenue.
This typically happens because while creating a Google Analytics account and adding the tracking code to your site can be easy, actually tracking GA events based on button clicks, form submissions, or other events, can be considerably more complicated. But that's why we are writing this article, to explain to you the step-by-step process on how to track Google Analytics events on your Webflow site.
Before starting with the tutorial, there are some important things to keep in mind:
☝🏻 There are many different ways to track GA events on Webflow (using Webflow attributes + onClick event functions, adding ga-event attributes to all <a> links using a JavaScript recursive function, etc), however, the way we are going to show in this article is what we believe is the easiest for non-technical users, so even if you don't have any coding experience, you should be able to do it without any problem.
✌🏻 At the same time, we will explain the process using only GA4 (Google Analytics 4), not because we love it (we actually kind of hate it, like most marketers do 🤣), but as Google Universal Analytics will be sunsetted on July 1, 2023, it's better to be prepared.
🤔 If you are looking for another tracking setup, we invite you to send us a message. Our team has extensive experience in advanced analytic setup on Webflow sites, so if you are looking for any specific integration or tracking setup, we will be happy to help.
Without further due, let's get started with the tutorial 🚀. We will start by explaining how to properly add GTM and GA, as it is commonly done incorrectly, however, if you want to jump directly to the Google Analytics events setup in Webflow, you can click one of the jump links below:
- How to properly setup Google Tag Manager and Google Analytics in Webflow
- How to track Webflow button clicks in Google Analytics
- How to track Webflow form submissions in Google Analytics

How to properly setup Google Tag Manager and Google Analytics in Webflow
Before getting started actually creating the GA events, it's important to properly add GTM (Google Tag Manager) and GA (Google Analytics) to your Webflow site. This is often not done properly, typically resulting in non-correct tracking data, duplicated results, etc.
We don't want to bore you, as this is a pretty easy and simple process, so we will try to keep it as short as possible. If any of you if you have questions or hit roadblocks in this part, we will write an article in the future.
Setup Google Analytics in Webflow
Let's first create your GA4 property, so we can later add it to Google Analytics for traffic and event tracking.
1. Go to analytics.google.com and Login with your Google or G-Suite account
2. Click Start measuring button
3. Type your account name, and check the Account Data Sharing settings according to your preferences
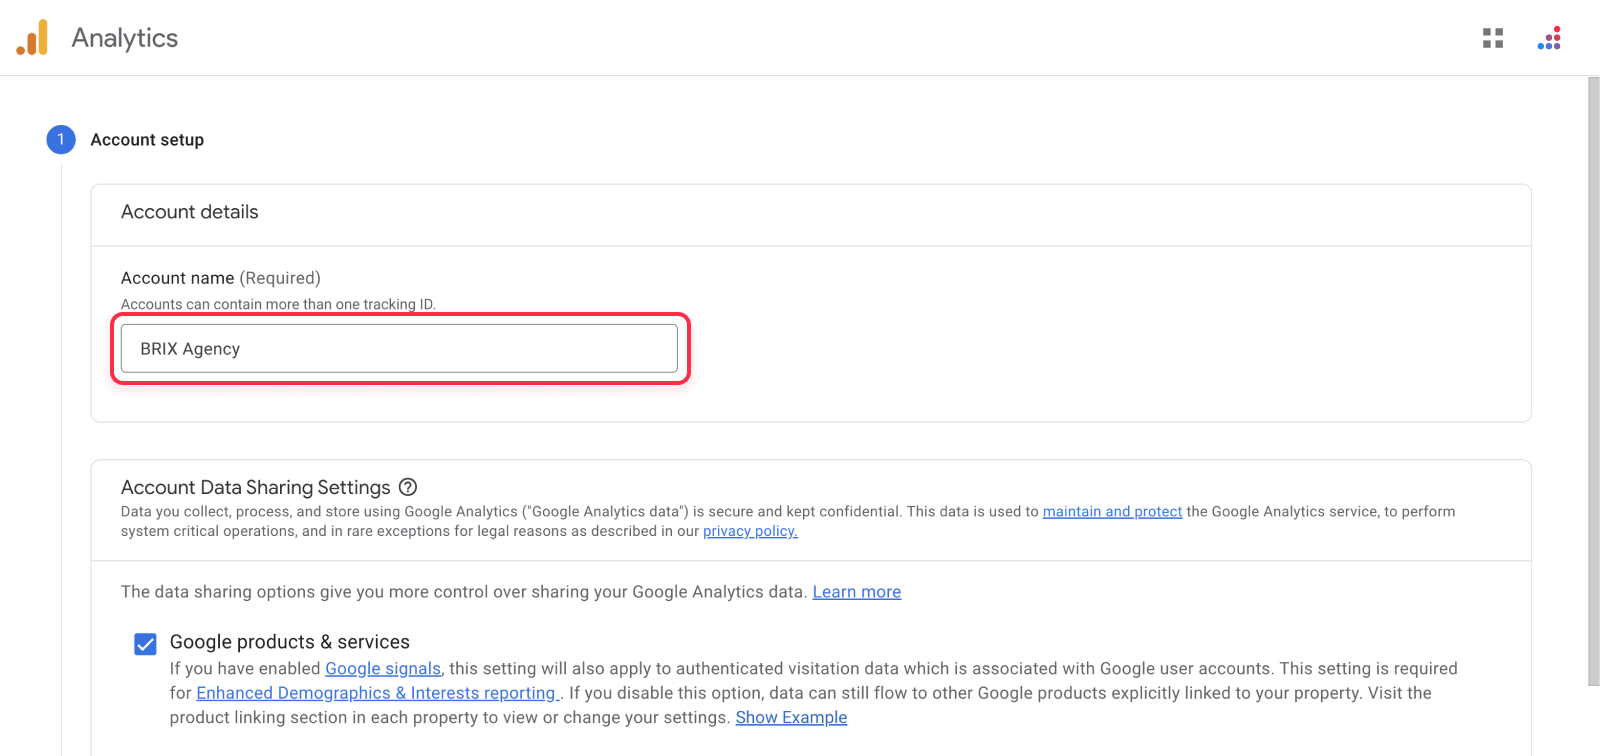
4. Type your property name (for example, ours is BRIX Agency), timezone, and currency
5. Fill in your business information. Typically what you check or not check won't influence your analytics in any way, it will just be used for account segmentation purposes by the Google Analytics team
6. Click Create and accept terms and conditions
7. Once you do that, you will start the onboarding process, and you will arrive to a screen that asks you to choose your platform. Choose Web
8. Type your Website URL (ensure to choose HTTPs), and Stream name (Write your website name, unless you want to name it in another way)
9. Keep Enhanced measurement toggled on and click Create Stream
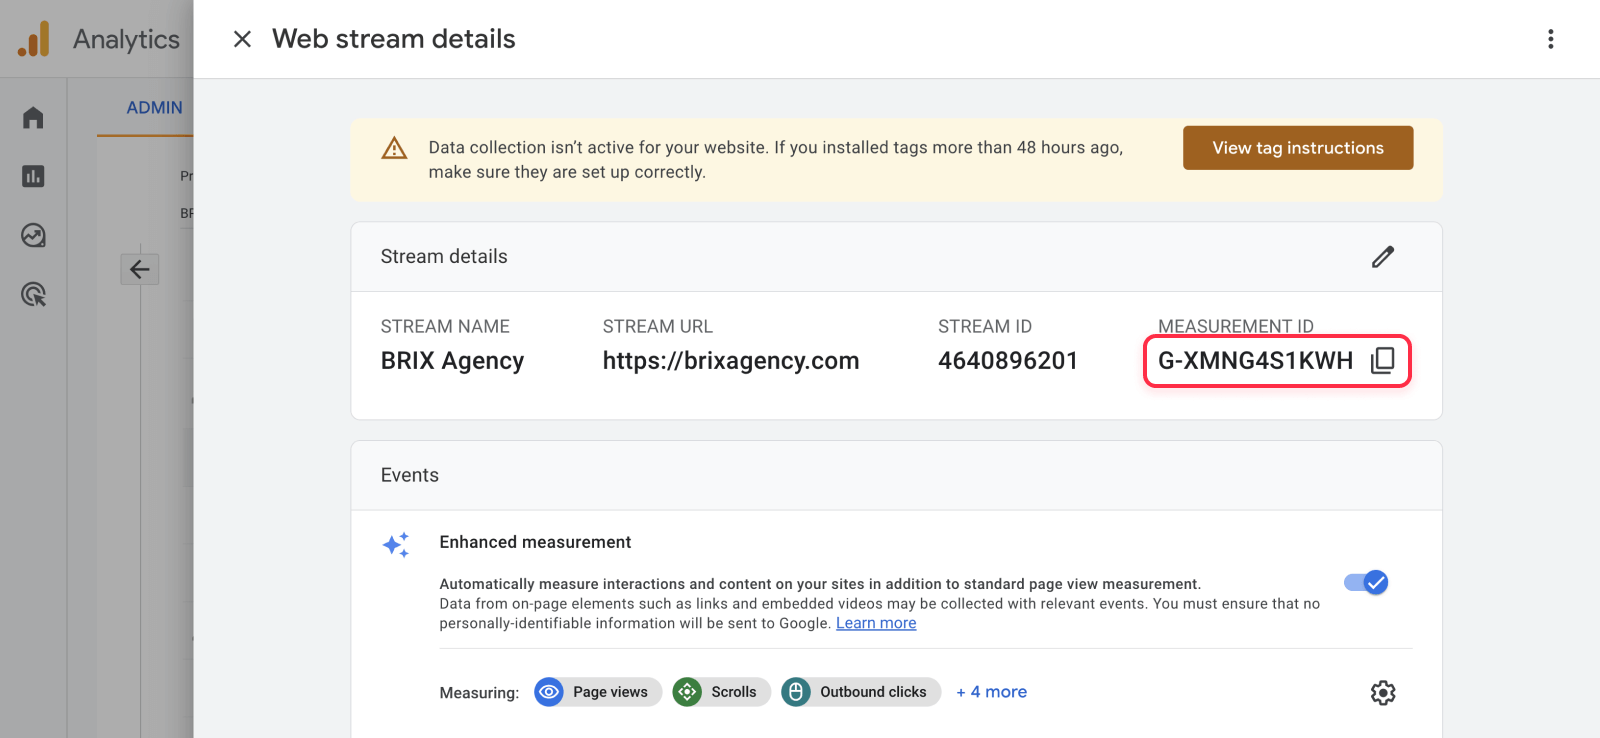
10. You will see a Web stream details window with all your GA property information. Copy the measurement ID, as we will use it in a few minutes.
Once with your GA measurament ID, it's time to continue with GTM.
Setup Google Tag Manager in Webflow
In short, Google Tag Manager is a platform that allows you to manage all your tracking codes (Google Analytics, Google Ads, Facebook Ads, Segment, Hotjar, etc) from the same place, along with many other great features that make event and conversion tracking very easy, simple, and friendly. Let's create your account:
1. Go to tagmanager.google.com and Login with your Google or G-Suite account
2. Click Create account in the top right corner
3. Type your account name (i.e. BRIX Agency) and container name (i.e. brixagency.com)
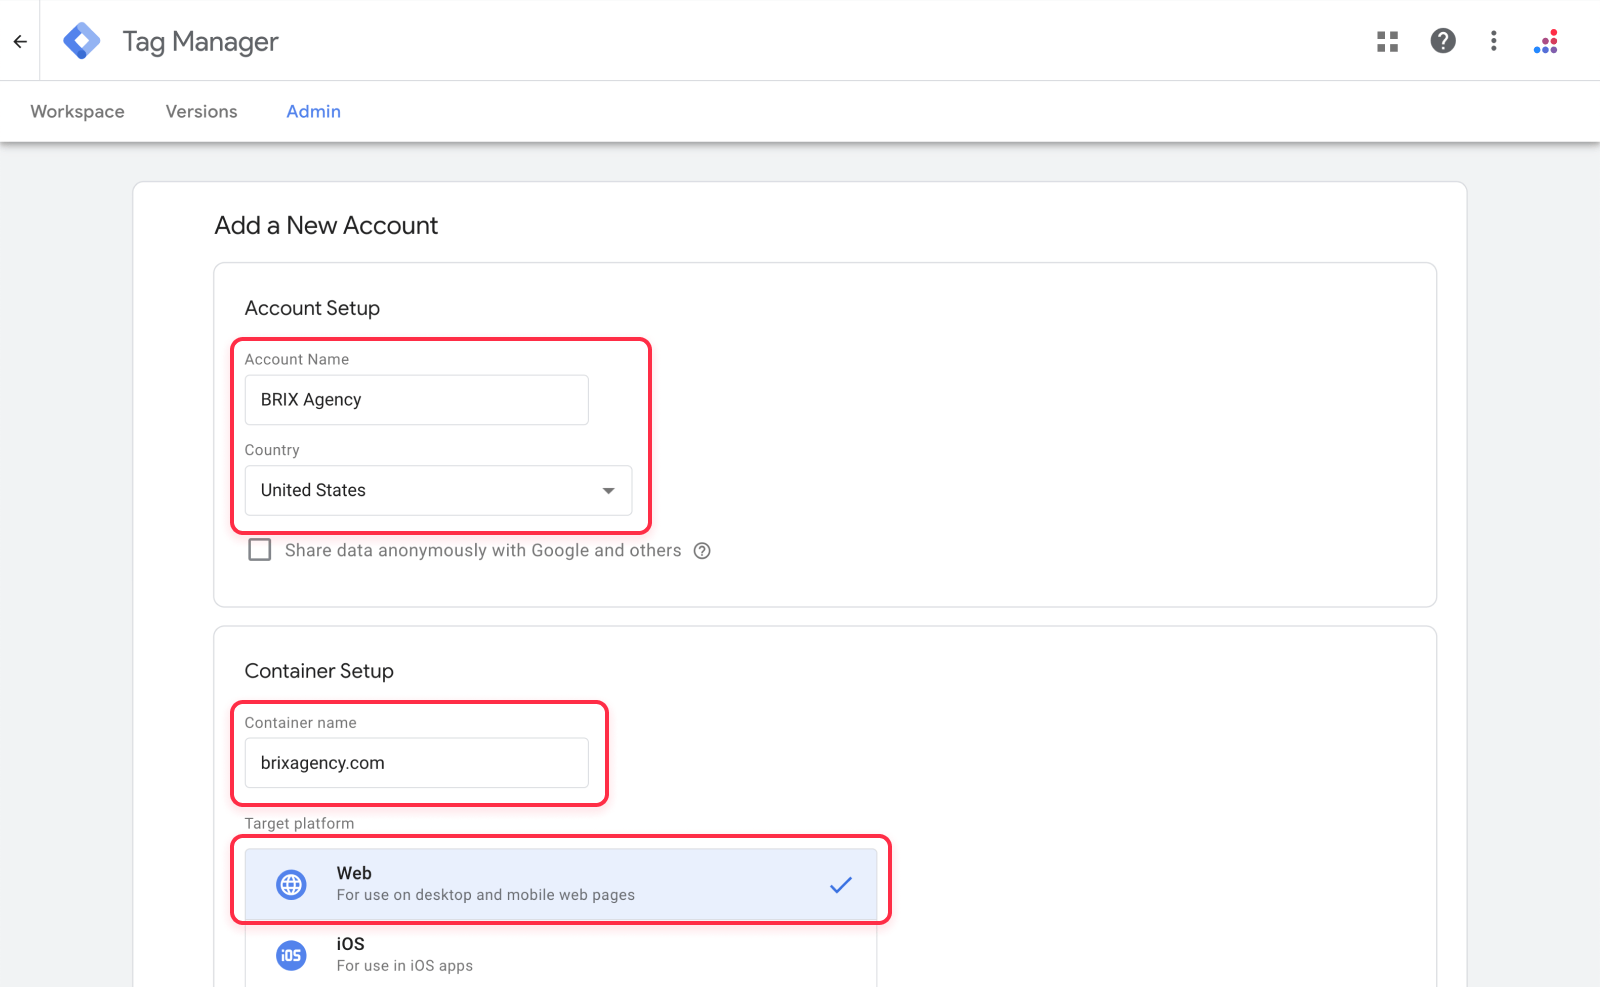
4. Select Web on the target platform
5. Accept terms and conditions and click Yes
6. Copy your code tracking codes ( <head> code and <body> code )
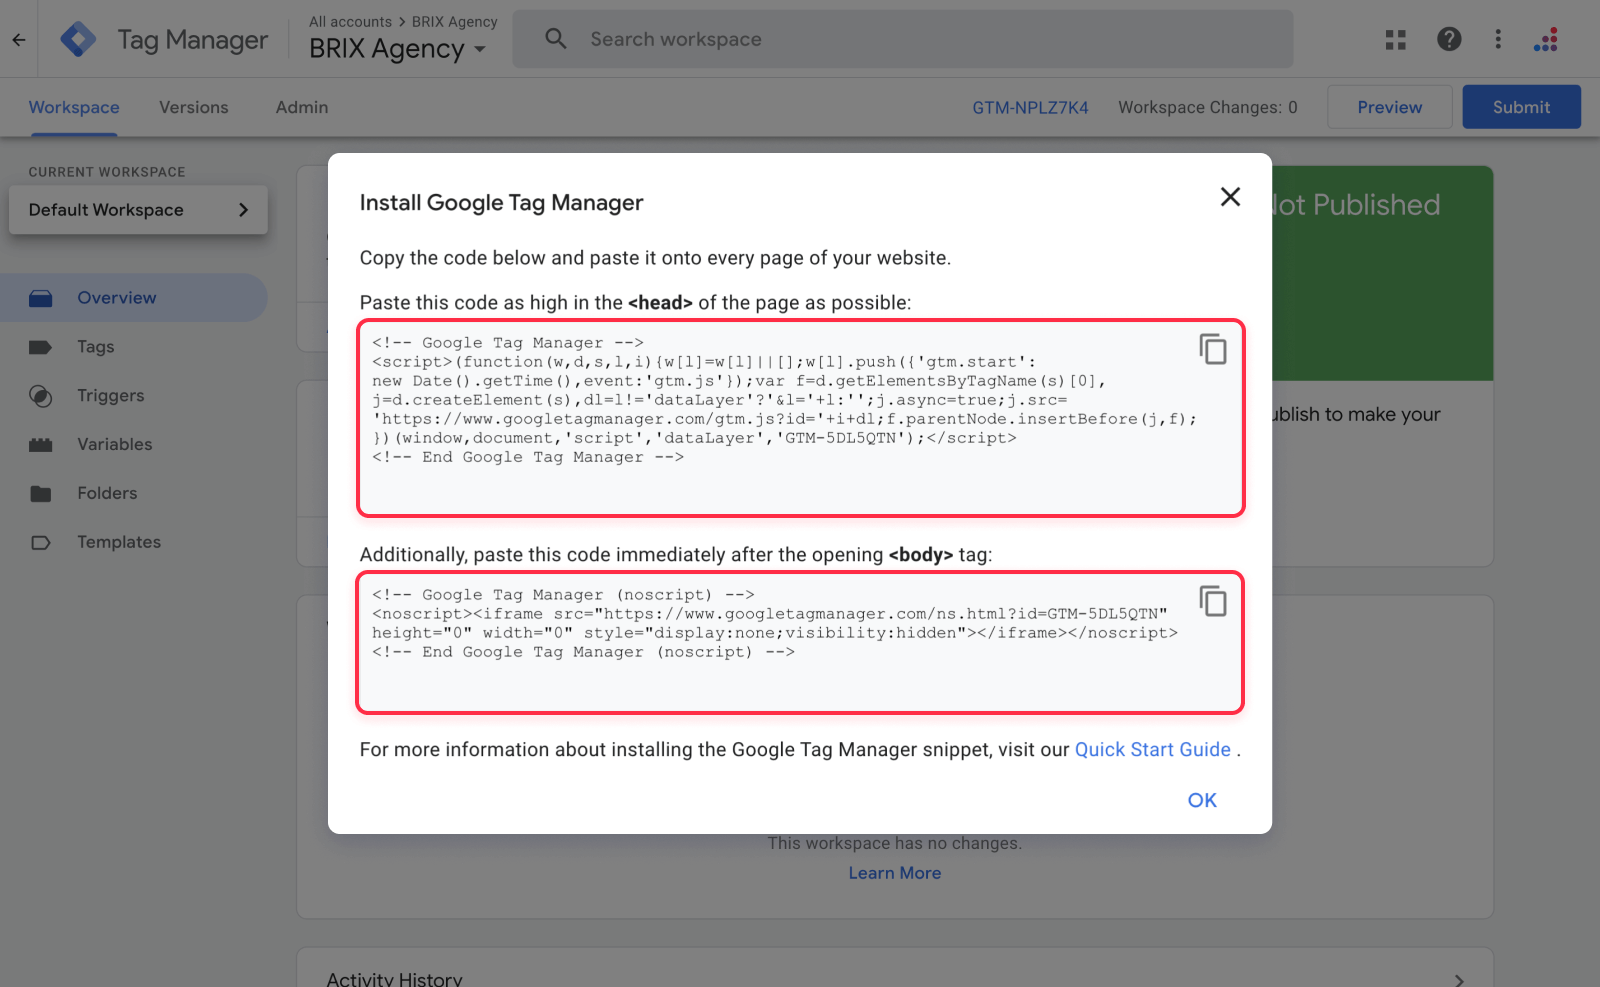
7. Go to Webflow > Project > Project Settings > Custom Code and paste the <head> code into the Head Code and the <body> code into the Footer code.
For the body code, Google recommends to add it on the start of <body>, however, from our experience we have seen that adding it towards the end slightly increases the initial website speed load, and in most cases affects data attribution less than 1%.
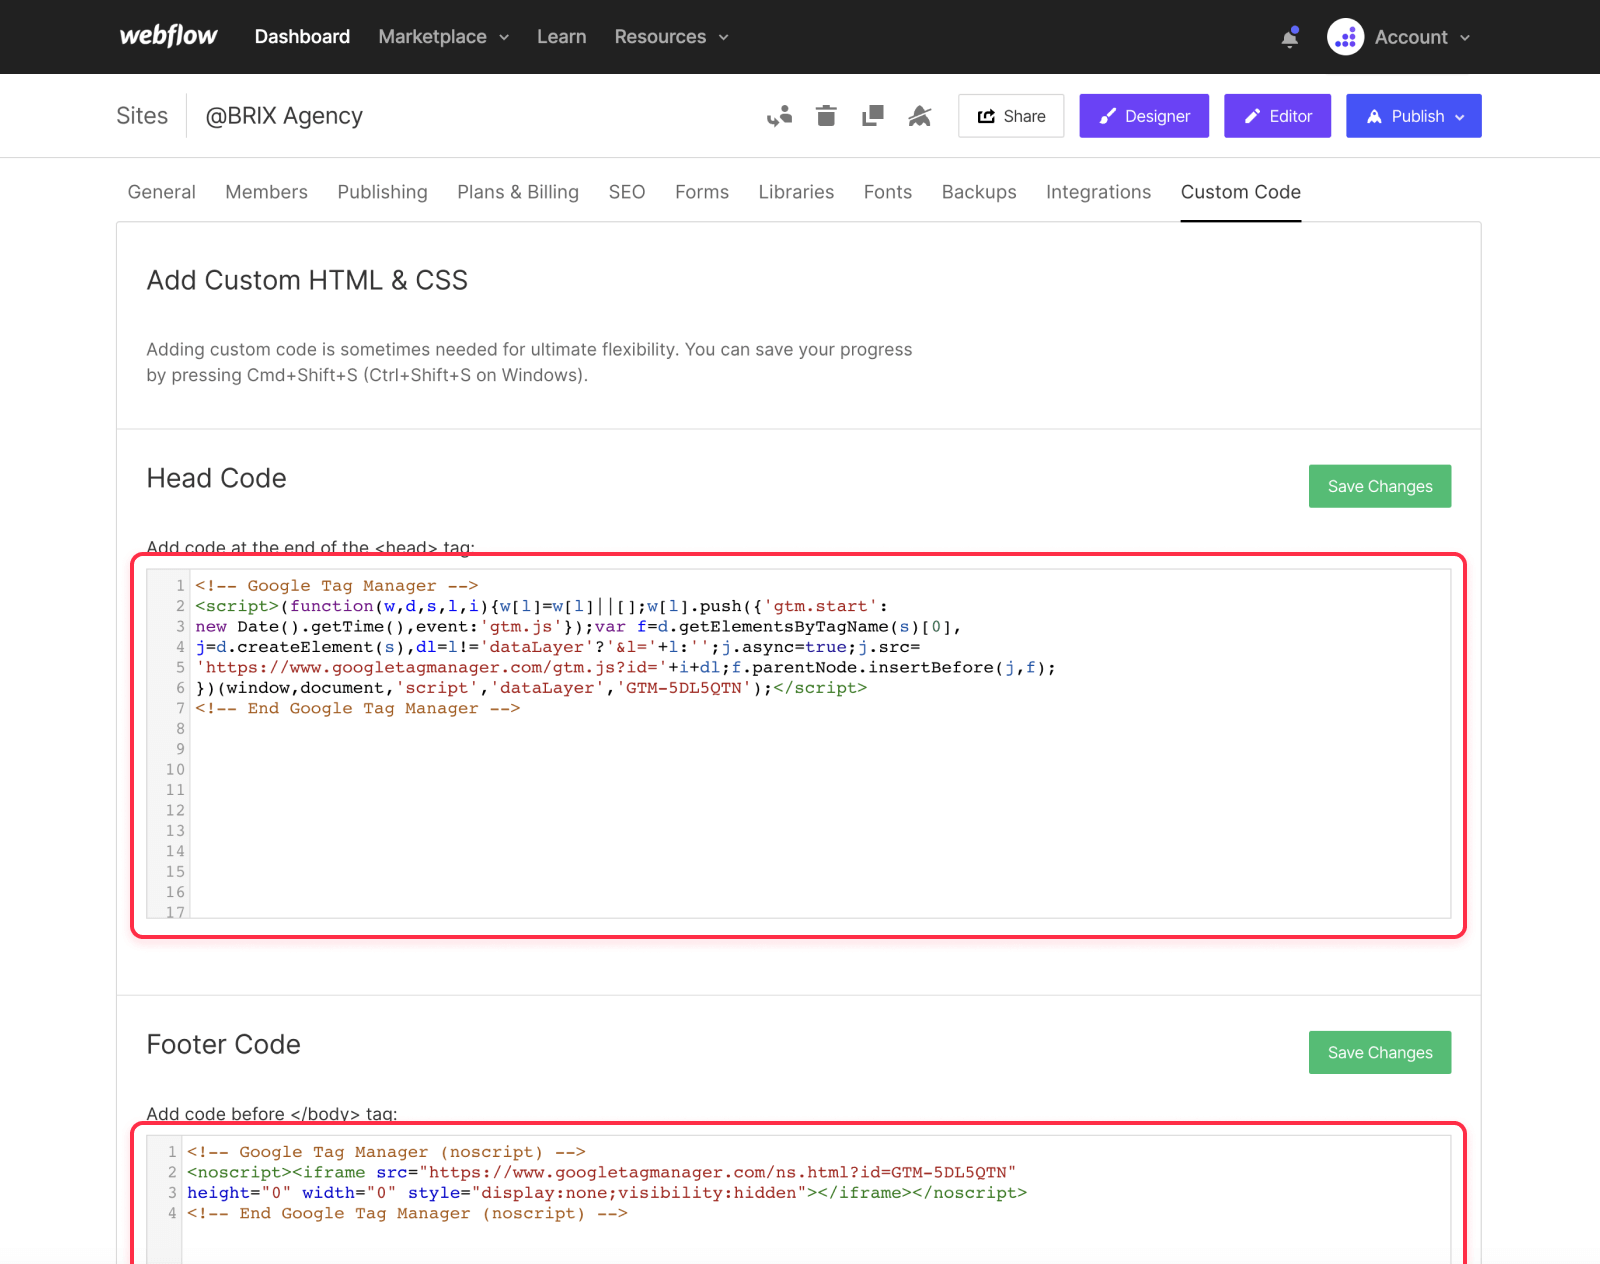
If you prefer, you can add it in the start of the <body> (Read our in-depth article on GA and GTM for Webflow to learn how).
Publish your site, and your GTM code will be live, now it's time to integrate Google Analytics.
8. Inside GTM, go to Tags, and click New
9. Name your tag Google Analytics 4 (or whichever name you like)
10. Click on the Choose a tag type to begin setup and select Google Analytics: GA4 Configuration
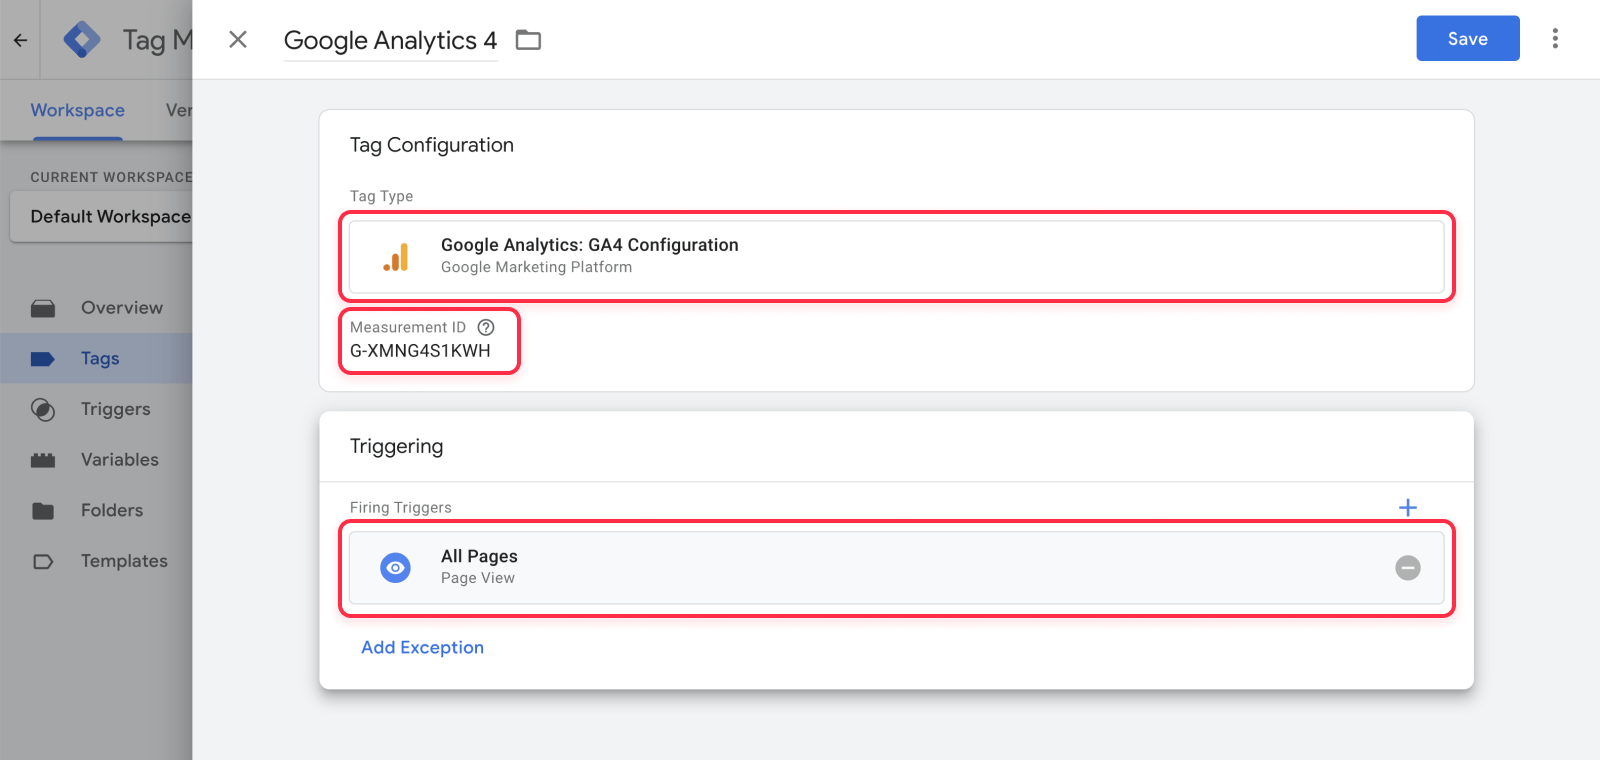
11. Add the measurement ID you copied from Google Analytics in the field
12.Click Choose a trigger to make this tag fire and select All Pages
13. Click Save to save the new tag you just created
14. Click Submit in the top right corner
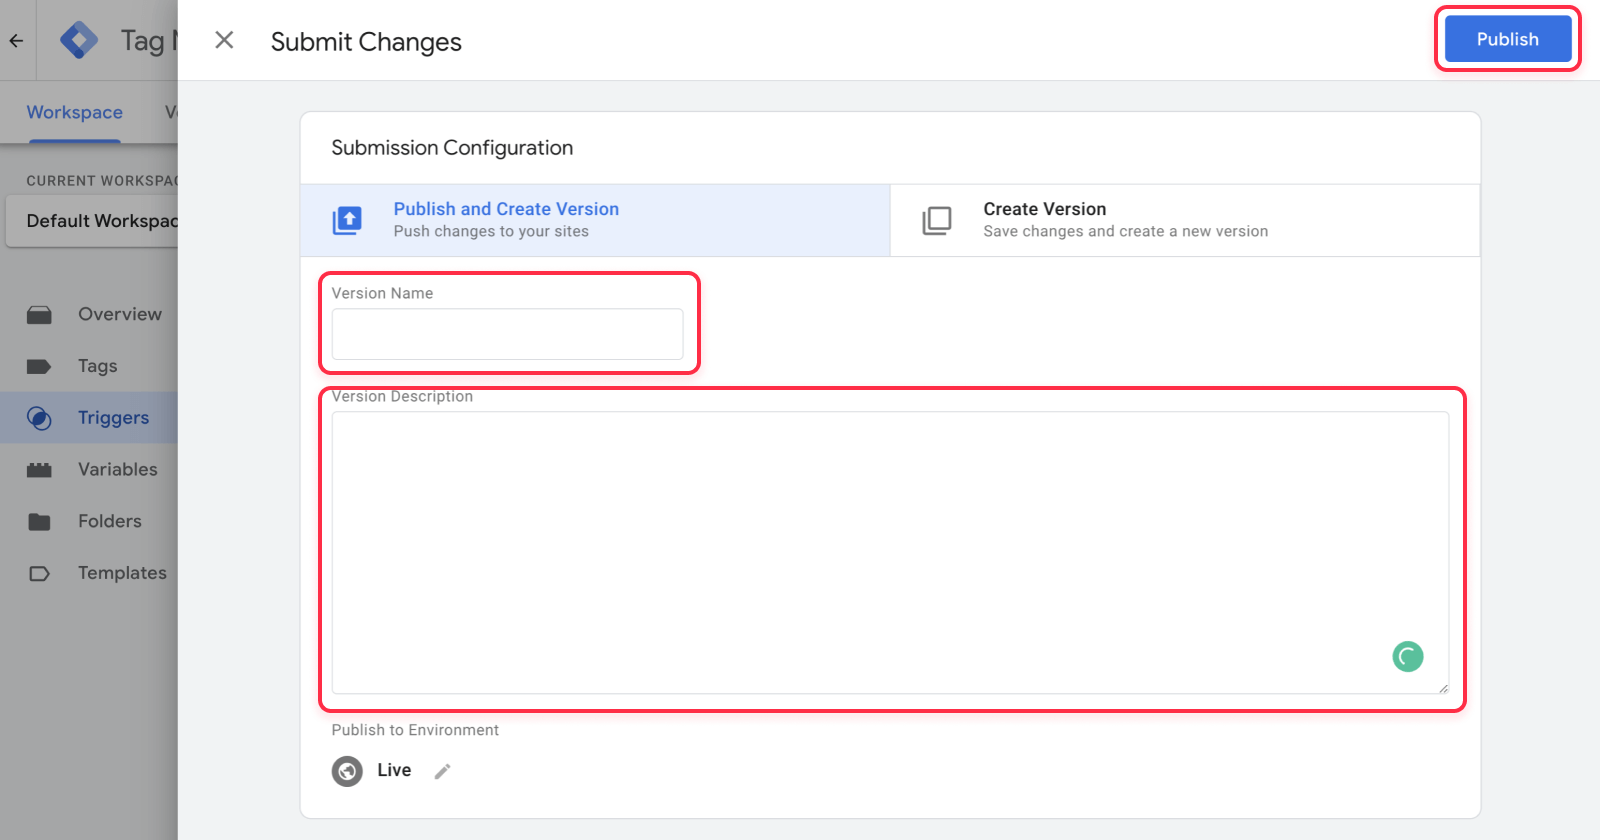
15. It will prompt you to type a version name. Add any name you want (i.e. First GA/GTM Version), or keep it empty, and click Publish
If you did everything properly, your GA and GTM tags will be already live on your Webflow website, so you are all set ✅ to start tracking button clicks and form submissions on your Webflow site as Google Analytics events.
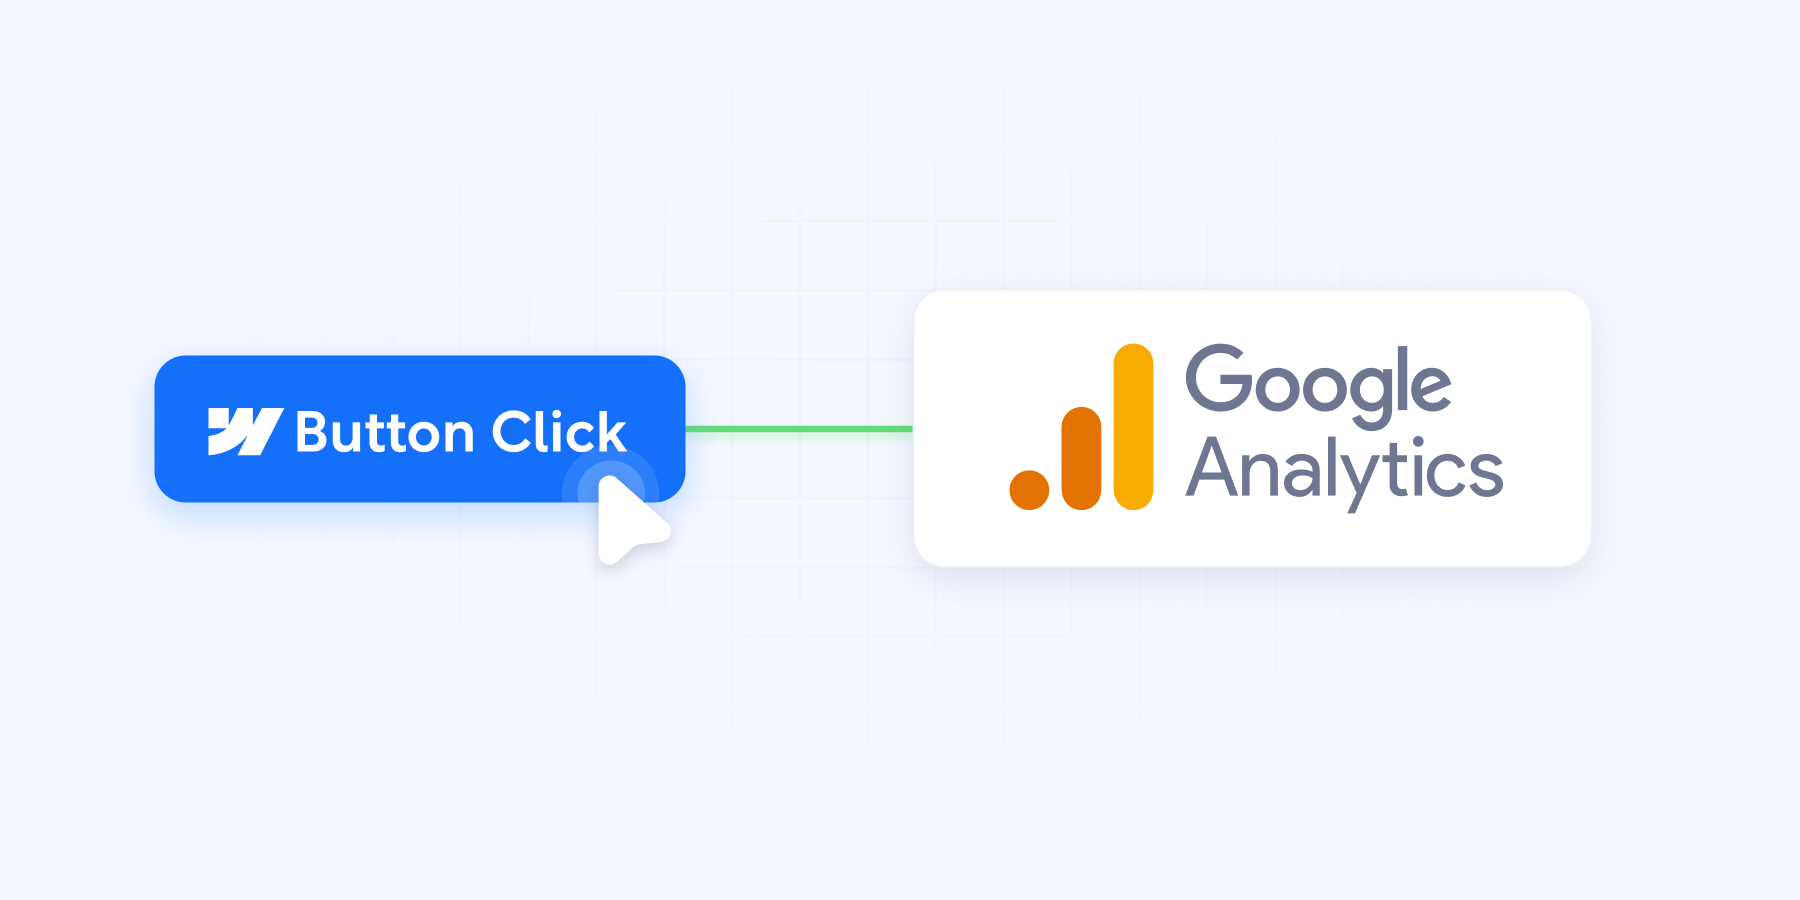
How to track Webflow button clicks in Google Analytics
Once you have GA and GTM properly setup, tracking Webflow button clicks 🖱️ in Google Analytics is child's play 😉.
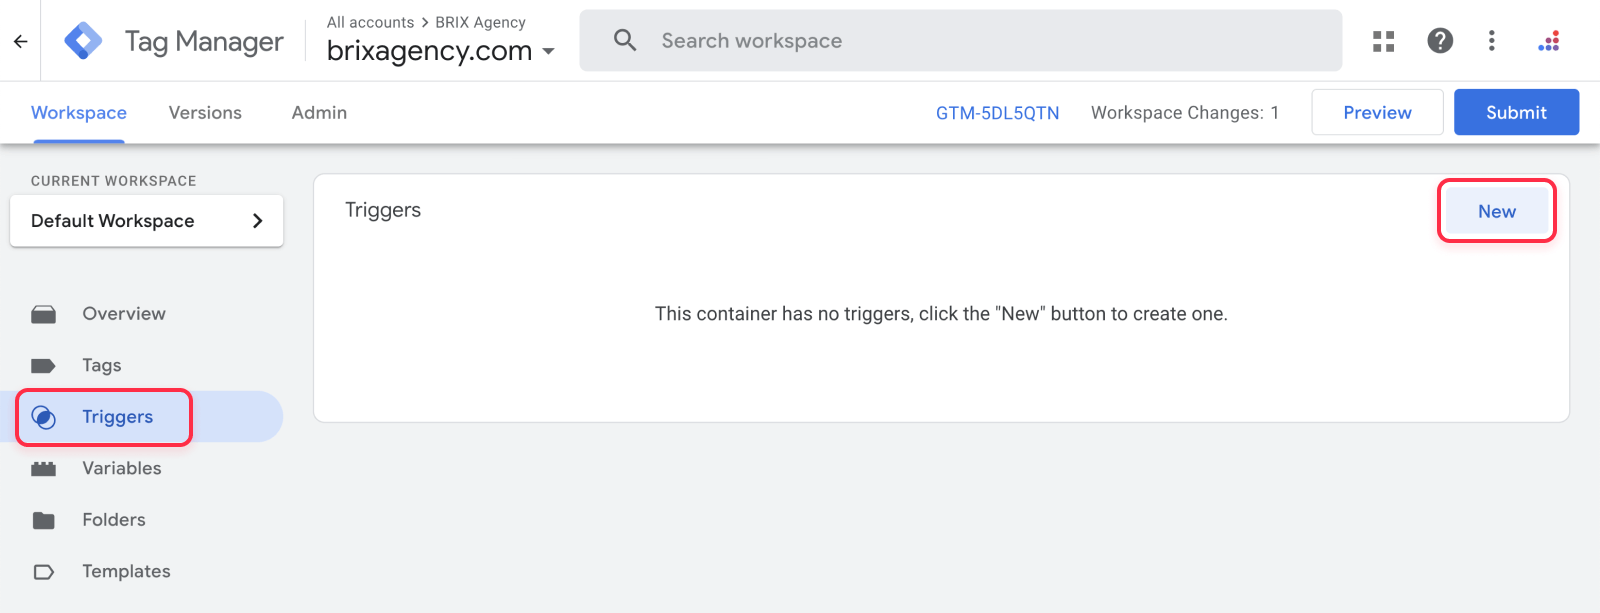
1. Go to Triggers in Google Tag Manager and click New
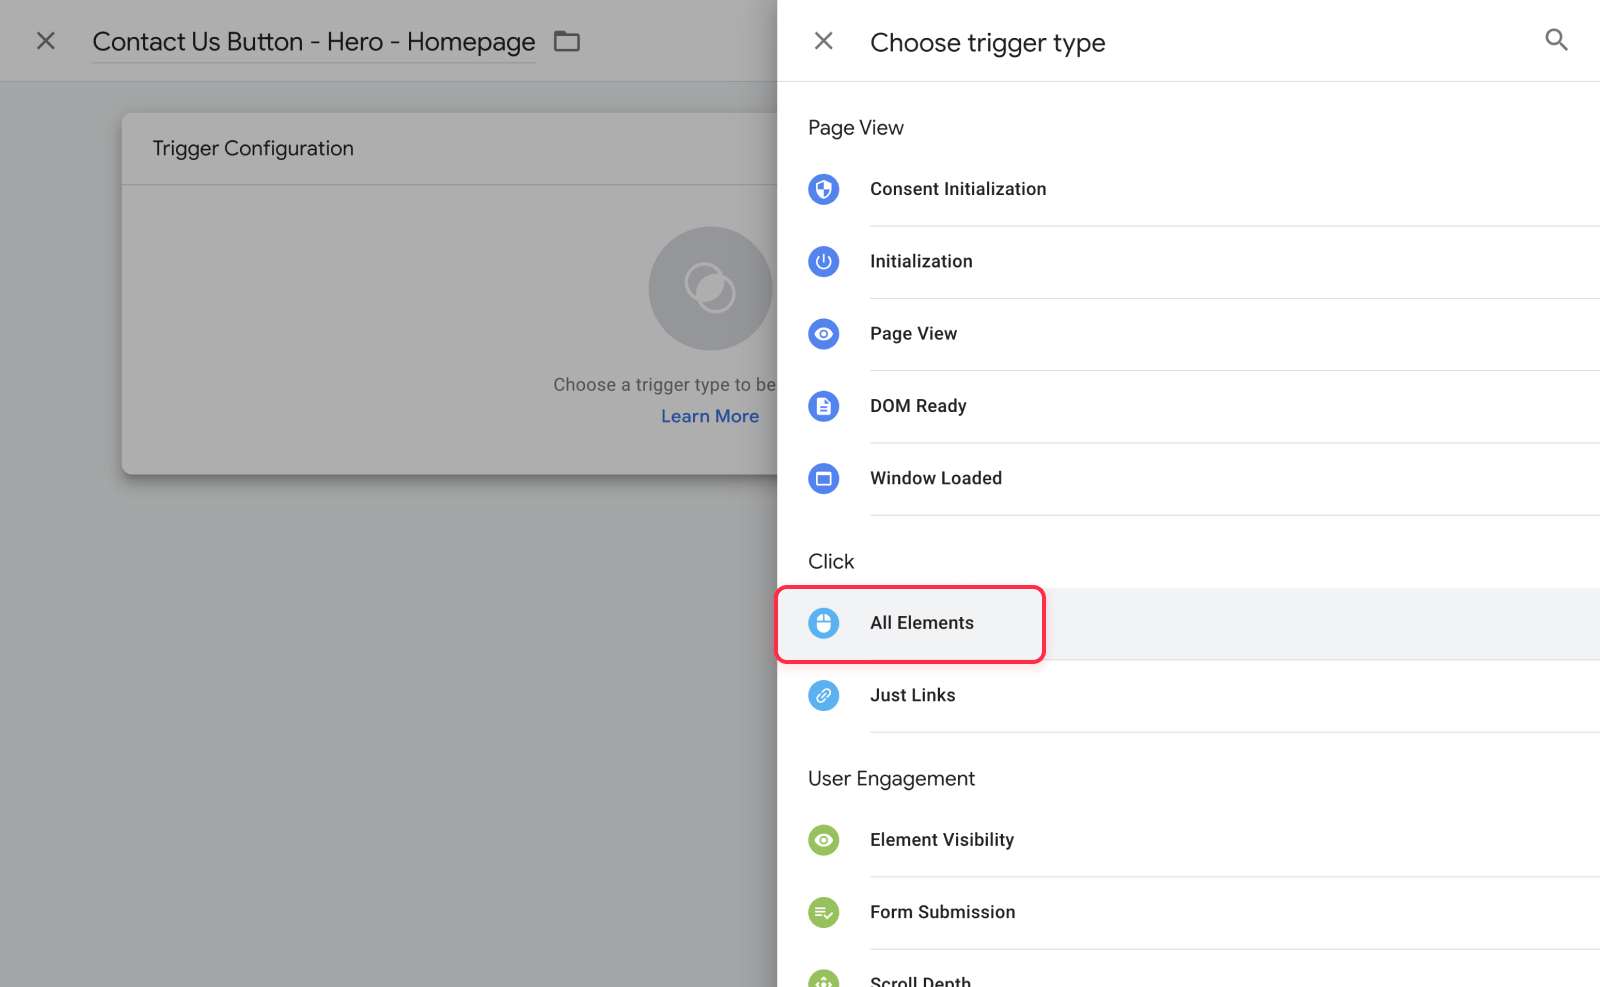
2. Type a trigger name you can easily identify. For example, if you want to track a Contact us button in the hero section of your Homepage, you could do Contact Us Button - Hero - Homepage, however, feel free to use any naming convention you like.
3.Click Choose a Trigger Type to Begin Setup and choose Click > All Elements. Once you choose it and add it, you will have an option to choose between All Clicks and Some Clicks. Select Some Clicks.
4. Add the page in which you want to track the button click (Right now we are only adding one, however, you could configure this condition setting so it covers more pages, or even all pages by just removing this condition).
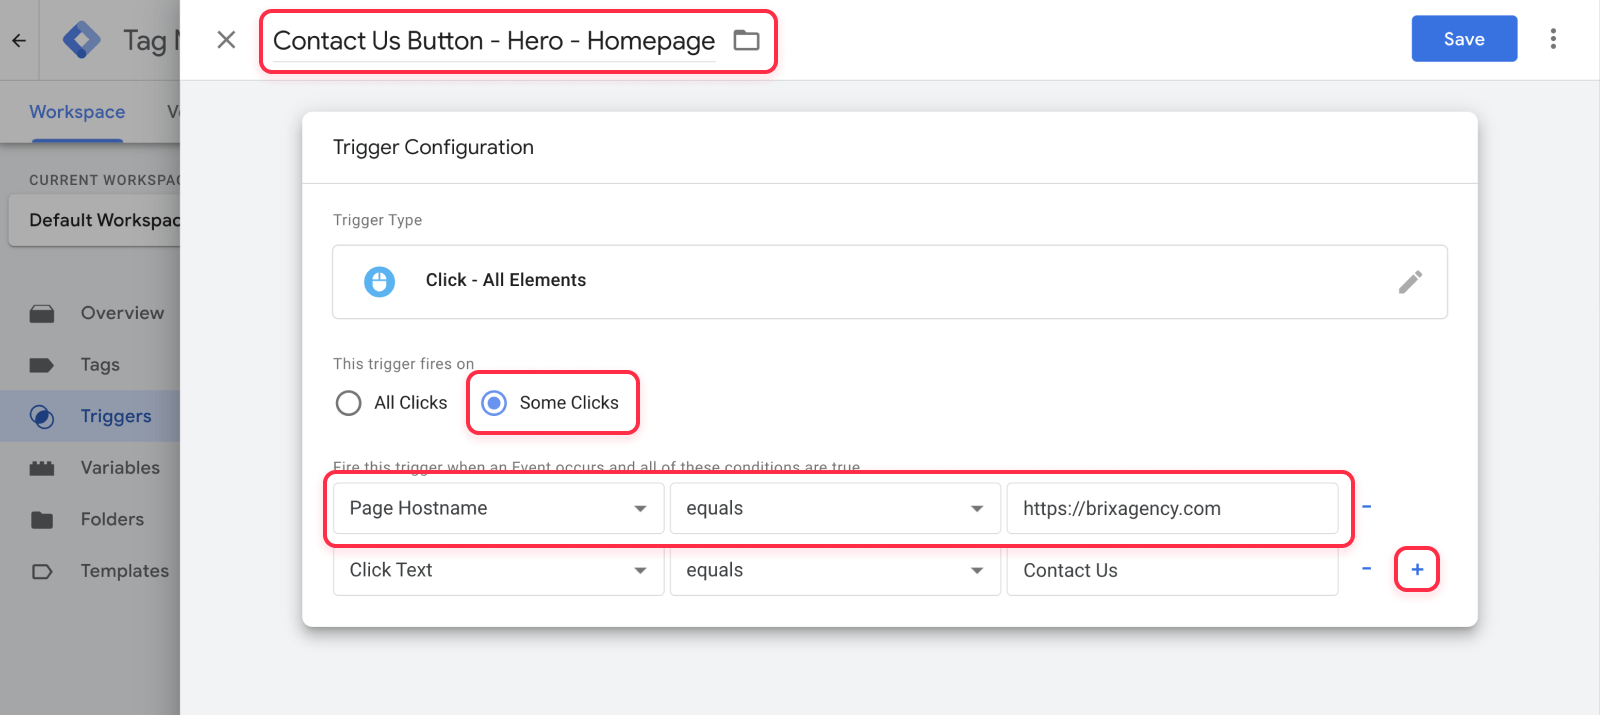
5. Click the + icon to add another condition, and on the dropdown that says Page Hostname, click Choose Built-in Variable > Click Text and then just write the button label (It's important to know this is case sensitive).
6. Click Save to save the Trigger. Once you save it, it will look something like this:
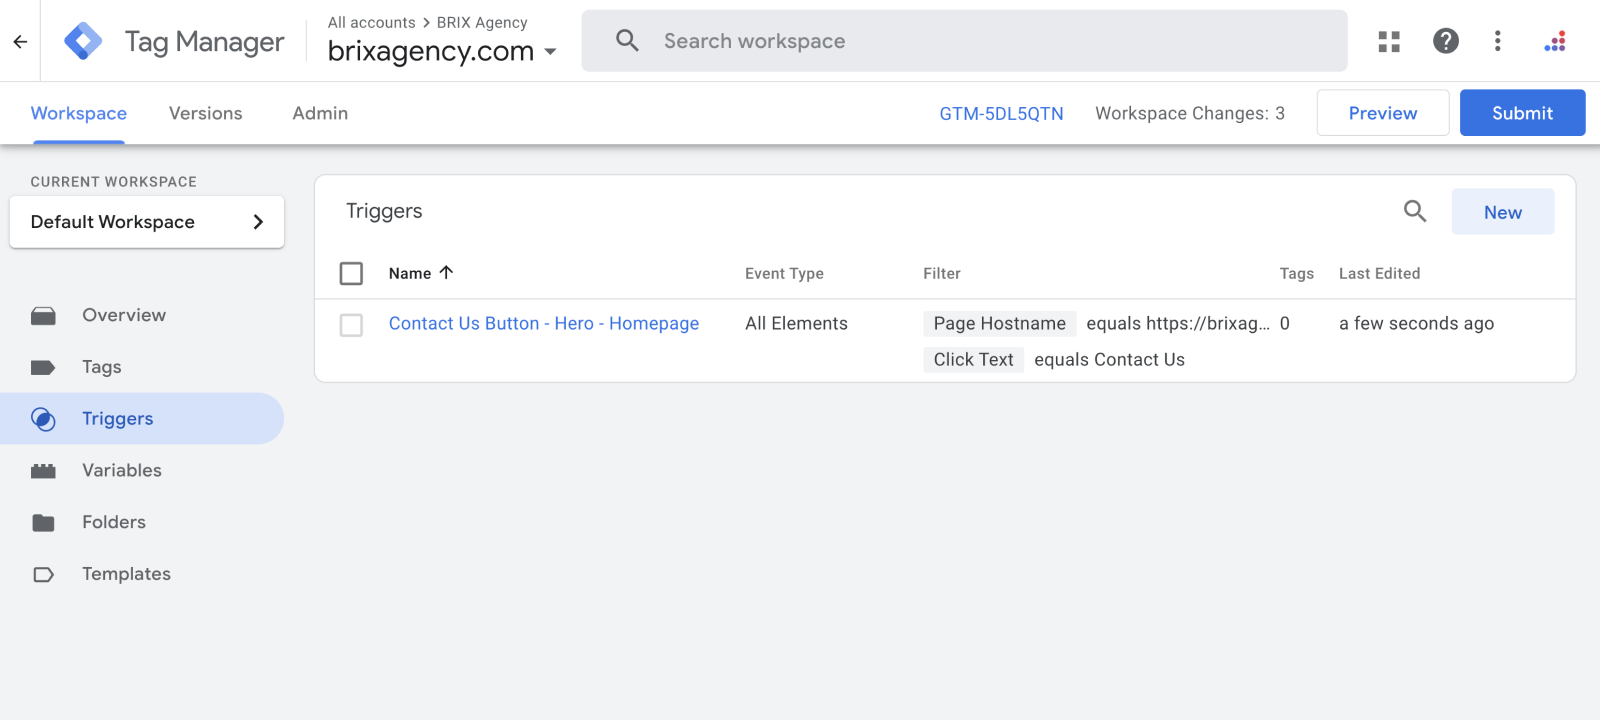
7. Now let's go to Tags, and click New. By default, in the Tags you should at least have one tag already (the Google Analytics 4 tag). If you don't have it, you should create it following the instructions at the start of the article.
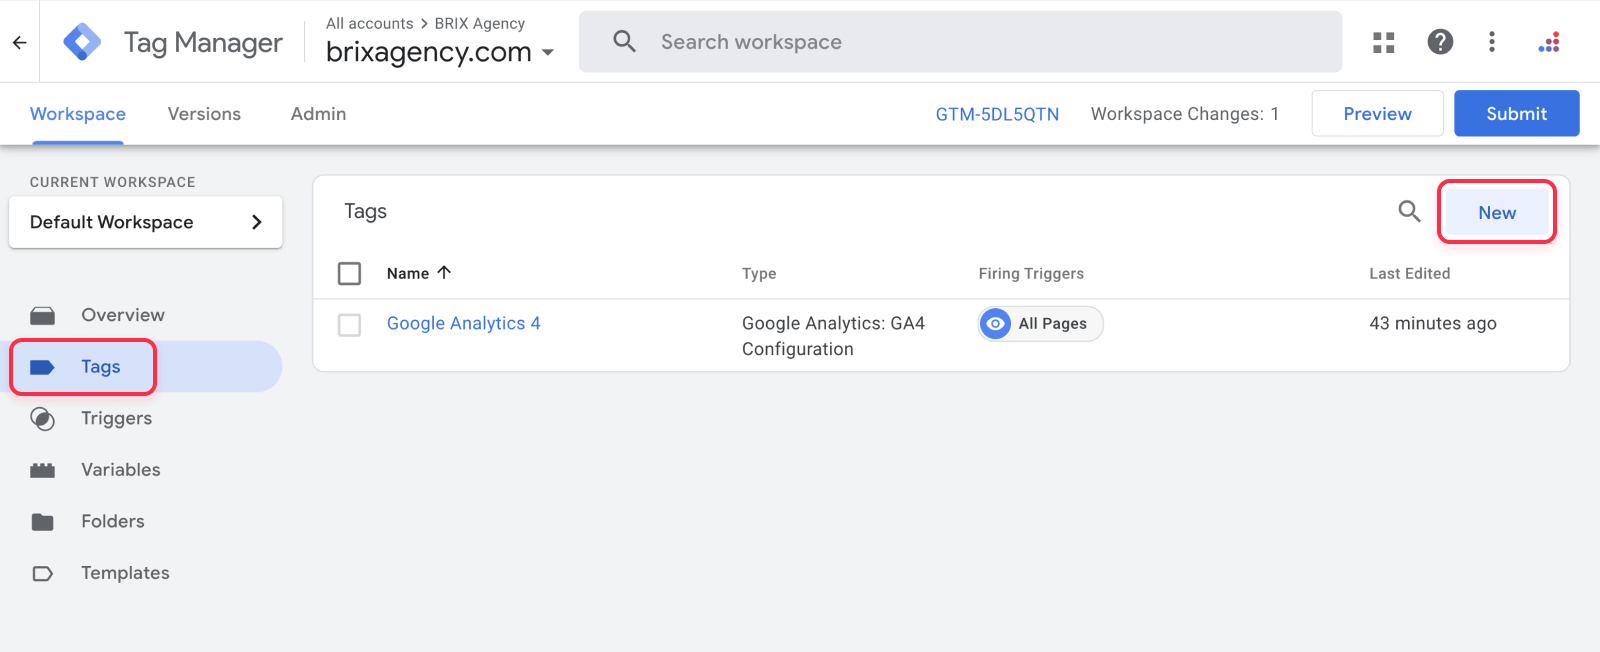
8. Name your tag with the same name you gave to your Trigger (i.e. Contact Us Button - Hero - Homepage) and select Google Analytics: GA4 Event on the tag type.
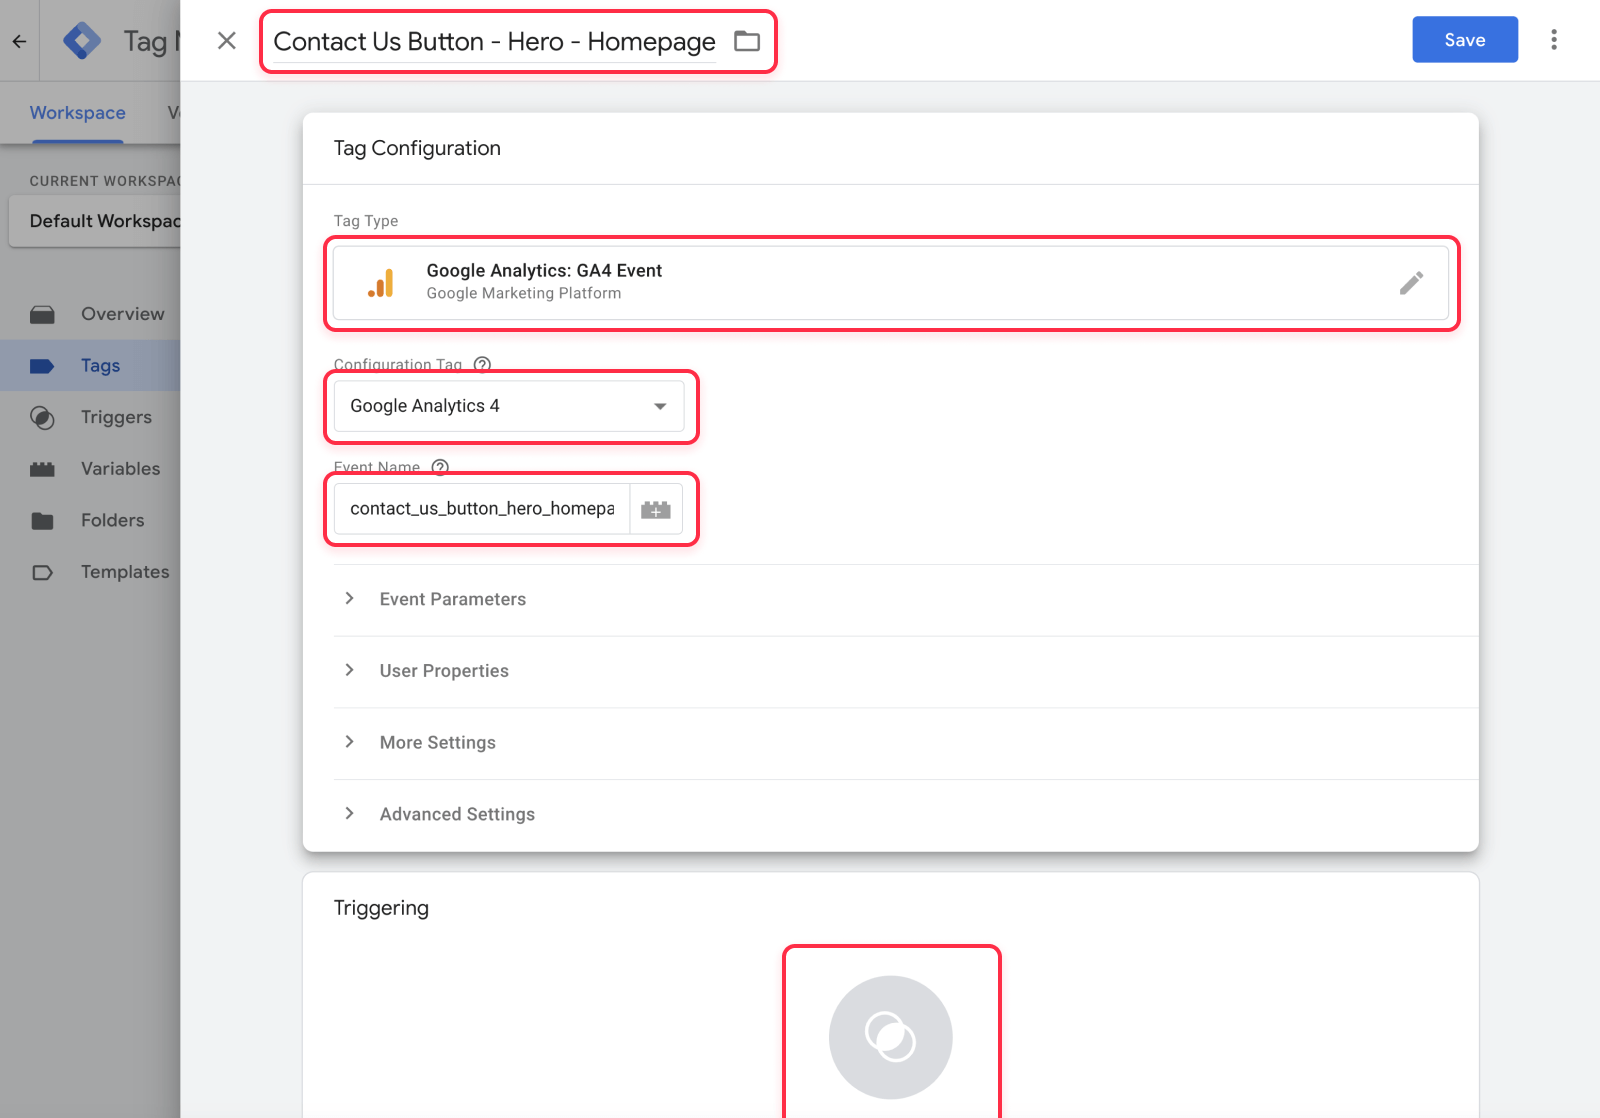
9. Add the additional details to the tag, which are the following:
- Configuration Tag: Choose Google Analytics 4 (so it fires the event under your GA4 account)
- Event Name: Add the event name following the name from the trigger, but using underscores instead of spaces (i.e contact_us_button_hero_homepage)
You can also add Event Parameters or User Properties in case you want to have more in-depth data, or you want to get dynamic information of where the button was clicked (For example, if you want to track clicks to a Contact Us button accross all the website, you could use an event parameter of Page URL to know in which page of the website the event happened). If not, you can keep them blank.
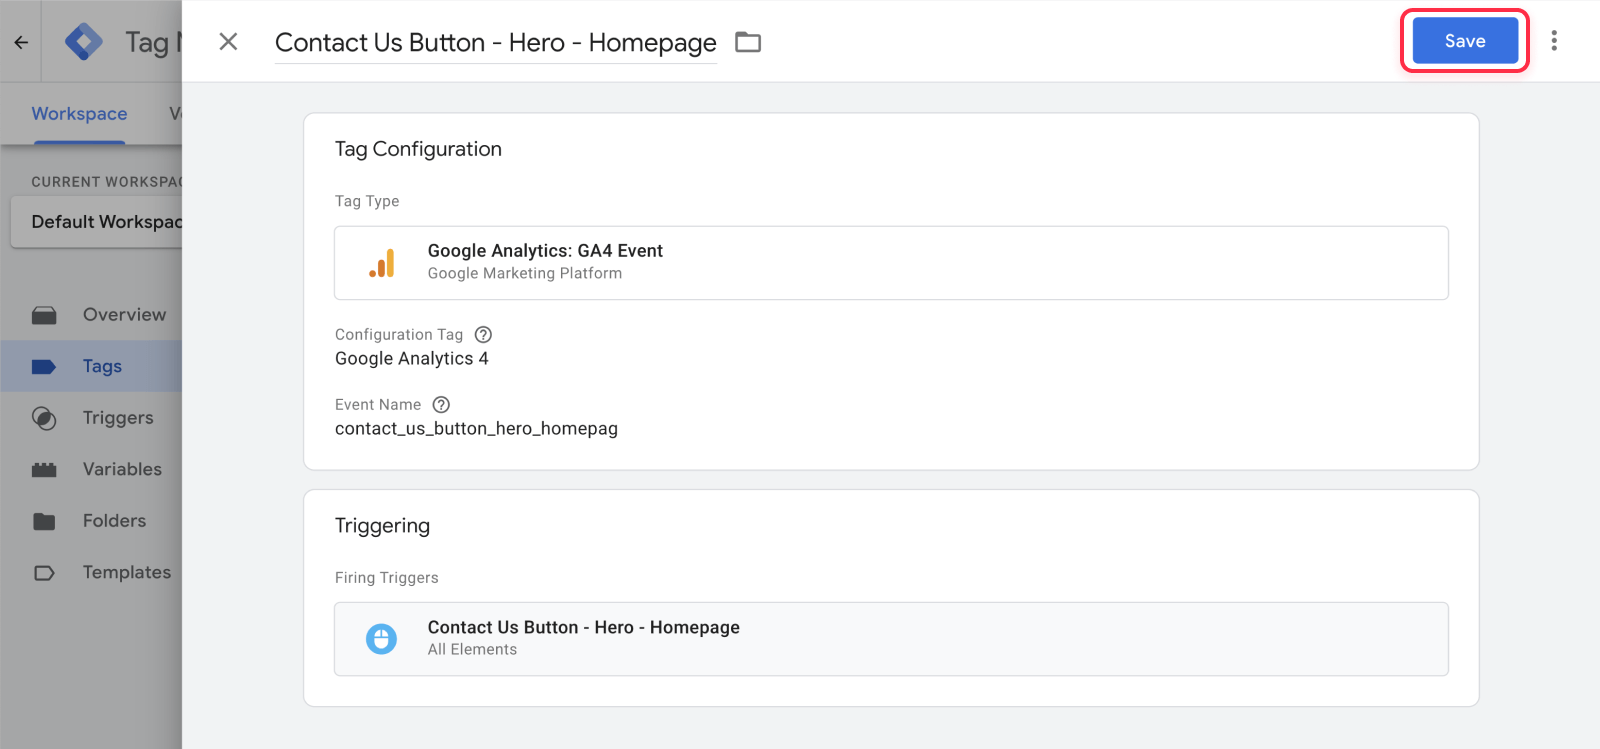
10. Now click on the Choose a Trigger section, and choose the Trigger you just created a few minutes ago

11. After that, it will look something like this, and you just need to click Save
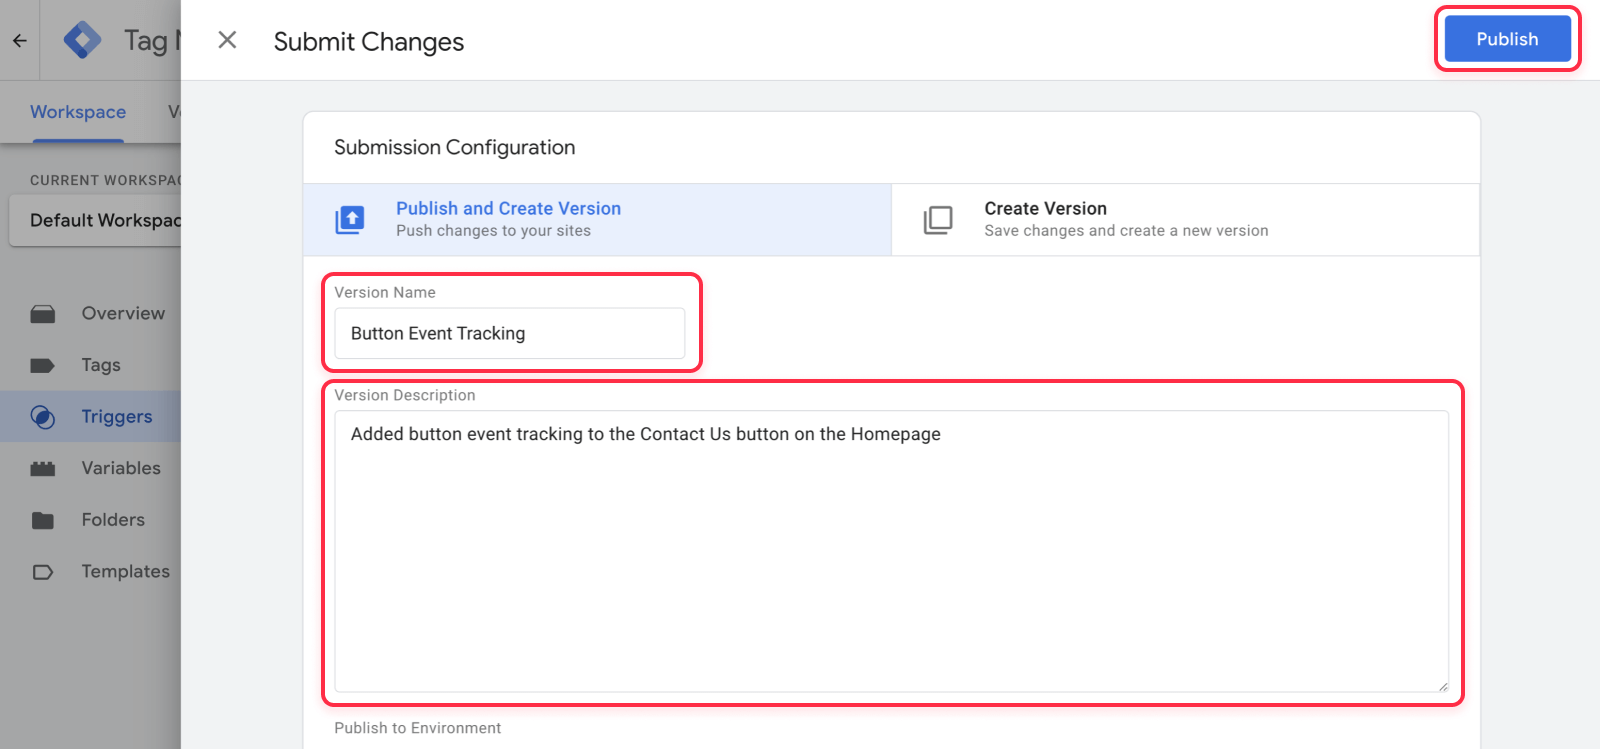
12. Click Publish and write your version name and version description (this is just to remember what updates are included in this new version. If you prefer, you can keep it empty and nothing related to the tracking will be affected).
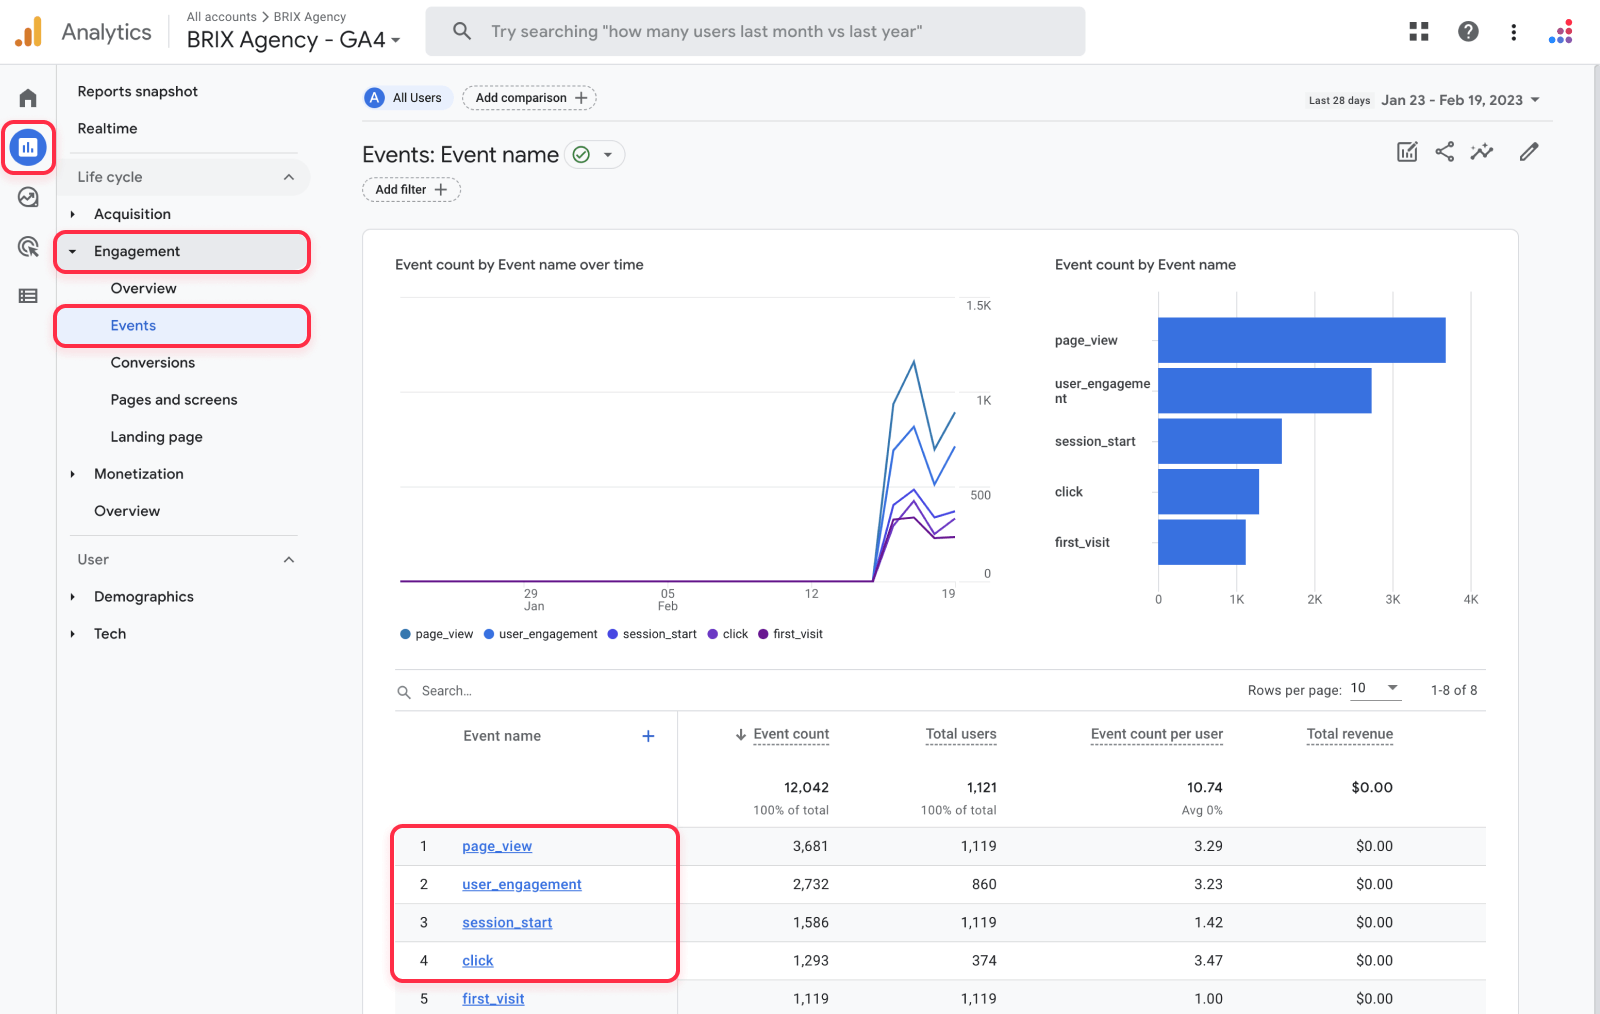
13. Now if you go to Google Analytics 4 > Reports > Engagement > Events, you will be able to see the event count for the new Button click event you created. At the same time, you can now use that event as an step/action in Funnels you create in GA4 (Please just keep in mind the events can take up to 24 hours to show in GA, so we recommend just waiting til tomorrow).
And voilà 🪄, now every time your button is clicked, a Google Analytics event will be registered. However, I would bet some of you may be thinking: Will I need to do this for all the buttons of my website 😱?
Well, no. As variable event names and event parameters exist, it is perfectly possible to have all your website buttons covered just with 2 or 3 events (or even just one depending on how your website is setup), however, it needs to be properly setup, otherwise it can be a crazy mess 😵. Feel free to try the variable event names and event parameters to configure it as you need.
On the other hand, if you are saying: Heck no, all of this analytics stuff is driving me crazy 🤬, we invite you to send us an email! We will be happy to schedule a call with you to understand how and what data you want to track, and then give you a proposal to handle all the setup for you, hassle free.
How to track Webflow form submissions in Google Analytics
Now that you know how to track button clicks or taps (if your users are on mobile), let's continue to now learn how to track Webflow form submissions as events in Google Analytics. A good part of the process is very similar to the button setup, so it will look a little repetitive 😅.
1. Let's go to Triggers in Google Tag Manager and click on the New button
2. You will need to type a trigger name for your form submission. For example, if you want to track a Request a demo form in the final call to action of the page, you could do Request a Demo Form - Final CTA, however, feel free to use any naming convention you like.
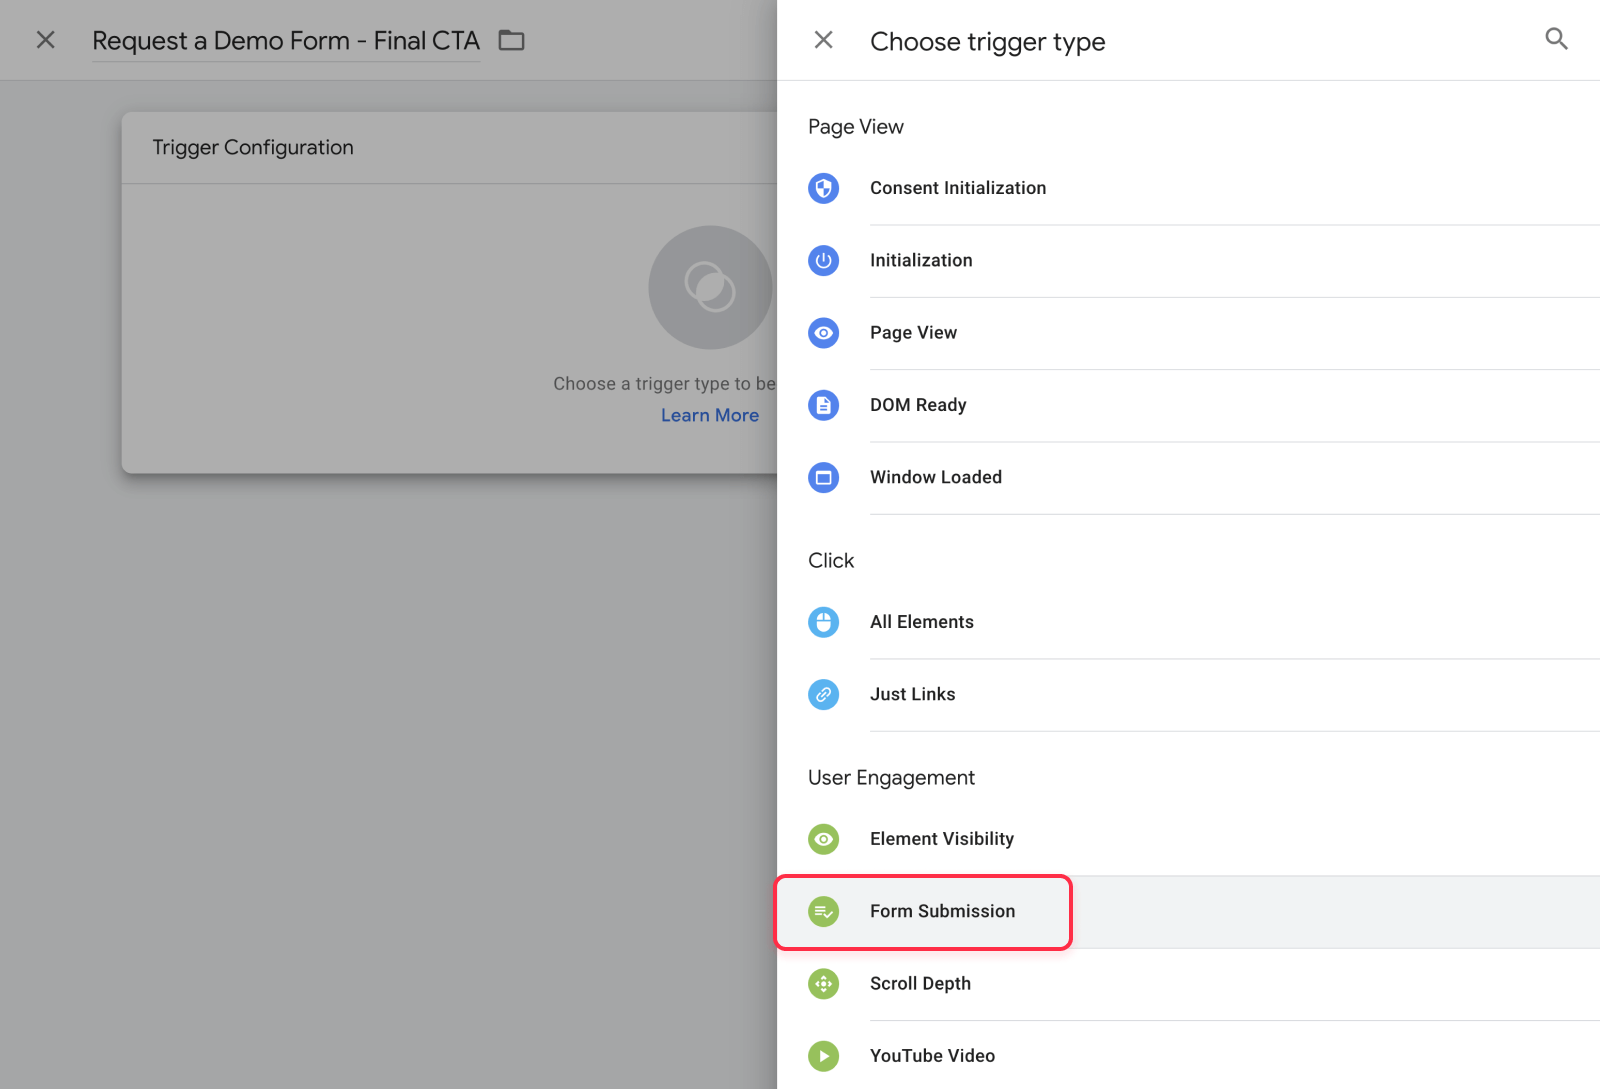
3. Click on Choose a Trigger Type to Begin Setup and select the Form Submission trigger under User Engagement.
4. Once you add it, you will notice you have a few settings to add. The two important ones to keep attention to are the following:
Check Validation: This will only fire the event if the form validated correctly (for example, it won't fire the event if they didn't fill out the form correctly and they need to change some inputs). We would recommend to check this, however, it is up to you.
This trigger fires on: Setting up conditions under the Some Forms settings for when the event will fire (and when it won't) is very important, as if you have many different forms and your website, and you don't setup the conditions, you could start getting false attributions from other forms.
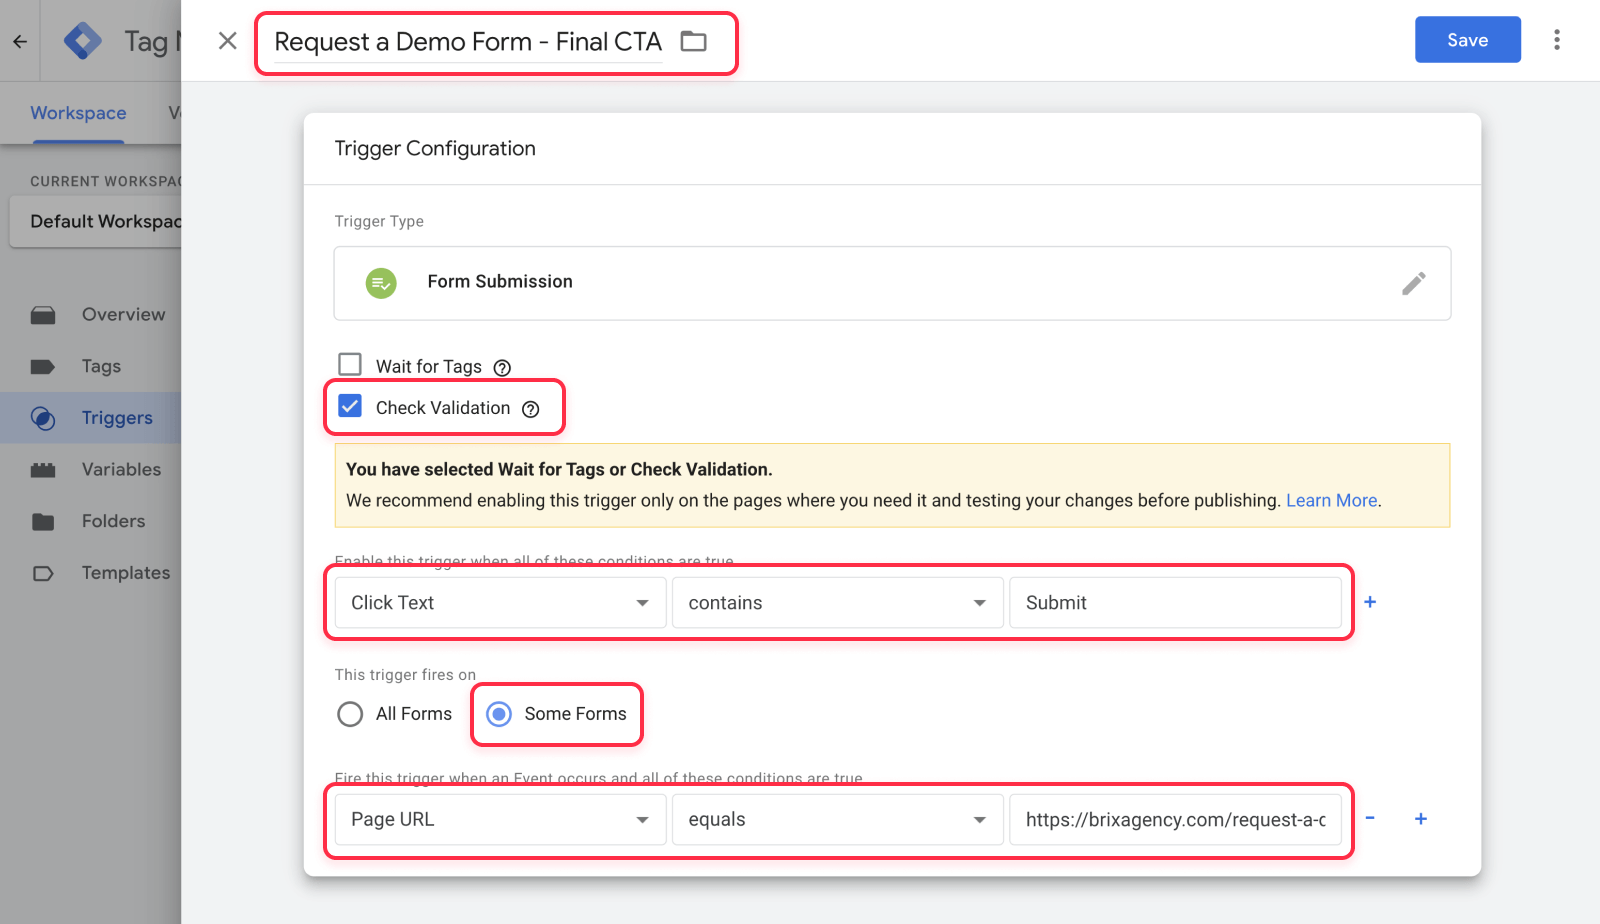
For example, in our case, we added a conditional of Page URL that requires the page to equal the /request-a-demo/ page in order to fire the event. However, you can add another condition (or even multiple conditions) depending on your requirements.
6. Click the Save button to save the Trigger
7. Now let's navigate to the Tags section, and click on the New button. By default, in the Tags you should at least have one tag created (the Google Analytics 4 tag we explained at the start of the guide). If you don't have it yet, we recommend you to follow our explanation at the start of this article, or otherwise it is not going to work.
8. Now it's time to give your tag a name. We recommend using the same one you gave to your Trigger (in our case, Request a Demo Form - Final CTA), and then select Google Analytics: GA4 Event as the tag type you will add.
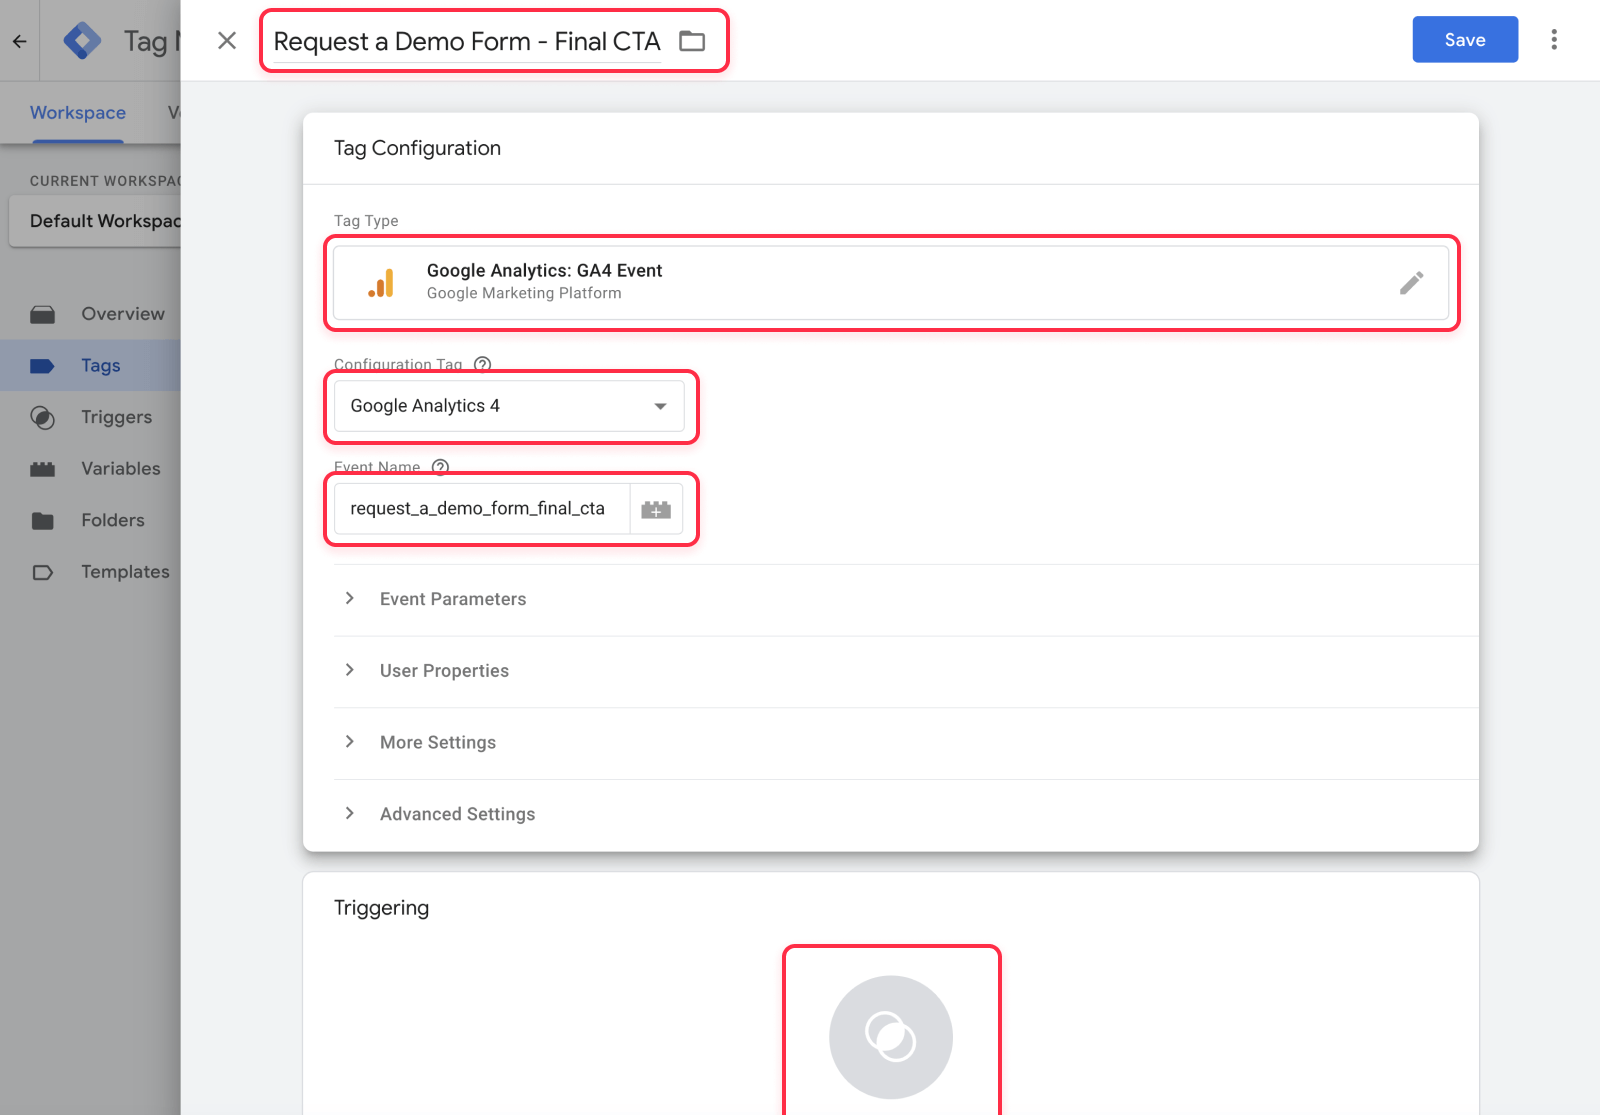
9. Once you ad the GA4 Event, you will need to add some additional details:
- Configuration Tag: On this dropdown, just select Google Analytics 4 (so it fires the event under your GA4 account)
- Event Name: On the Event Name field, add the label you want to give to this event. It must follow the GA naming convention. We recommend just to re-use your Tag name, but replacing the spaces with underscores (request_a_demo_form_final_cta)
You can also add Event Paramenters, User Properties, and some more settings. You can take advantage of Event Parameters to add the Page URL information in case you are tracking the form across many pages. For the other ones, we would recommend only using them if you are sure of what you are doing 🤣.
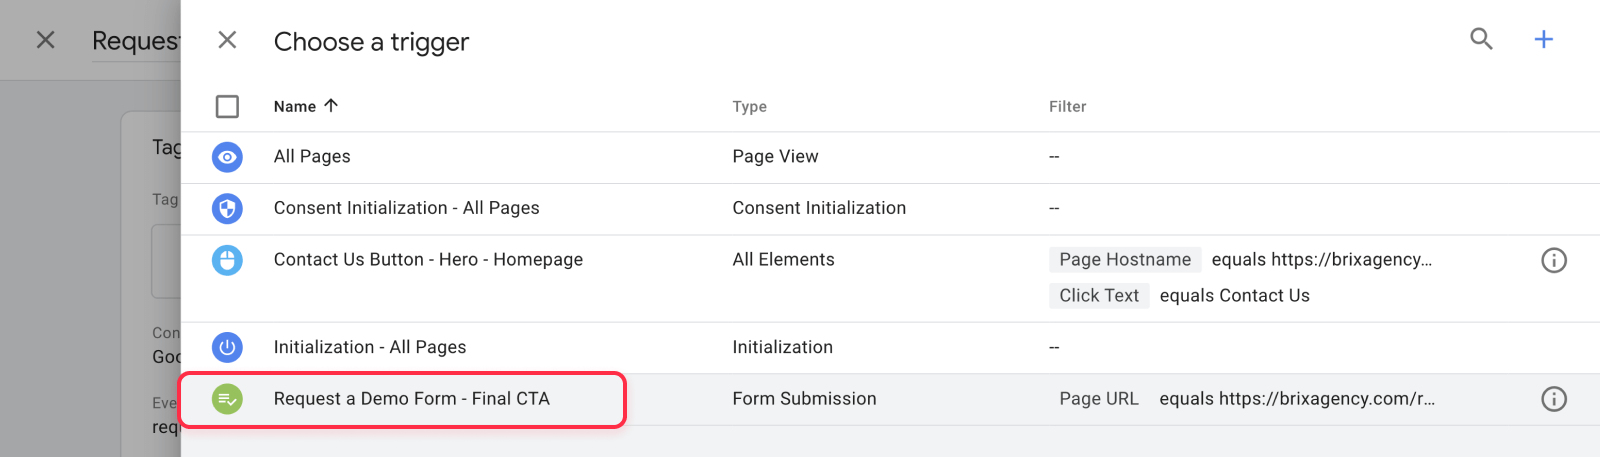
10. Continue by clicking Choose a Trigger, and just select the Trigger you previously created on step two.
11. If you followed all the steps, it should look something like this, and you can now click Save

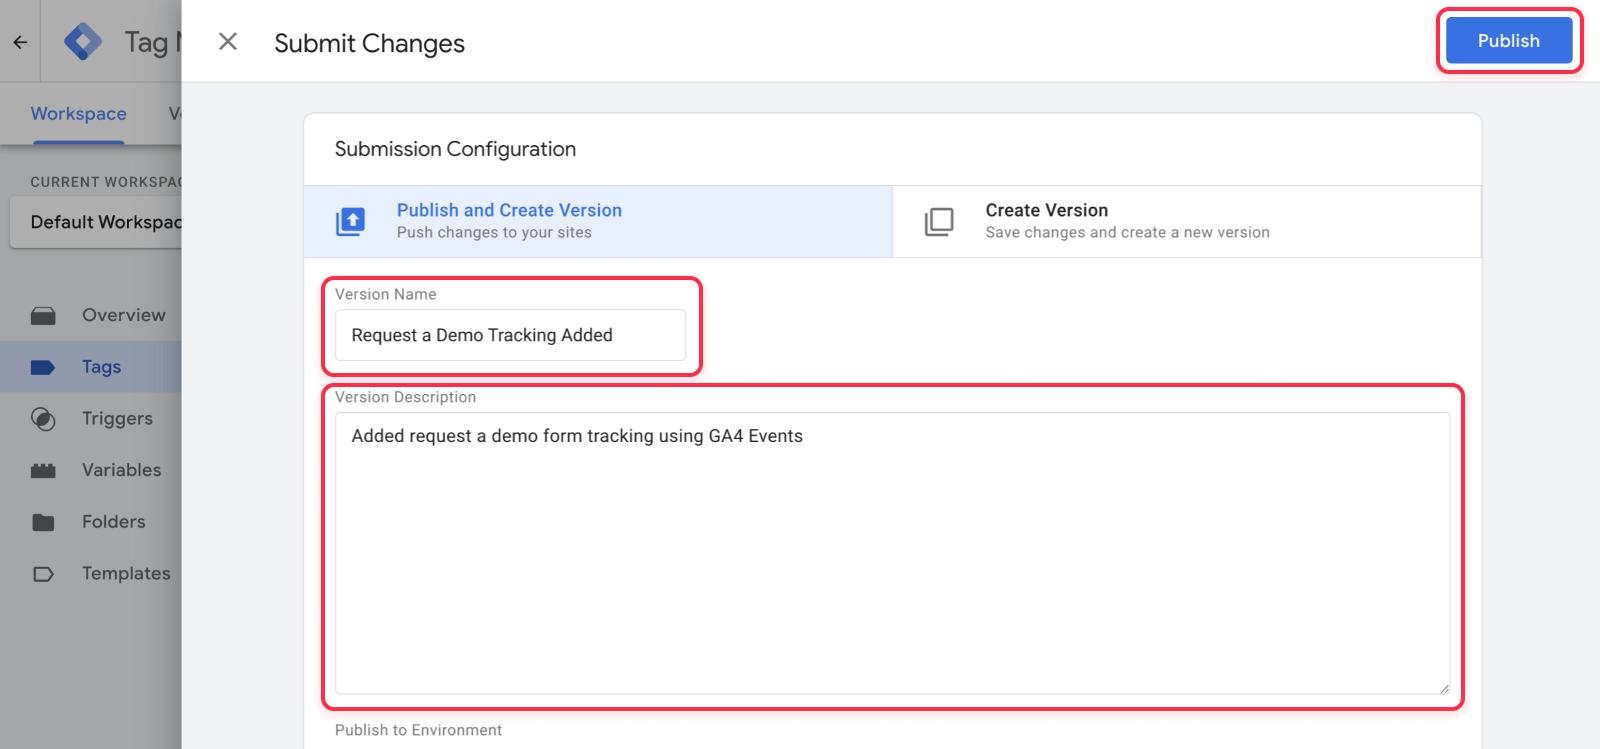
12. Now it's time to click Publish on the top right corner and write your version name and version description (this is just for internal purposes, you can keep it empty if you want, and it won't affect in any way).
And you are done 🎈🎉 - Now it is just a matter of going to Google Analytics 4 > Reports > Engagement > Events, and you will be able to see the new event logs, as well as use this new event you just created to create Funnels under Google Analytics (please just note it may take a few hours for it to show. Typically you can check the next day and if you had form submissions, they will already show in there 😉).
If you arrived until here, it means youuuuuuu did it 🚀, so congrats on that. Now with all the events data you will be able to better optimize your website for conversions and have a higher ROI. On the other side, if unfortunately you were not able to make it work 🥲, don't worry, we all fail sometimes (I got an F in many history exams back in the elementary school haha), so if you were not able to get it done, we invite you to message our Webflow agency. Our team of Webflow Experts (that are conveniently also Experts in Google Analytics) will be happy to help you our. Just drop us a message ✉️.