In the past, we published an article explaining how to track Google Analytics events in Webflow sites, and we found out that many of you wanted a more in-depth explanation of how to properly set up Google Analytics and Google Tag Manager from the start, so all your events and conversions are tracked properly.
As there are multiple ways to set up Google Analytics (through the Webflow Integrations, using the GA code directly, using GA + GTM, etc), it can sometimes be confusing on which is the best approach to take 🤔.
And that is what this article is all about. We will guide you through the step-by-step process on how to properly set up GA + GTM on your Webflow site, in 10 minutes or less ⚡👌🏻.
Why Google Analytics and Google Tag Manager?
Before going starting with the step-by-step process, let us quickly explain what Google Analytics and Google Tag Manager are actually for, as chances are, you may not even completely understand what is each of these two for, and why you even need them.
- Google Analytics (Which we will refer to as GA from now on) is the most popular website analytics reporting platform, and as its name suggest, it was built by Google. It can help you track all your website visitors, page views, demographics, devices, bounce rates, etc.
- Google Tag Manager (Which we will refer to as GTM from now on) is a kind of tracking code and event tracking manager, that lets you integrate many other analytics platforms outside of the Google ecosystem. For example, you can use it to load tracking codes like the Meta Facebook Pixel or Hotjar Tracking Code.
Google is making GTM constantly more and more integrated with GA, so there are certain features of GA that you may not take complete advantage of if you are not also using GTM 😱.
Now that it is clear what each of these two platforms do, and why you should use both, let's start with the tutorial.
Setting up Google Analytics in Webflow
Let's get started with Google Analytics. In order to start tracking your website analytics, we need to begin by creating your GA4 property.
1. Go to the Google Analytics website, and Login with your Google or G-Suite account

2. Click on the Start Measuring button
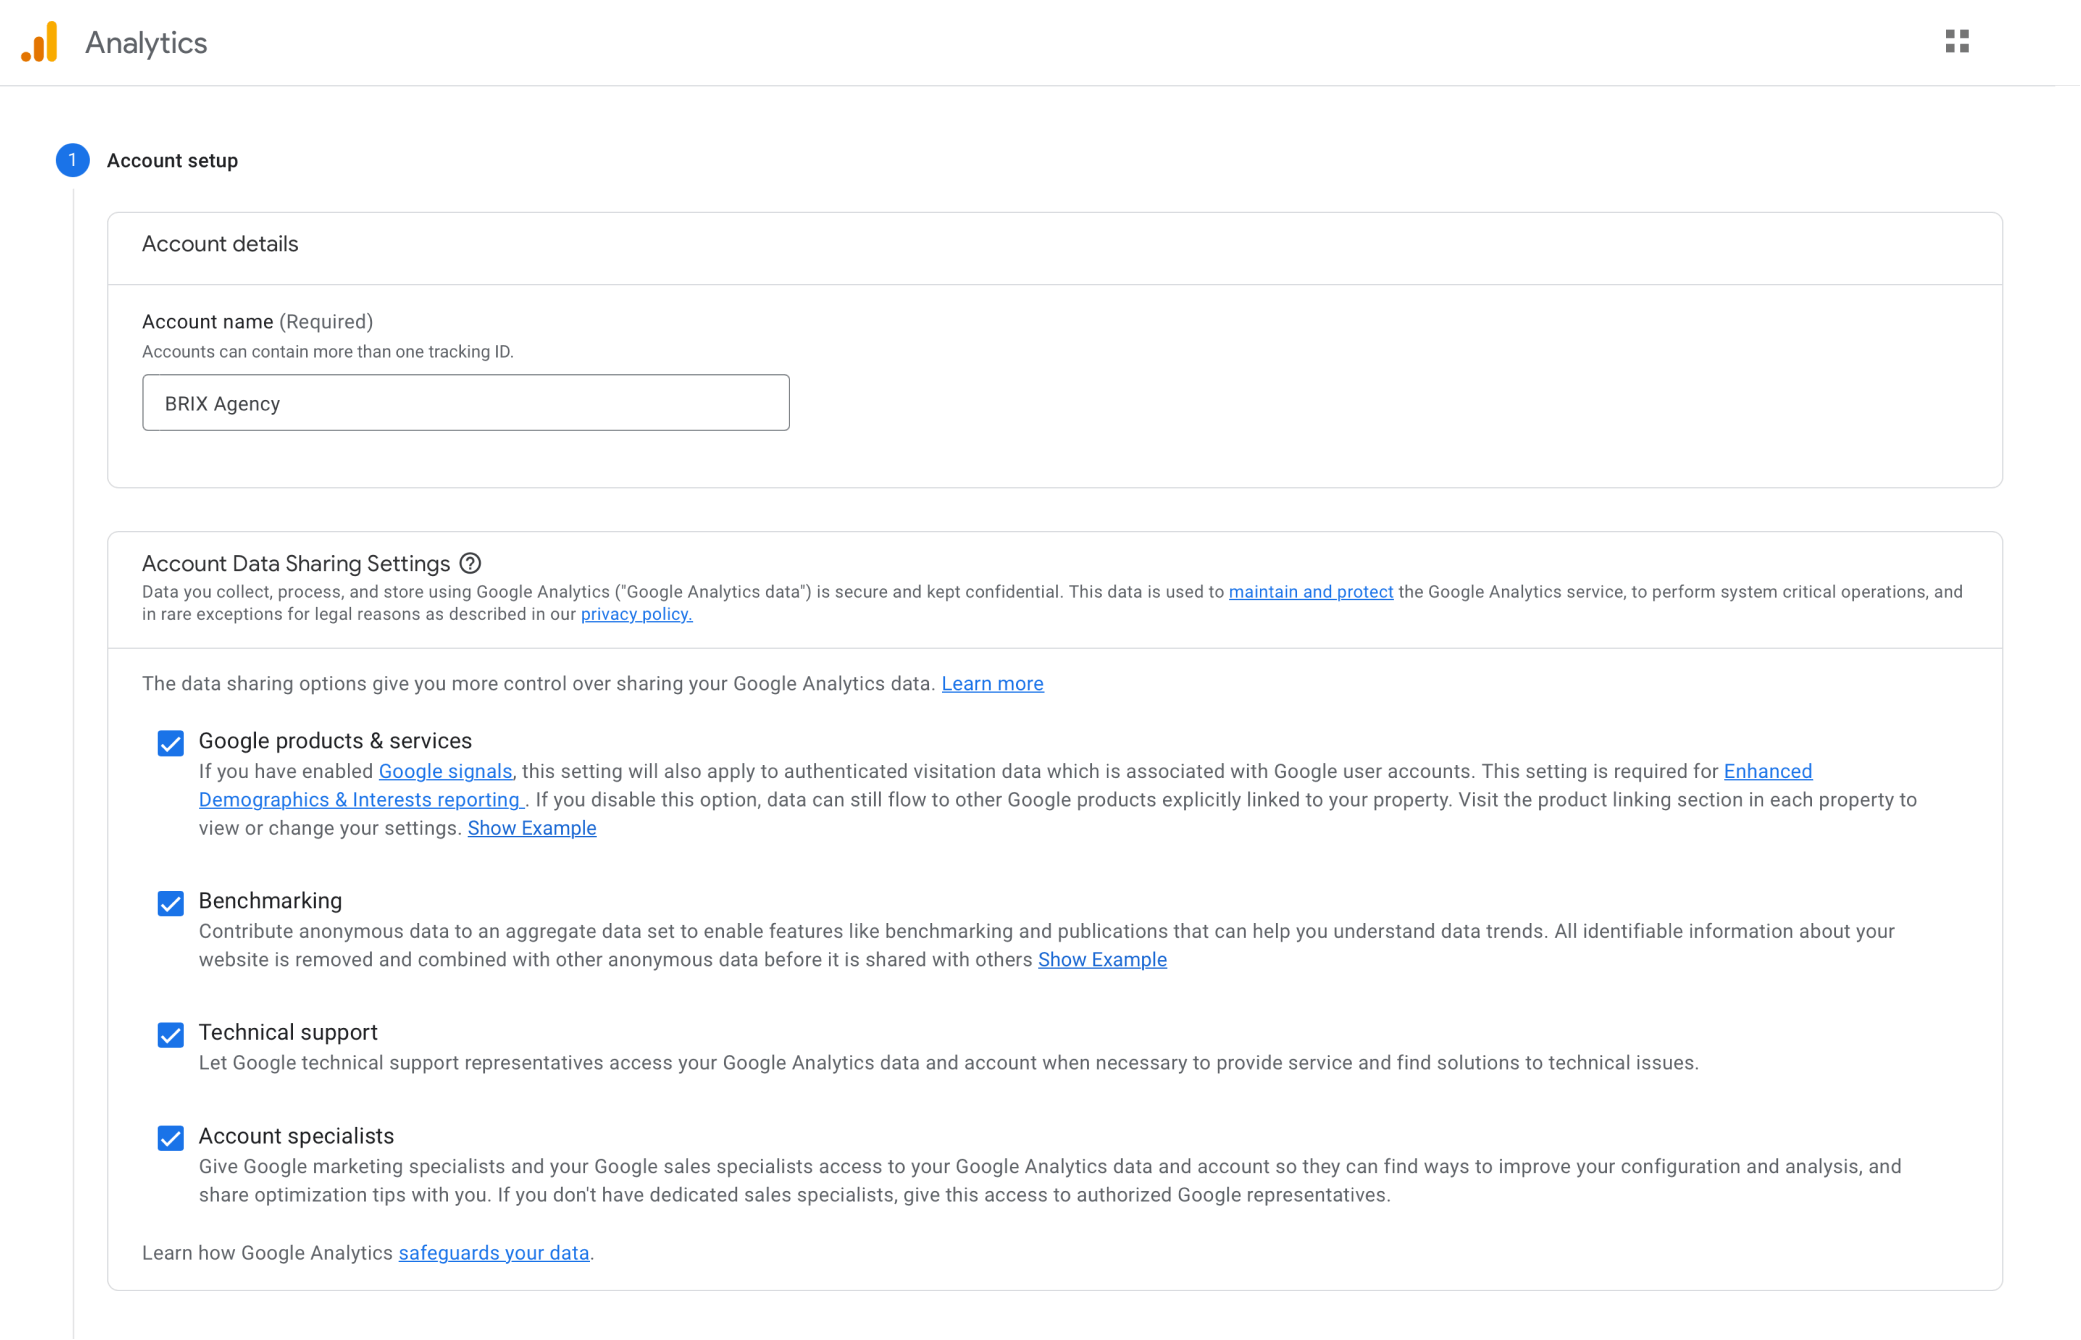
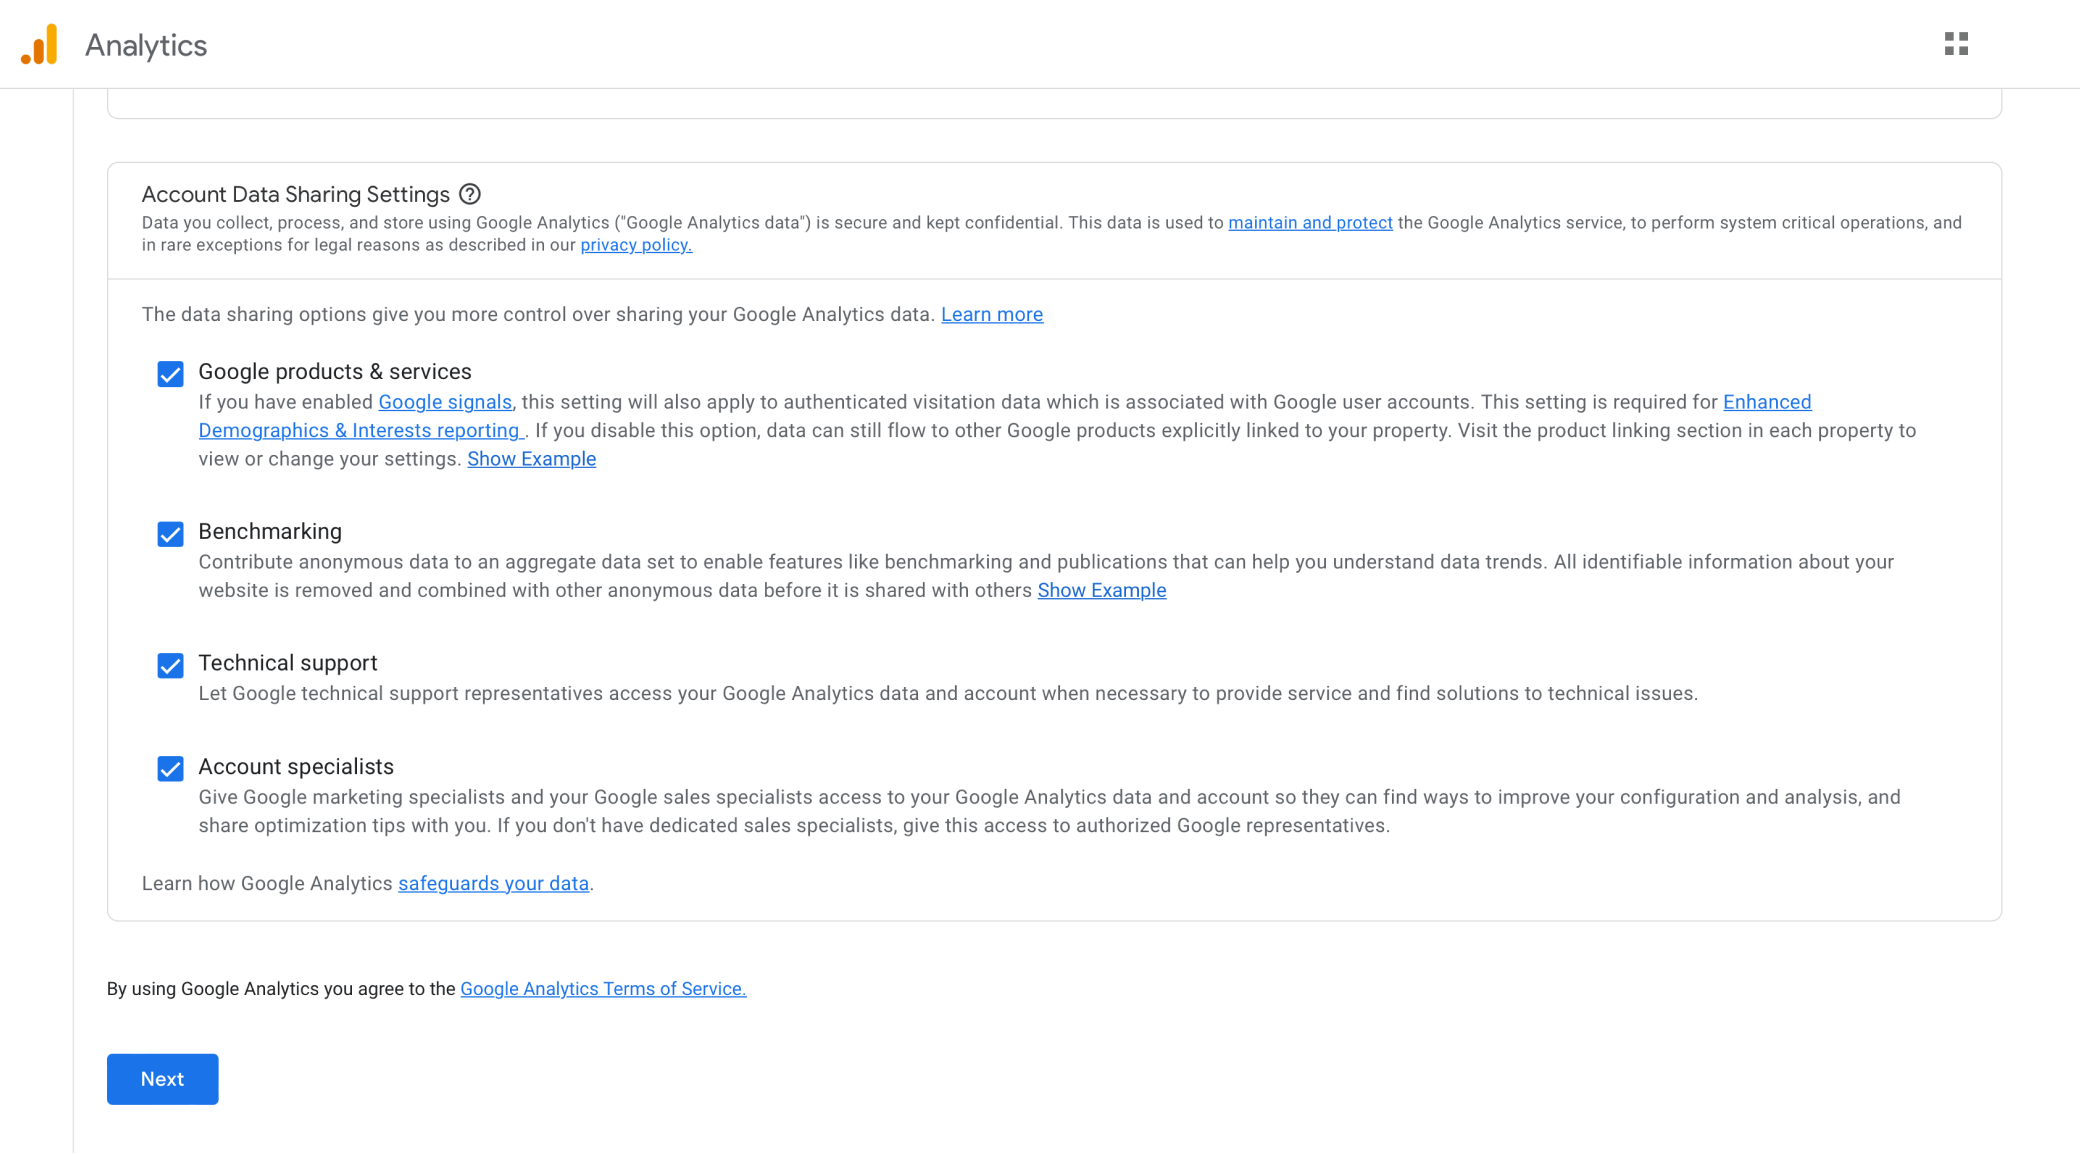
3. You will arrive at the Account setup screen, in which you should start by filling up your Account name. Below that, you will find the Account Data Sharing Settings, in which you can select which data you want to share (and to who). It is important to check the first option (Google products & services) if you want to have the Enhanced Demographics & Interests Reporting, which can provide valuable analytics data.
4. Scroll down and click the Next button
5. You will now arrive at the Property setup screen. On this, you need to write your property name (You can use the same name, or any other name, depending on your own preference), and you may be wondering: What is the difference between an Account and a Property? Well, in short, an Account can be a holder of many different properties.
For example, a company may have only one account, but many different analytics properties inside it (Marketing Website, Web App, Mobile App, etc).
After adding the Property name, please also fill in the Reporting time zone (This is so the analytics presented to match your timezone) and the Currency (this is to match conversion value data to your currency). Once you fill that out, click the Next button again.

6. You will now arrive at the About your business screen, in which you should fill out a little more information about your company. This is not going to impact the data reporting, so don't worry on that front. Fill that out, and click the Create button.

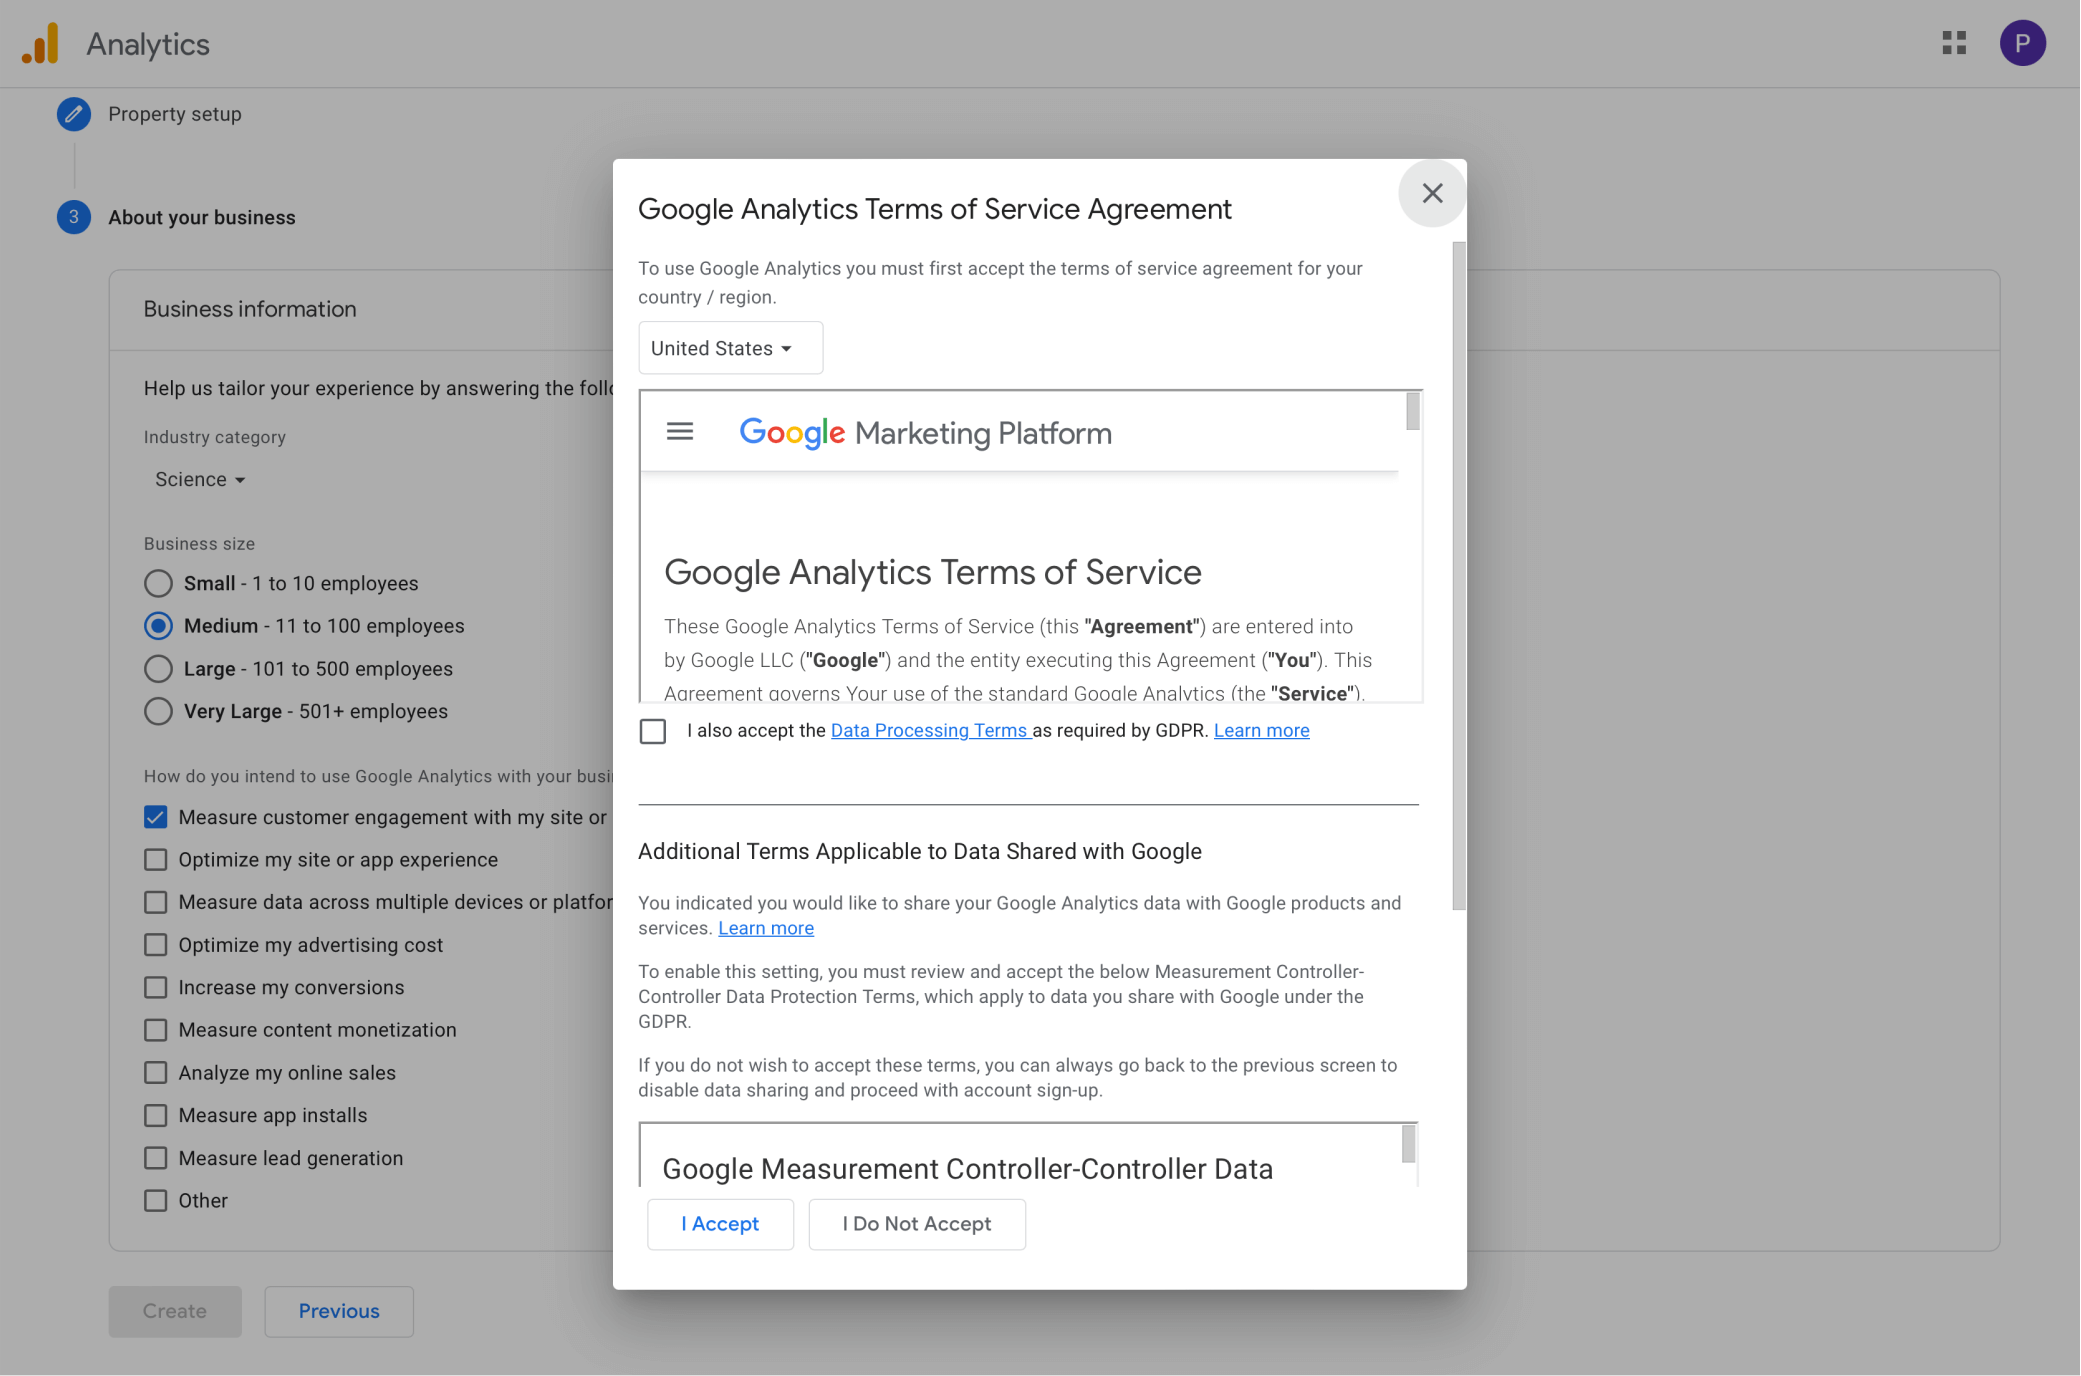
7. You will be shown a popup to accept the Terms of Service, so read them (or not 😂) and check the I accept boxes to then click the I Accept button.
8. Finally, to finish creating your account, you will be prompted if you want to subscribe to the GA email communications. We already receive many emails per day, so we didn't check them, but feel free to make your own choice 😉.
9. You will be redirected to the Data Streams screen, in which you should select Web under the Choose a platform options.
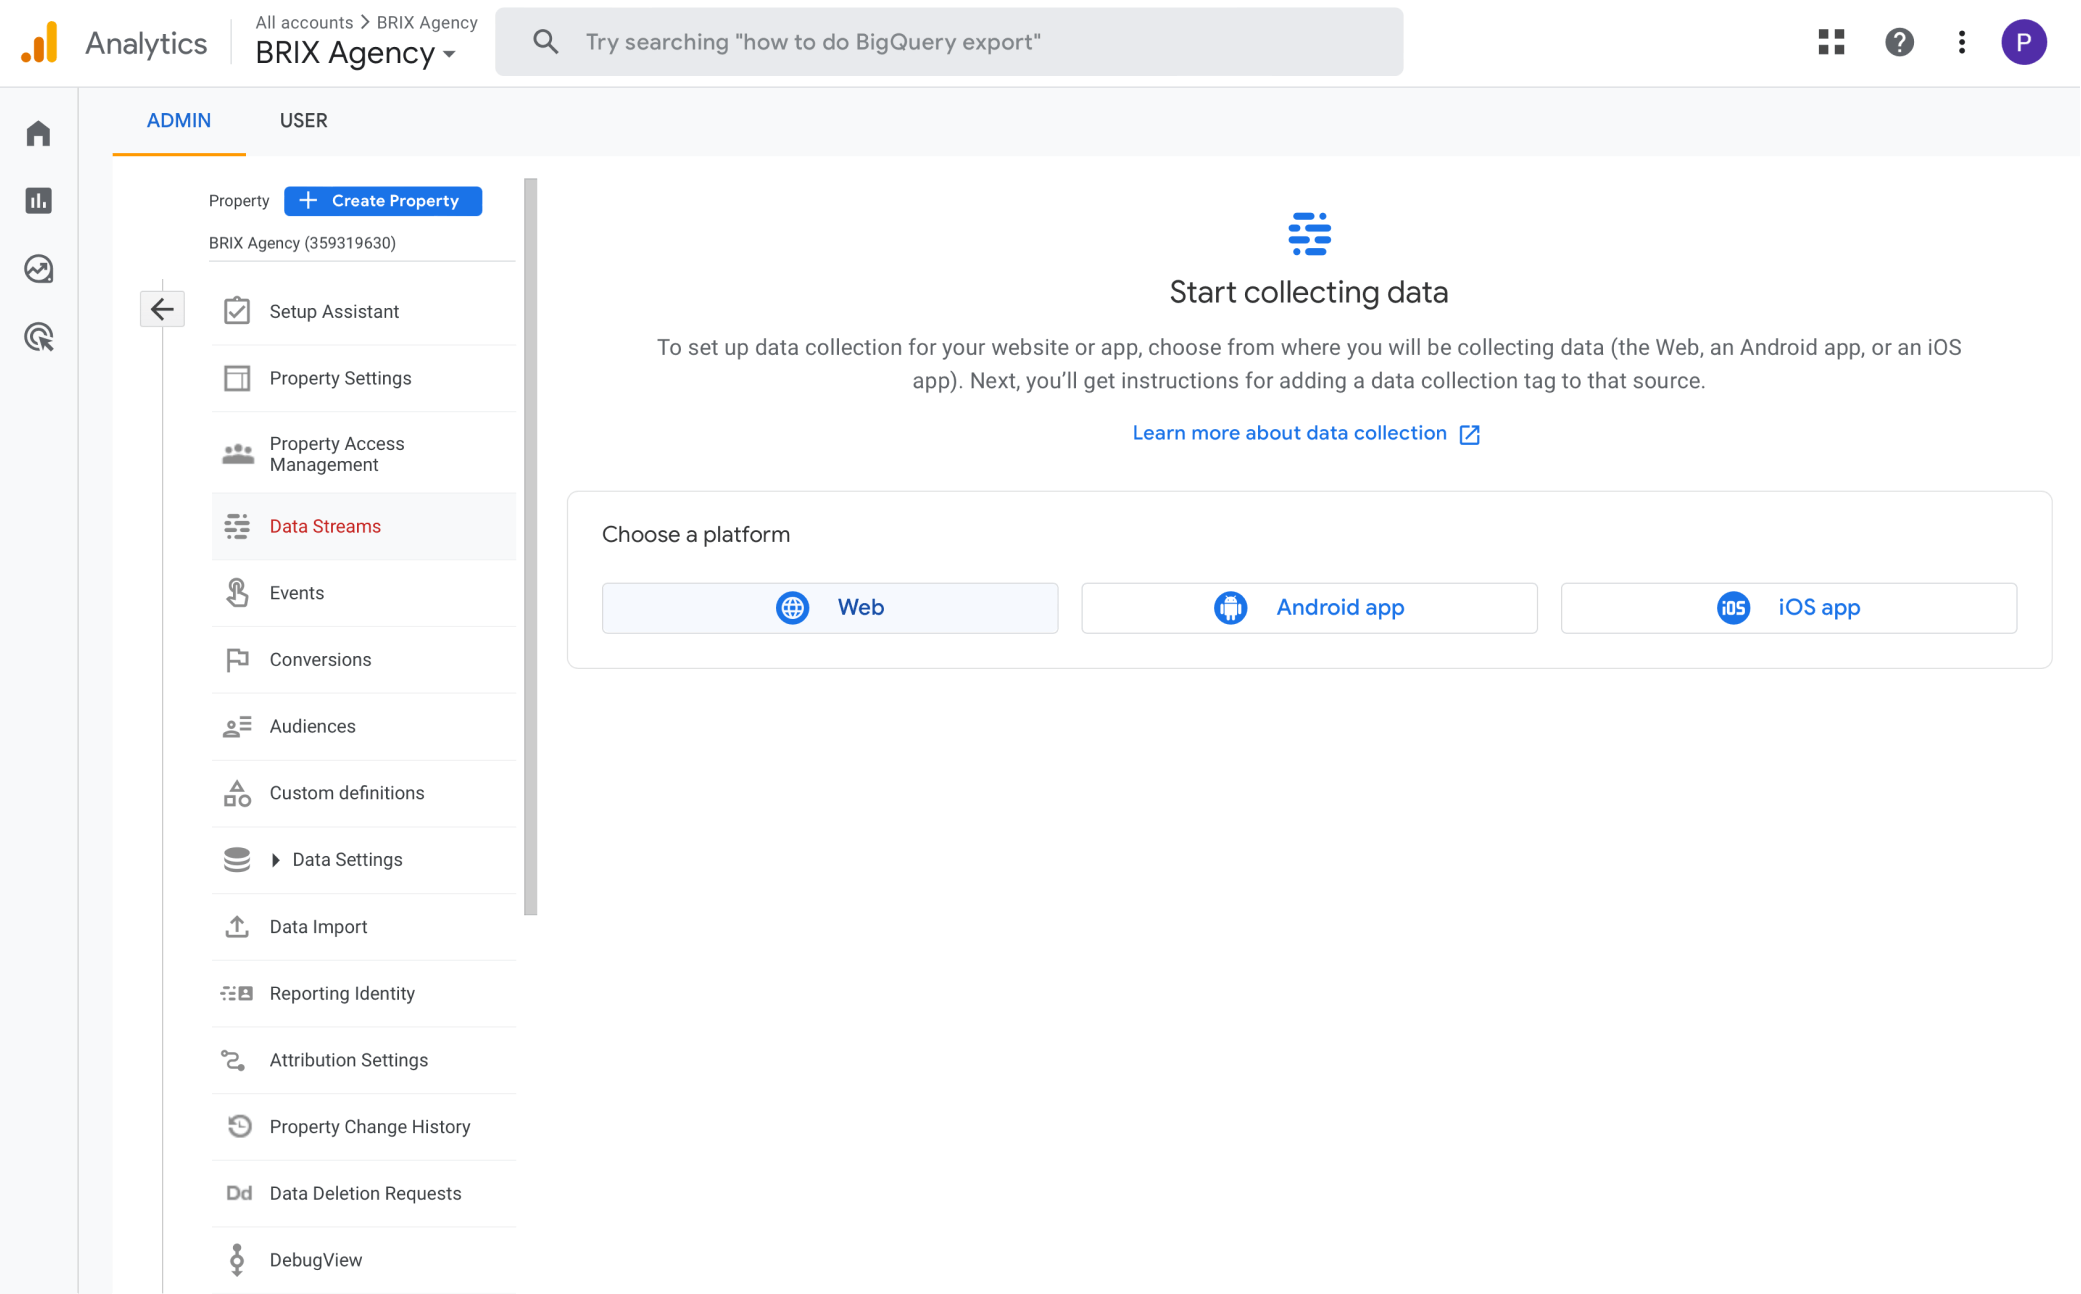
10. Type your website URL and type a Stream Name. Ensure to check Enhanced measurement, otherwise you won't be able to measure more advanced demographics and analytics.
11. Click the Create stream button, and continue.

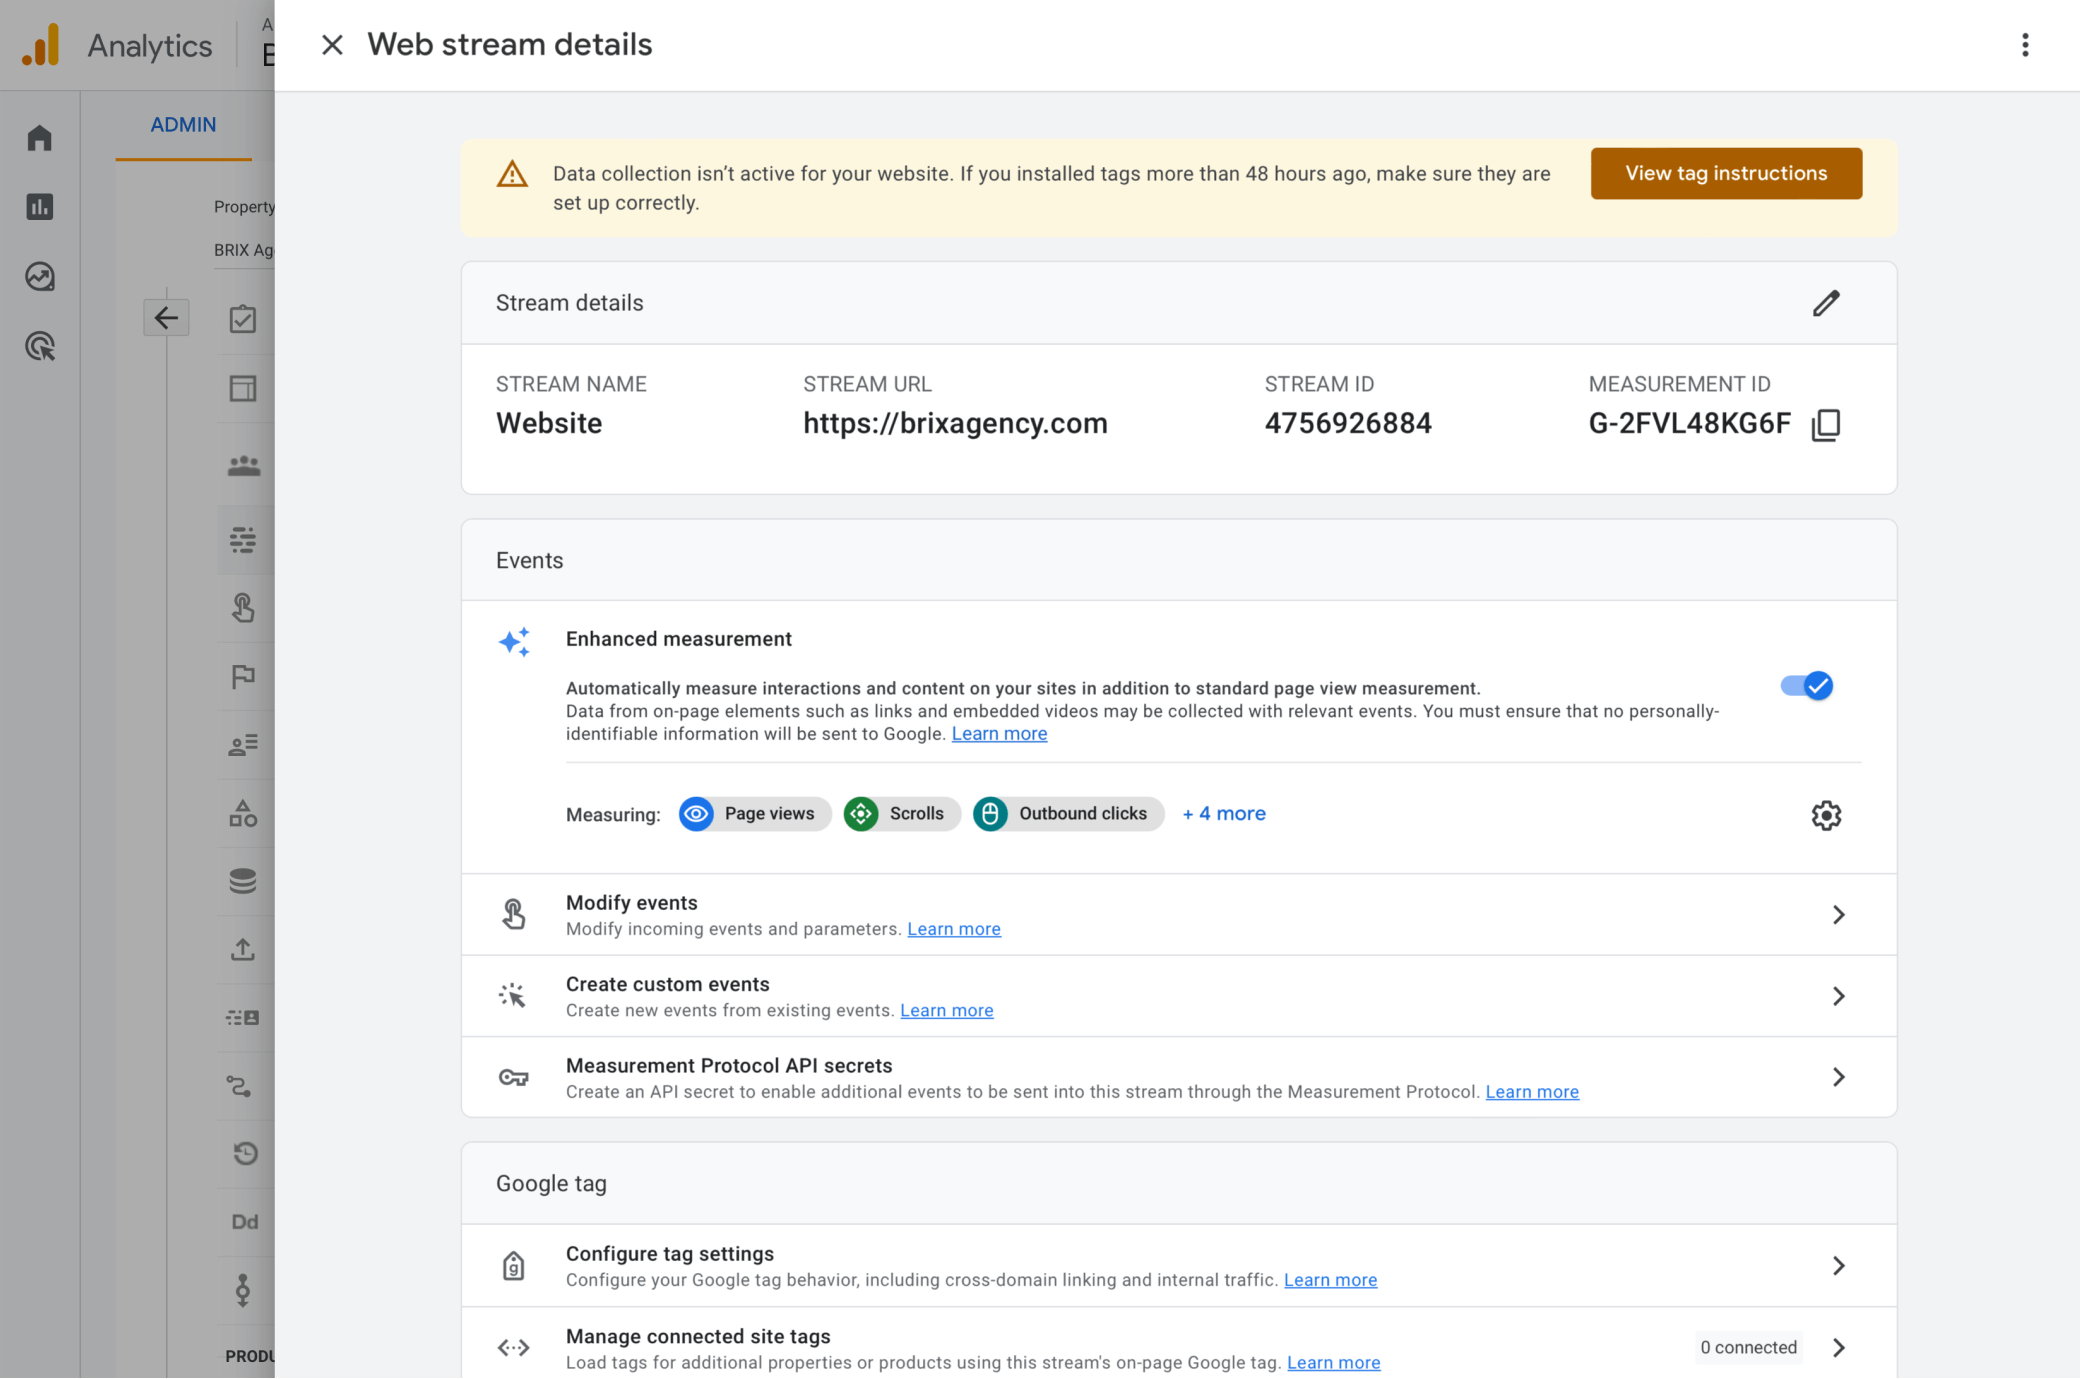
12. You will receive your Google Analytics web stream details. Copy your Measurement ID, and save it carefully in your most secure place 🔒 — Just joking 😂, just save it on the Notepad as we will use it in a few minutes.
And that is all for the Google Analytics side of things. Now we need to set up Google Tag Manager, and later connect the two and integrate them with Webflow. Continue reading 👇🏻.
Setting up Google Tag Manager in Webflow
Now that we have your Google Analytics property, it's time to setup Google Tag Manager, and connect them to unlock the full power of analytics. Let's start:
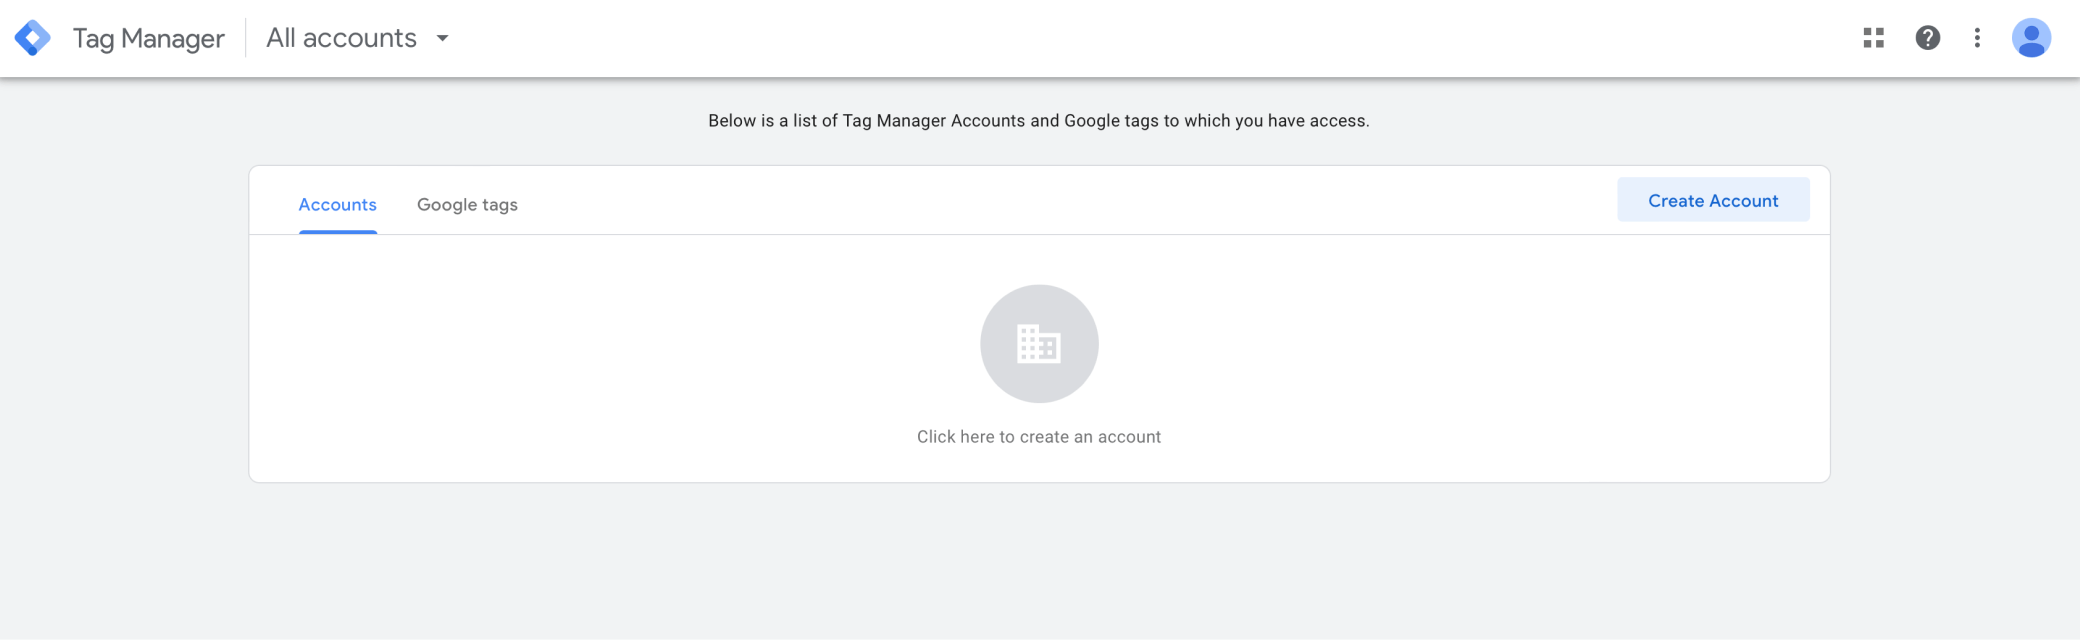
1. Go to Google Tag Manager website, and Login with your Google or G-Suite account
2. Click on the Create Account button
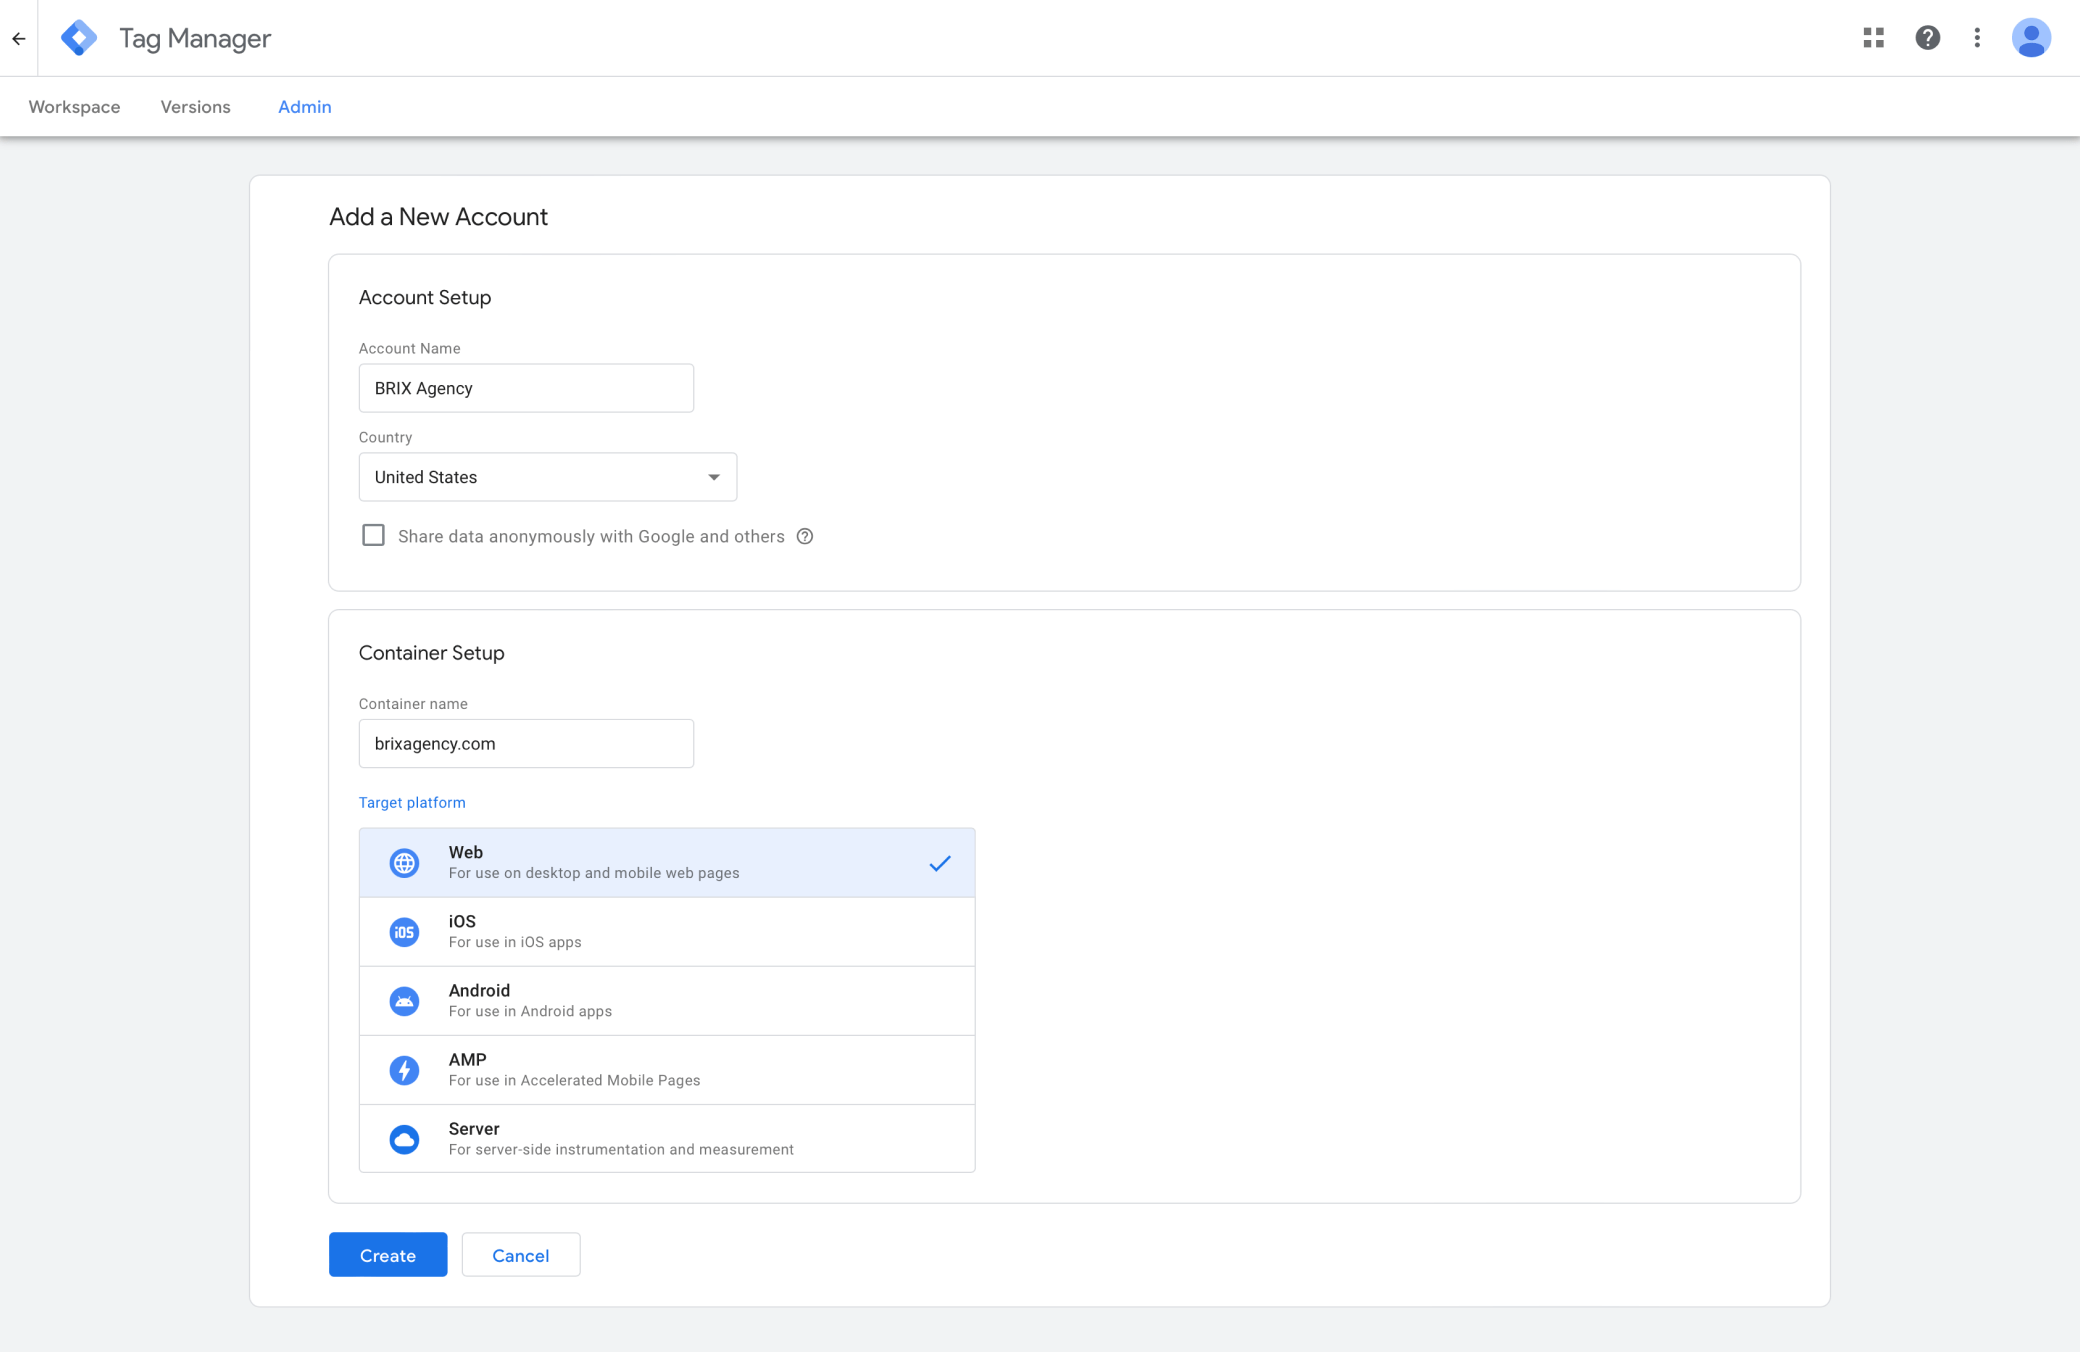
3. Fill in the following details:
Account Name: Use your company name.
Country: Select your country.
Container Setup: Type your company domain (i.e. brixagency.com)
Target Platform: Select Web
Once filled out, click the Create button to continue
4. You will be prompted to read and accept the Terms of Service. Check the box and click Yes
5. In the next screen, you will receive the tracking code to install Google Tag Manager on your website. Copy both codes and follow the next steps to add them to your Webflow site.
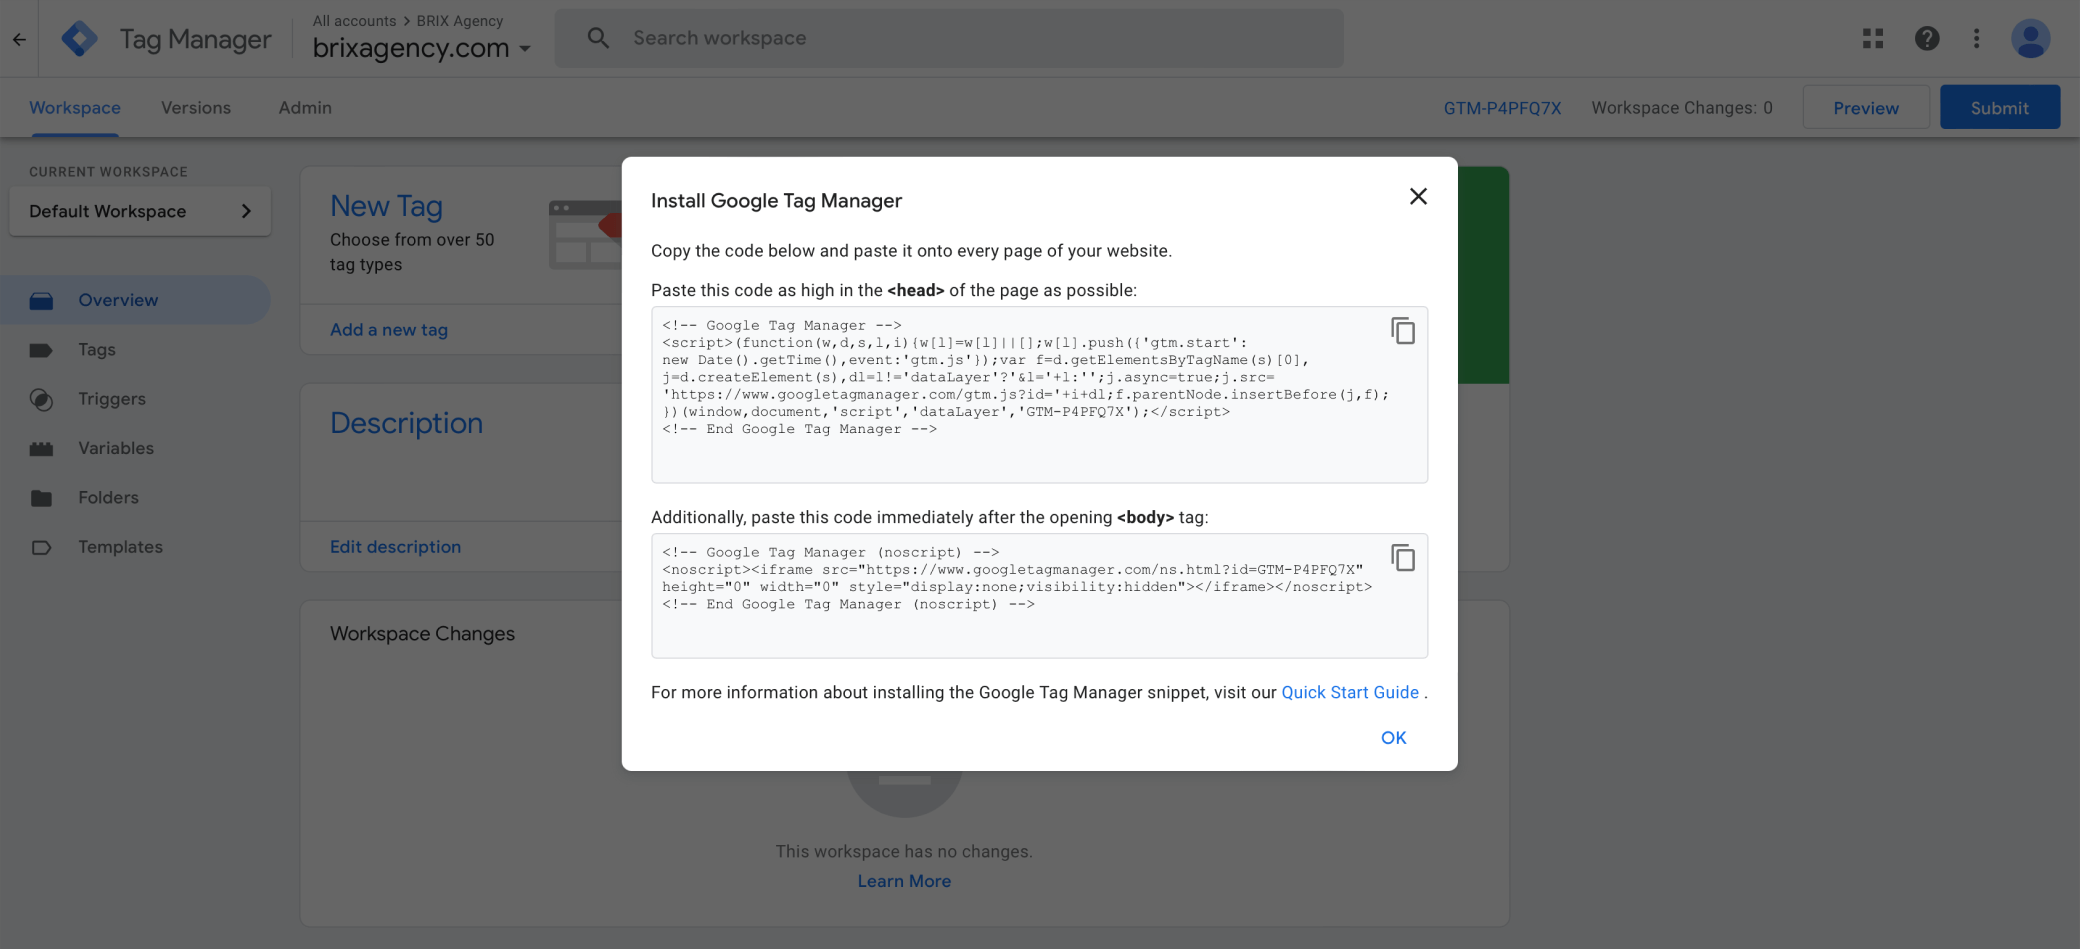
6. For the <head> code, we need to go to Webflow > Your Webflow Project > Project Settings > Custom Code, and paste the code in the Head Custom Code input, as seen below:
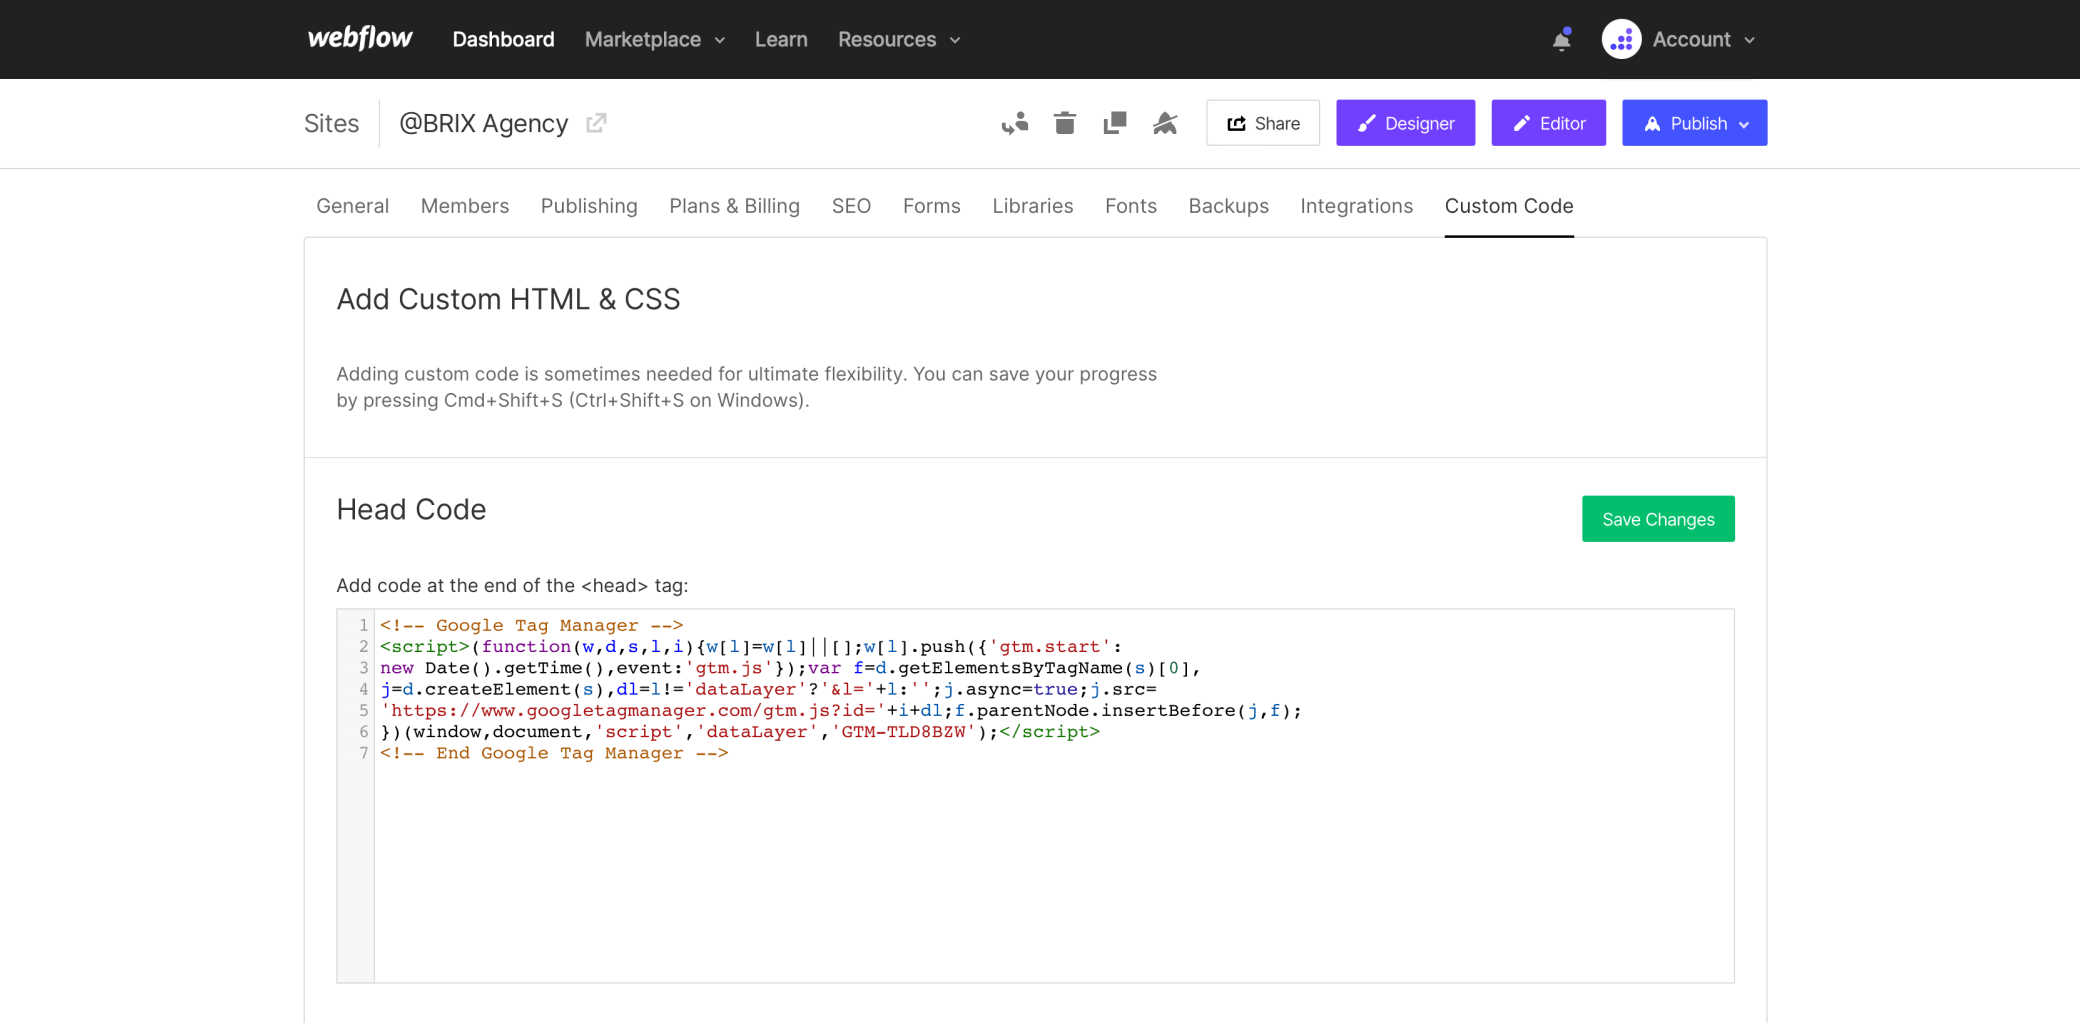
Just paste it there, and continue with the <body> code.
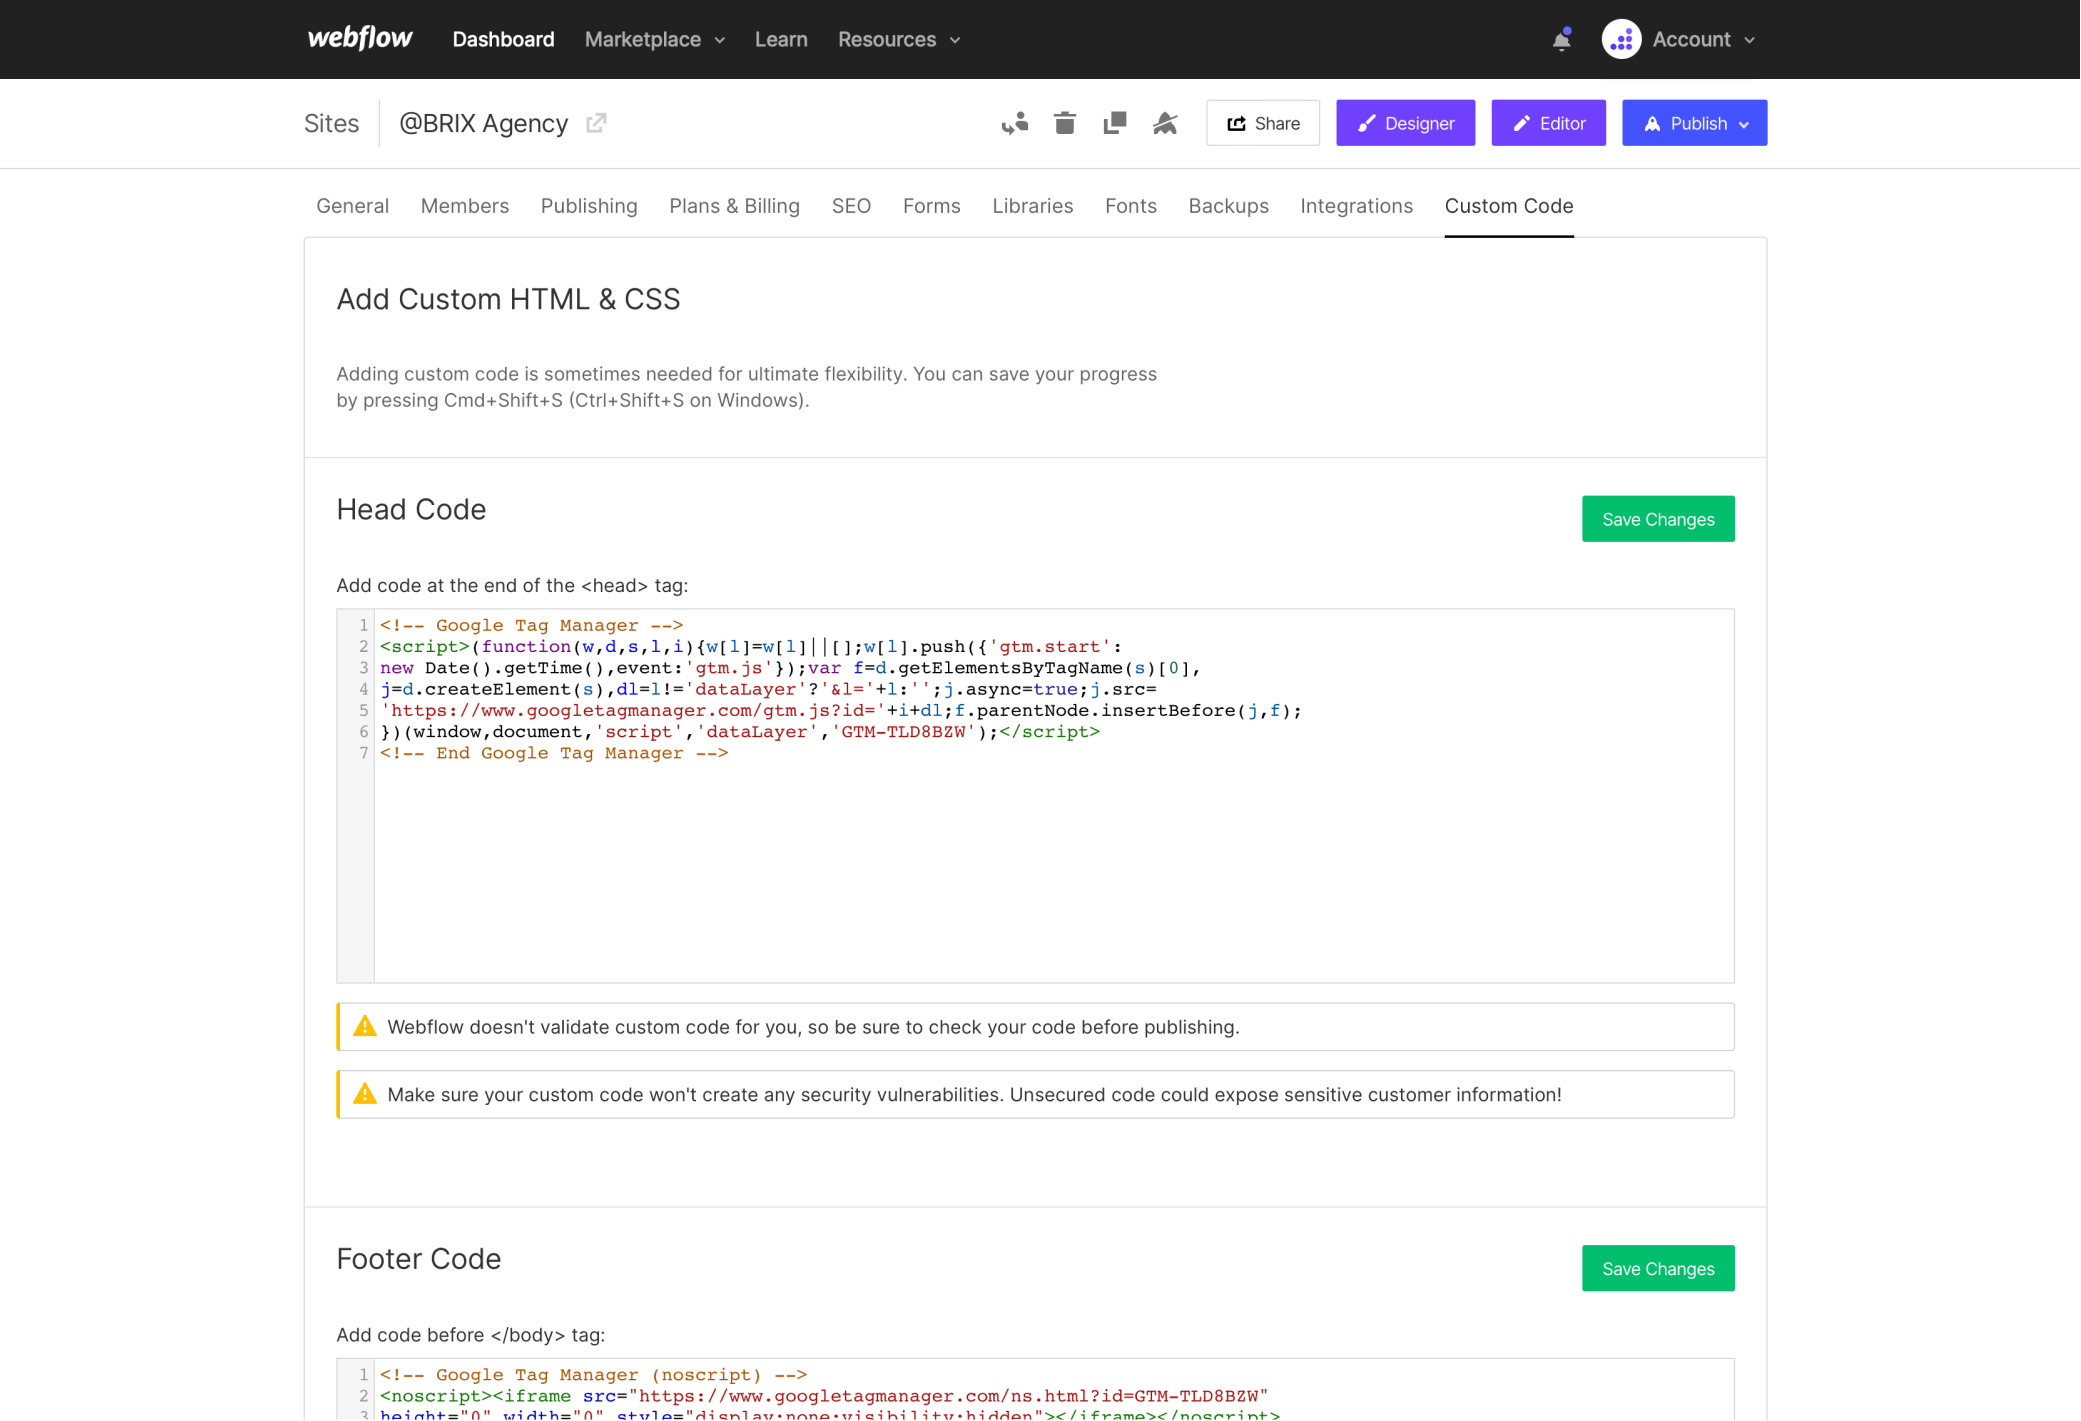
7. For the <body> code, there are two different ways to add it, the one recommended by Google, and another alternative way that many web developers recommend (including us).
The main difference is that the way Google recommends doing it typically guarantees the best data attribution, as the code loads before anything else on the page, so the user visit gets recorded instantly as soon as the <body> tag starts loading.
However, in the alternate way we recommend, the code gets loaded at the end of the <body>, so the visit gets recorded until the page has completely loaded, meaning that if some user visited the website and closed it in a few milliseconds, their visit won't be recorded. At the same time, as the tracking codes are loaded as last, the website loads much faster for the visitors, typically increasing the conversion rate and improving UX.
From our past benchmarks, the difference in data attribution is less than 1%, but the improvement in website speed can be significant.
✅ For the recommended way presented by Google, you need to do the following:
Go to your Your Webflow Project > Webflow Designer, and once you are there, you need to add the tracking code inside an HTML Embed at the top of your header, that way the first element that will load is your GA <body> code.

🤓 For the alternate way, you need to go to Webflow > Your Webflow Project > Project Settings > Custom Code, and paste the <body> code inside the Footer Custom Code input, similar to how you did it with the <head> code.
8. Once you complete any of these two steps, you just need to Publish your Webflow project, and Google Tag Manager will be successfully installed in your site 🚀
The only remaining step is to connect GA to GTM, so you have GA tracking on your website as well, and we explain it in the next section. You're almost done 🙌🏻
Connect Google Analytics with Google Tag Manager
Last but not least, we need to connect Google Analytics to Google Tag Manager, so it is also enabled in your Webflow site. In order to do it, you just need to complete the following instructions:
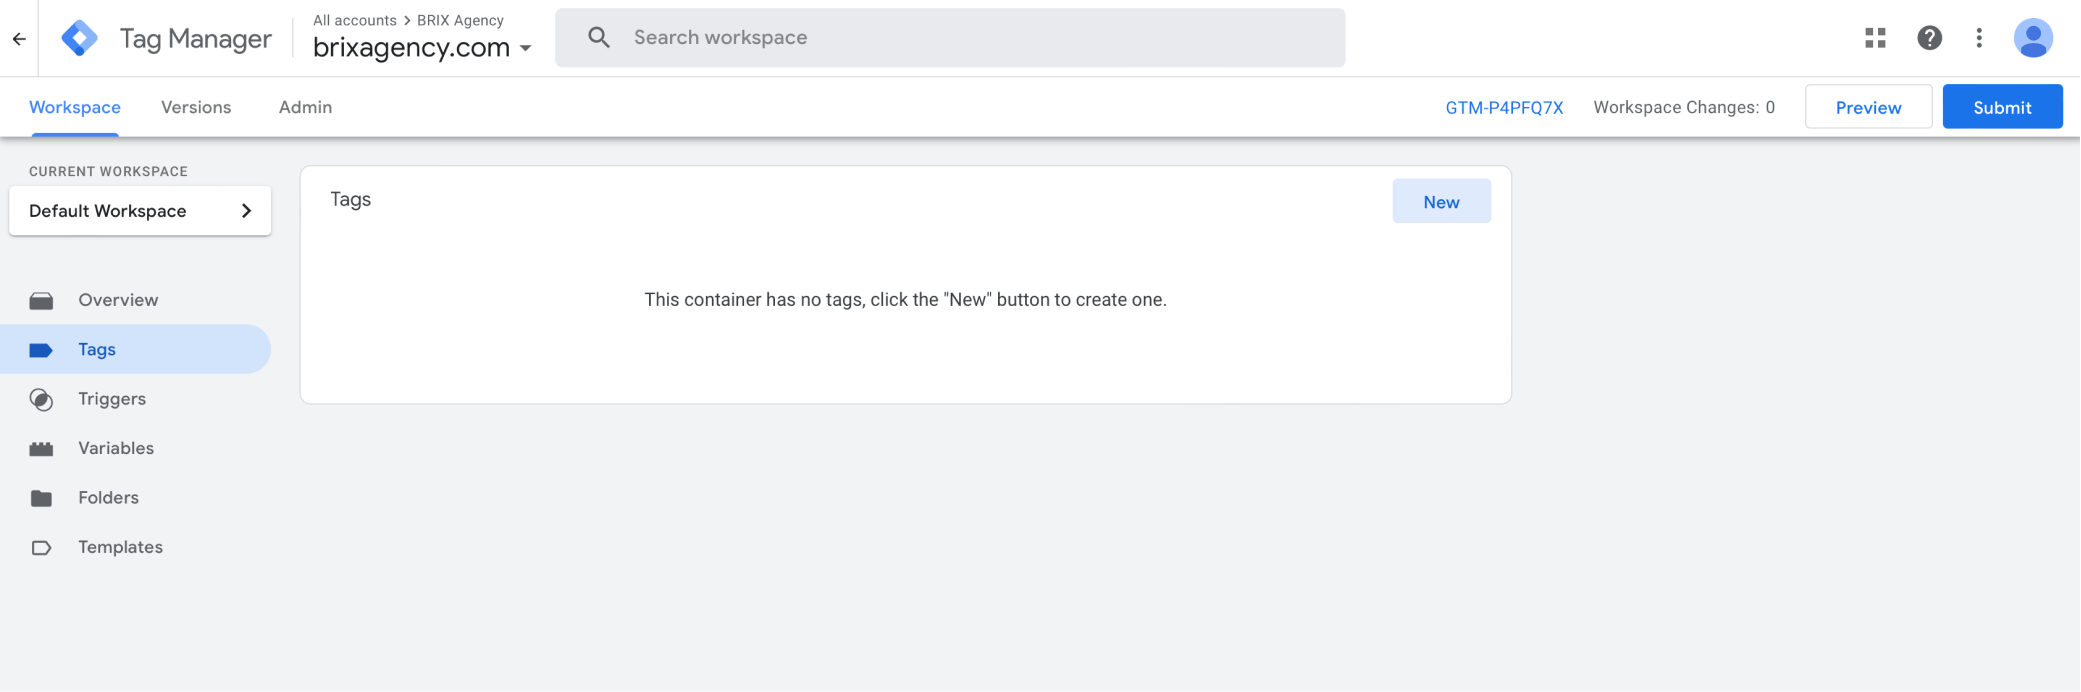
1. In GTM, go to Tags > New
2. Type a name for your tag (i.e. Google Analytics 4)
3. Click Choose a tag type to begin setup, and select Google Analytic: GA4 Configuration
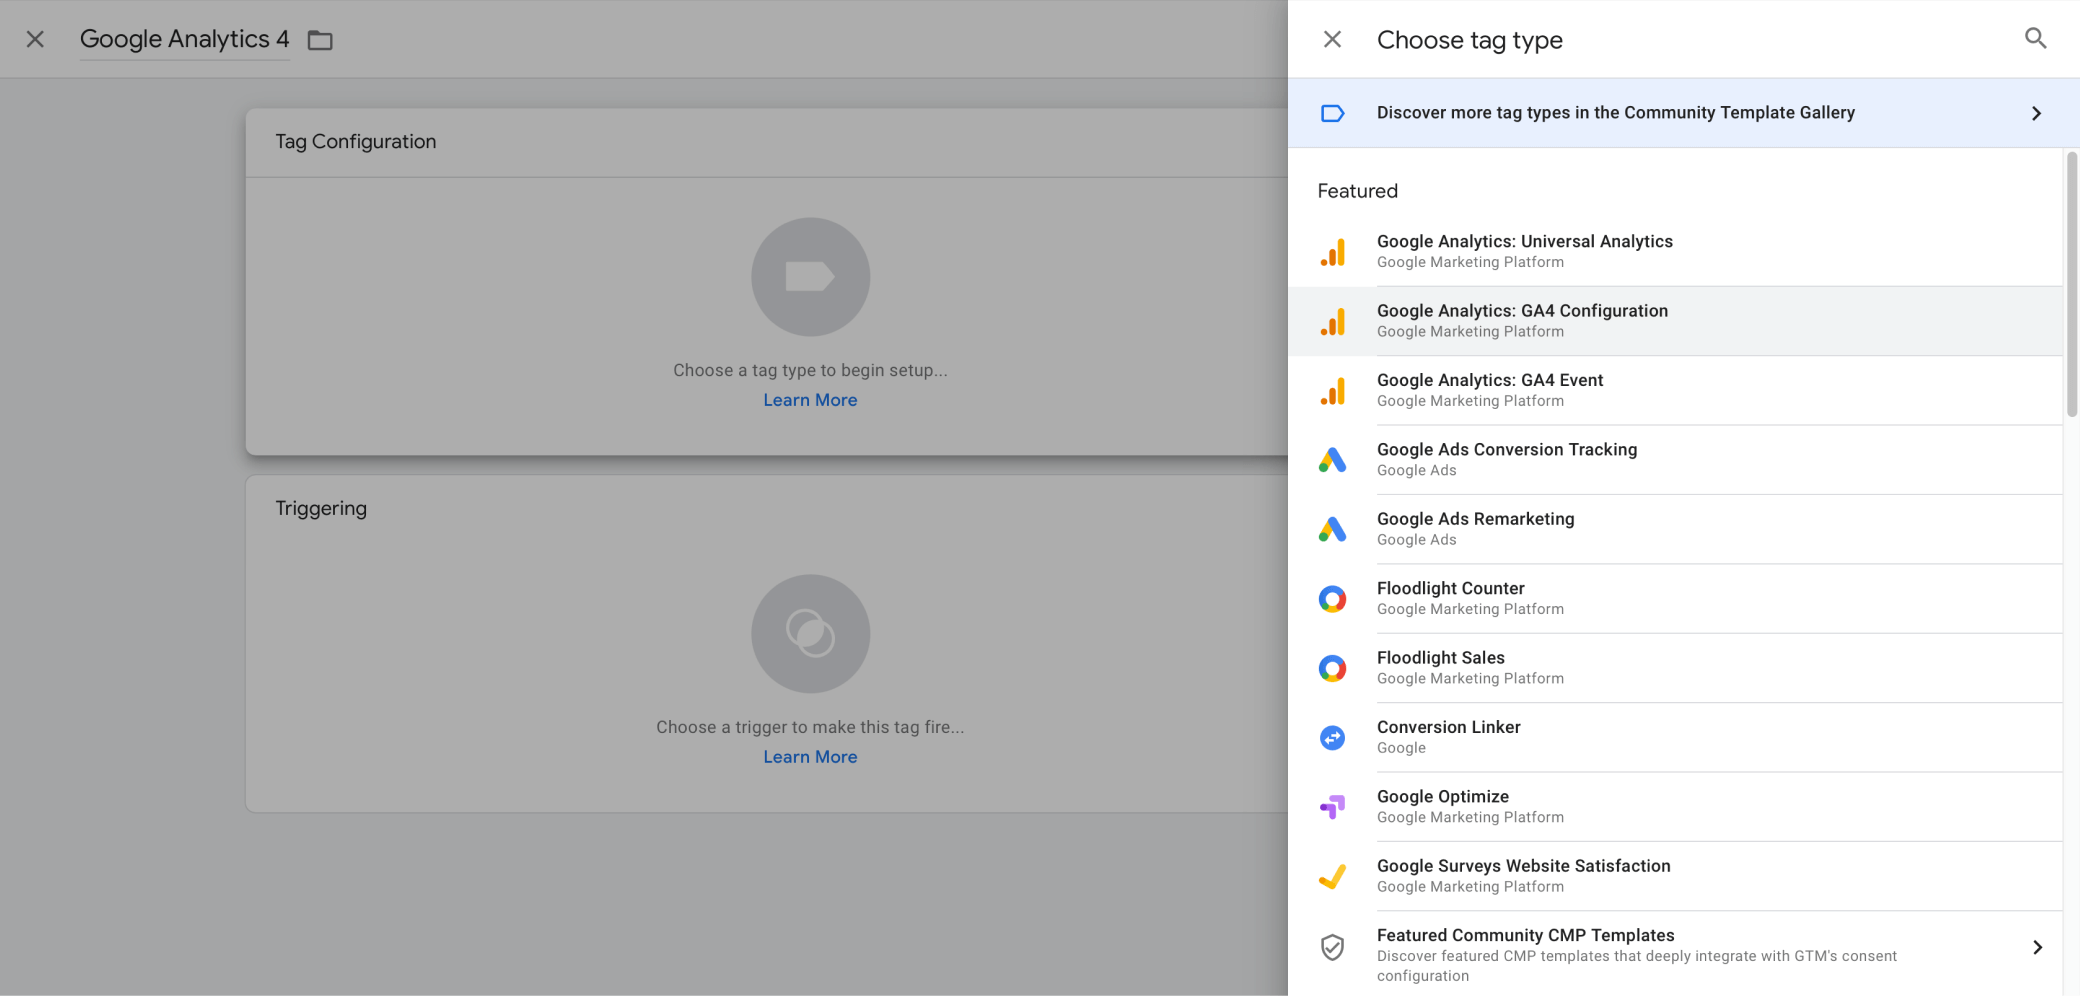
4. Paste your GA measurement ID on the measurement ID field
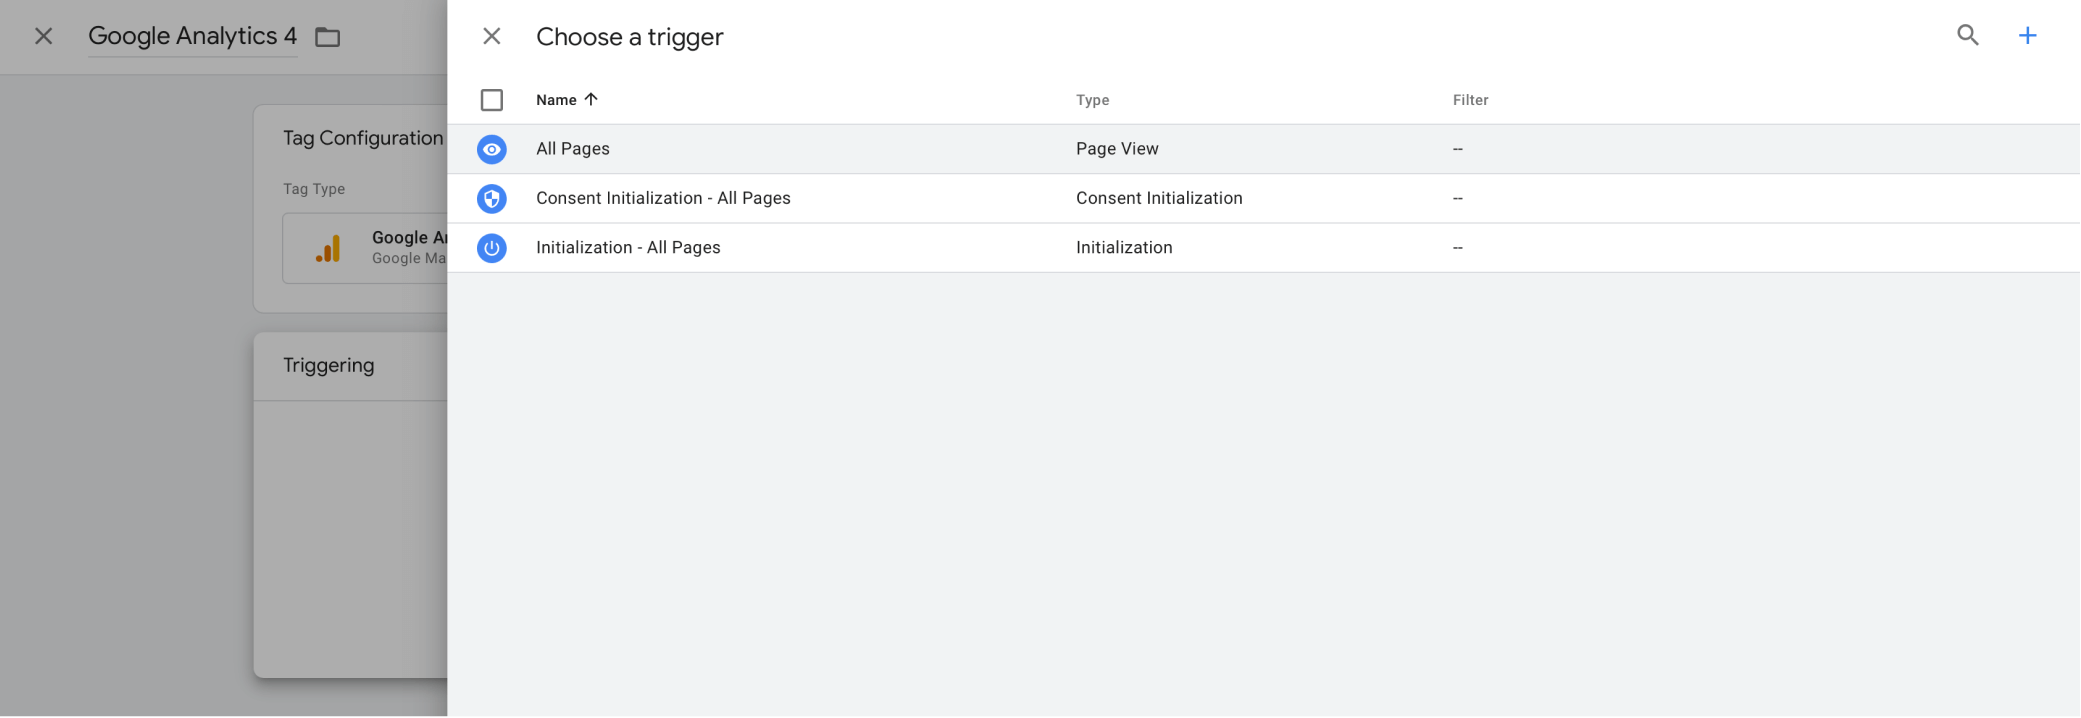
5. Click Choose a trigger to make this tag fire and select All Pages (Unless you want to run Google Analytics on just a few pages)
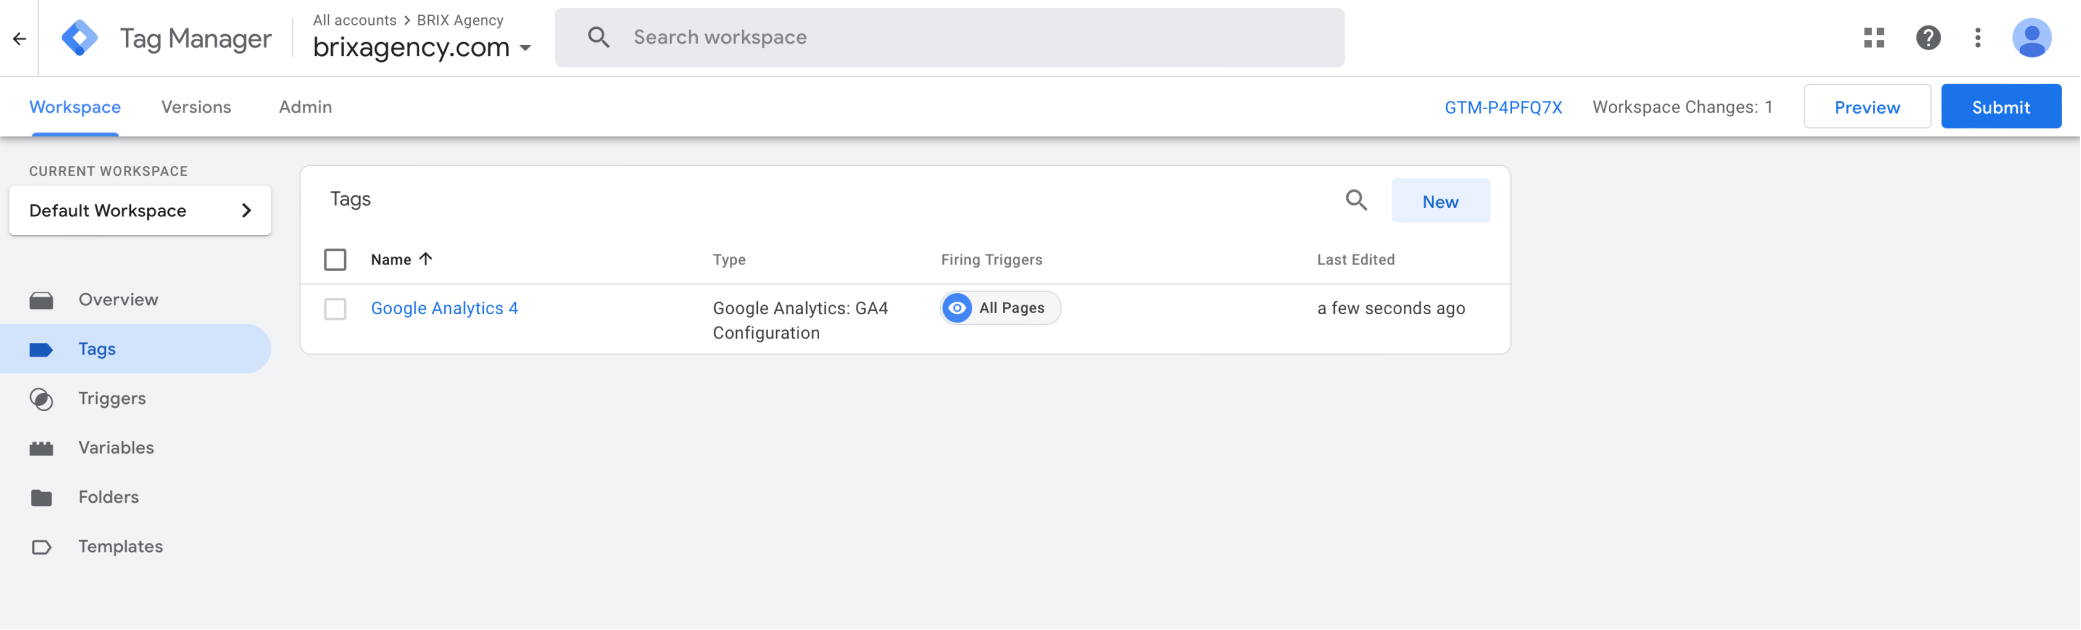
6. Click Save
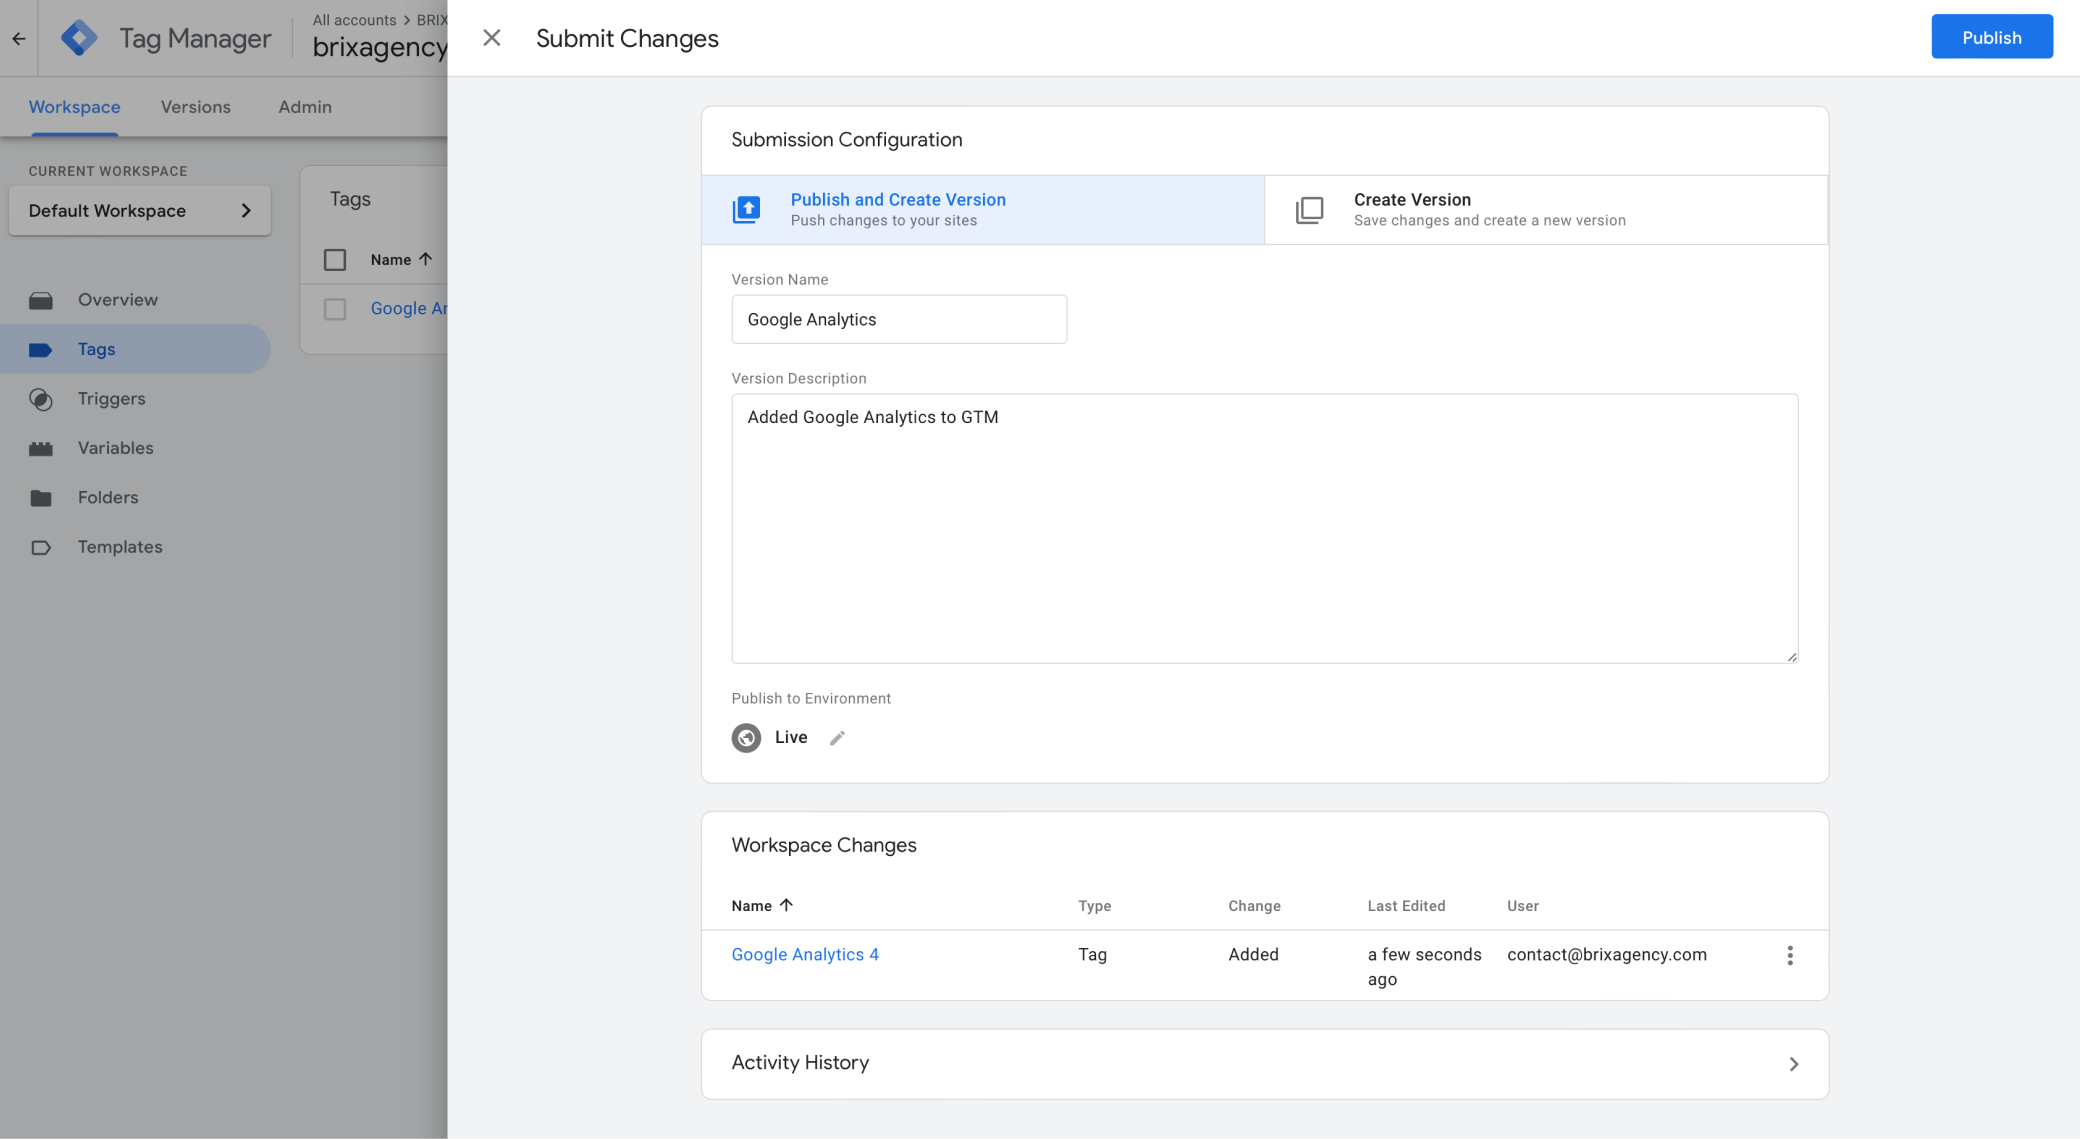
7. Click Publish on the top right button of the GTM interface
8. Type your version name and version description (or leave them empty, if you prefer) and click Publish again
Congrats — You are now done 🥳🎉🎈! You have successfully installed Google Analytics and Google Tag Manager to your Webflow site.
Remember that from now on, you can directly add any other tags (Meta Facebook Pixel, Twitter Ads Pixel, LinkedIn Ads Pixel, etc etc) directly from Google Tag Manager, so it will be much easier and more convenient than doing it directly through Webflow.
You will also fire these tags just on specific pages, which can be very convenient for many use cases (i.e. segmenting ads, firing conversion pixels, etc).
And that's all for today Webflow friends 💜 — Hope you enjoyed the article. If you want us to write about any other simple or complex analytics implementation with Webflow, please feel free to suggest it in the comments section, and we will promise to make it happen 👌🏻.