Webflow is a powerful no-code website builder, but just like all of the other platforms, it has certain specific weaknesses. But there is one that can be particularly problematic for big websites: by default, you can only connect one project to a subdomain.
This can be problematic for large companies or enterprises that want to host multiple Webflow projects on the same domain. For example, you might want your main website at the root level, a blog at /blog, and a careers page at /careers.
In this comprehensive guide, we'll explore two methods to overcome this limitation and host multiple Webflow projects on the same subdomain. Both methods involve creating a reverse proxy, which acts as an intermediary between the user's browser and your Webflow projects. Let's dive into each method in detail.
Understanding reverse proxies
A reverse proxy acts as an intermediary between the user's browser and your web servers (or in this case, your Webflow projects).
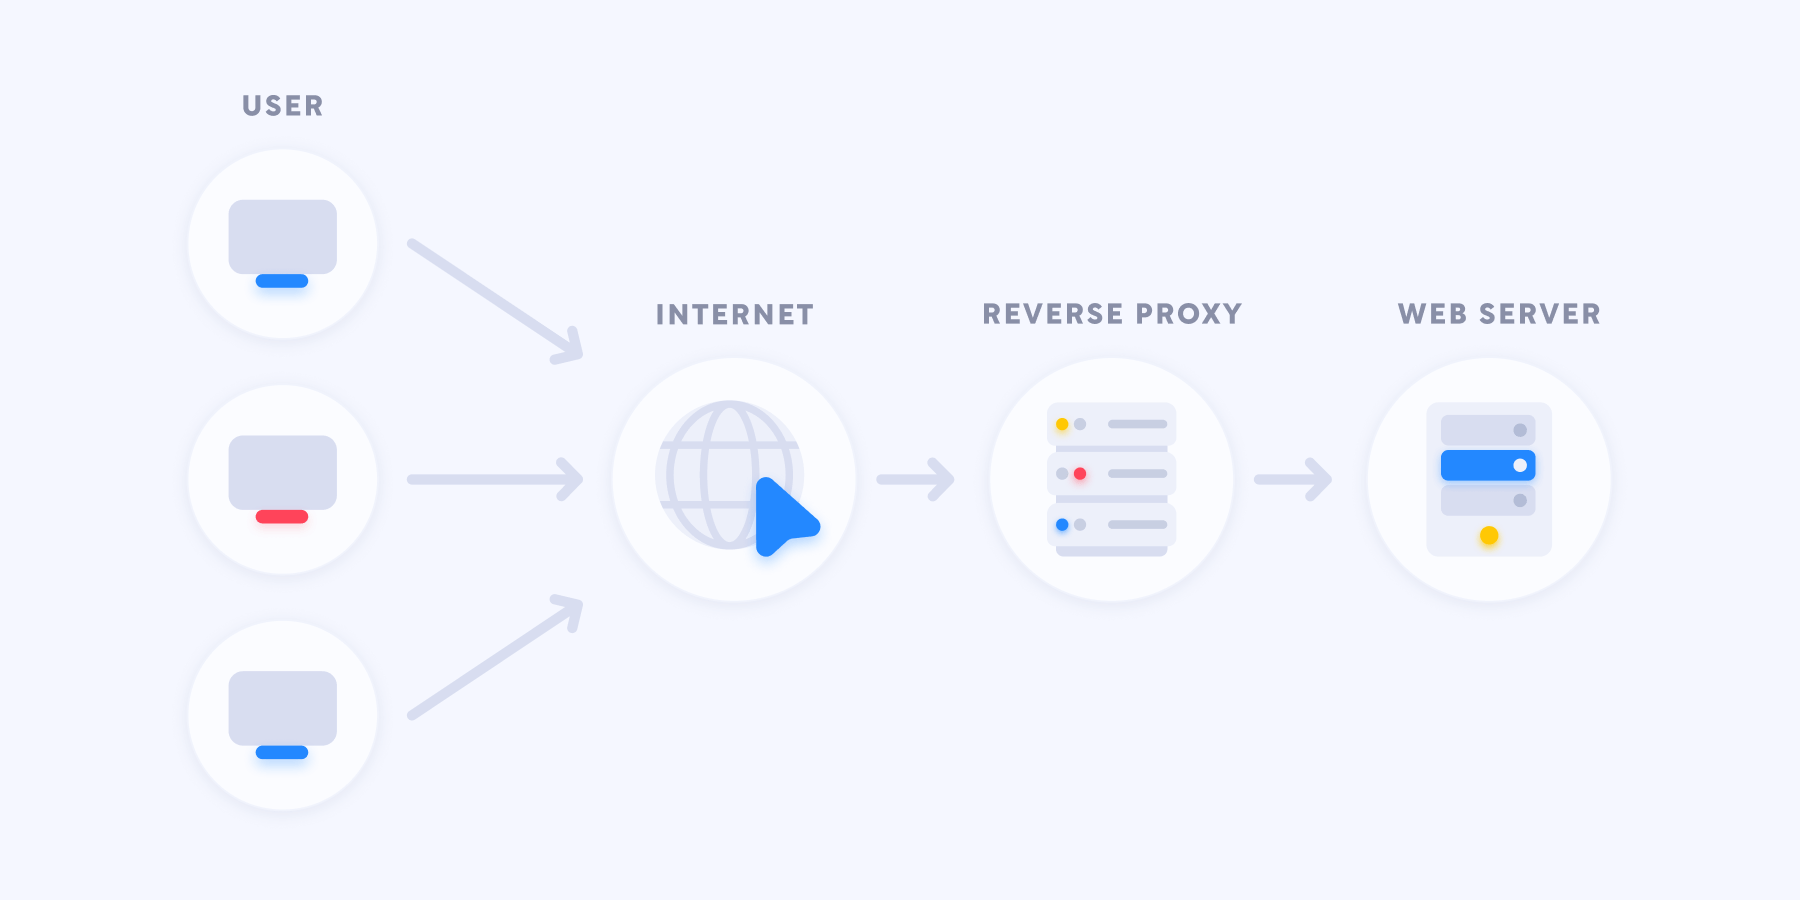
When a user requests a page, the reverse proxy:
- Receives the request
- Determines which Webflow project should handle the request based on the URL path
- Forwards the request to the appropriate Webflow project
- Receives the response from the Webflow project
- Sends the response back to the user's browser
This process allows you to serve multiple Webflow projects from different paths on the same domain, creating a seamless experience for your users. The best part? The entire process happens in a fraction of a second, making it virtually unnoticeable to the user.
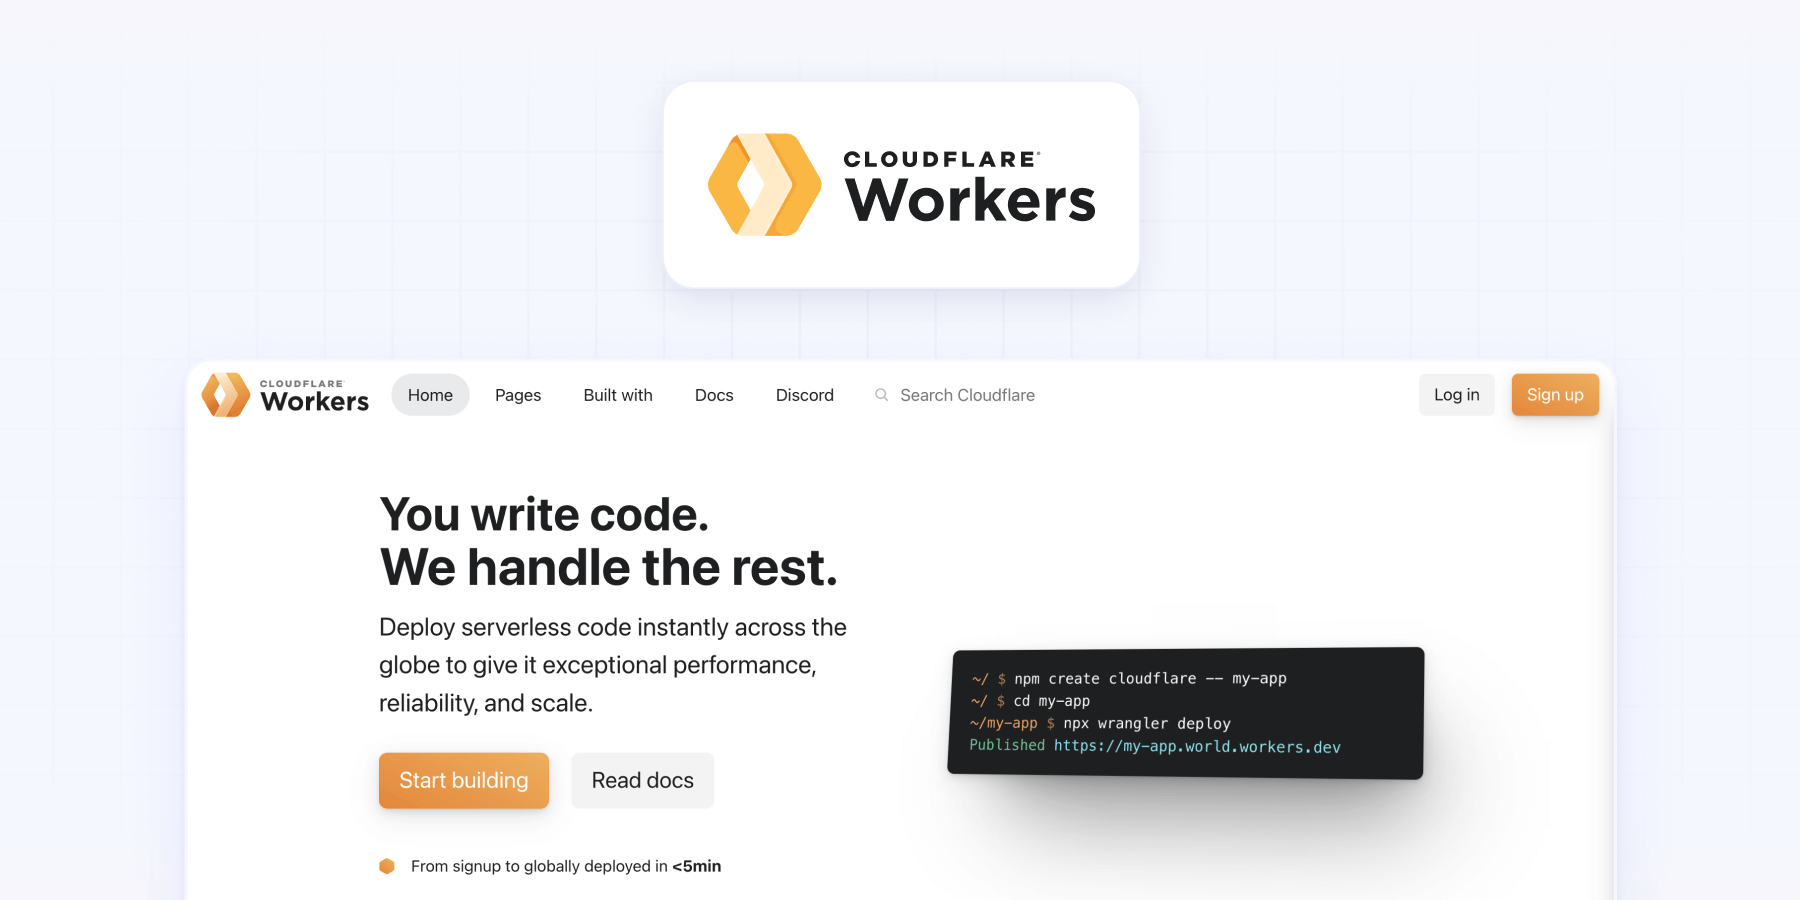
Method 1: Using Cloudflare Workers
Cloudflare Workers is a powerful feature created by Cloudflare that allows you to modify how URLs are served when visited, or in more technical terms, a programmable reverse proxy. Here's a step-by-step guide to setting up Cloudflare Workers for hosting multiple Webflow projects:
Step 1: Create a Cloudflare account
- Go to Cloudflare.com and sign up for an account if you don't have one.
- Once logged in, add your domain to Cloudflare.
- Cloudflare will scan and fetch your existing DNS records. Review and copy them to ensure your domain continues to point correctly.
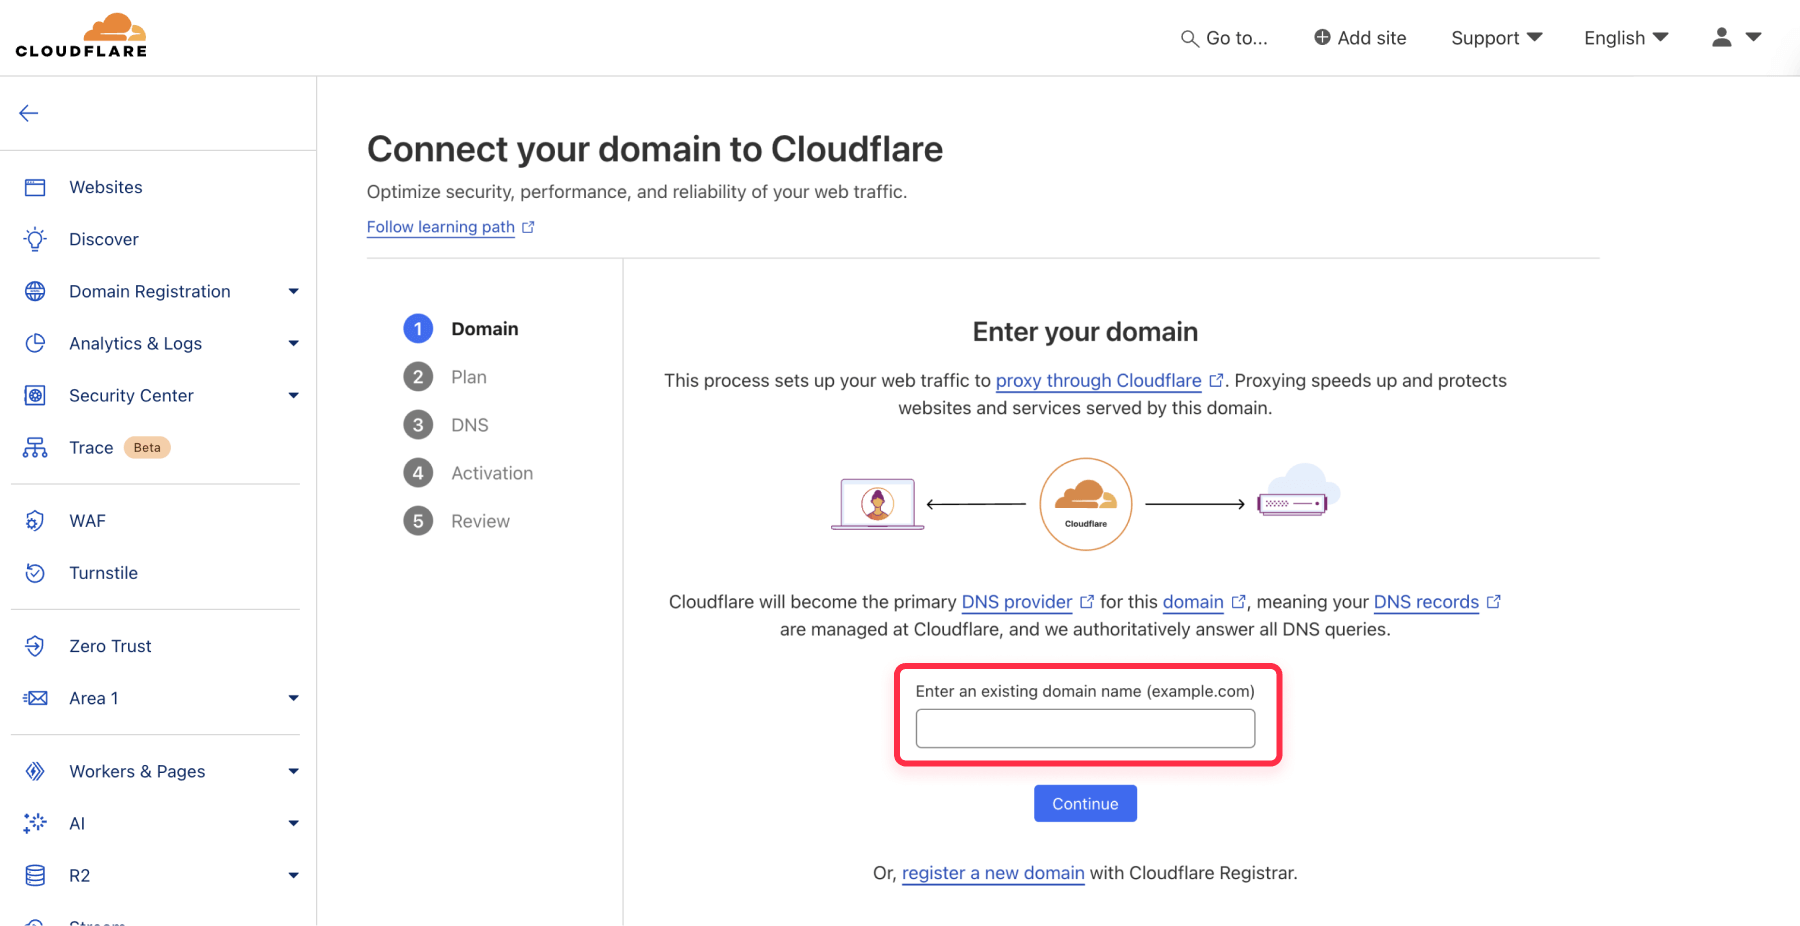
Step 2: Update your domain's nameservers
- Cloudflare will provide you with new nameservers.
- Update your domain's nameservers with your domain registrar to point to Cloudflare's nameservers.
- This step allows Cloudflare to manage your DNS and enable the Workers functionality.
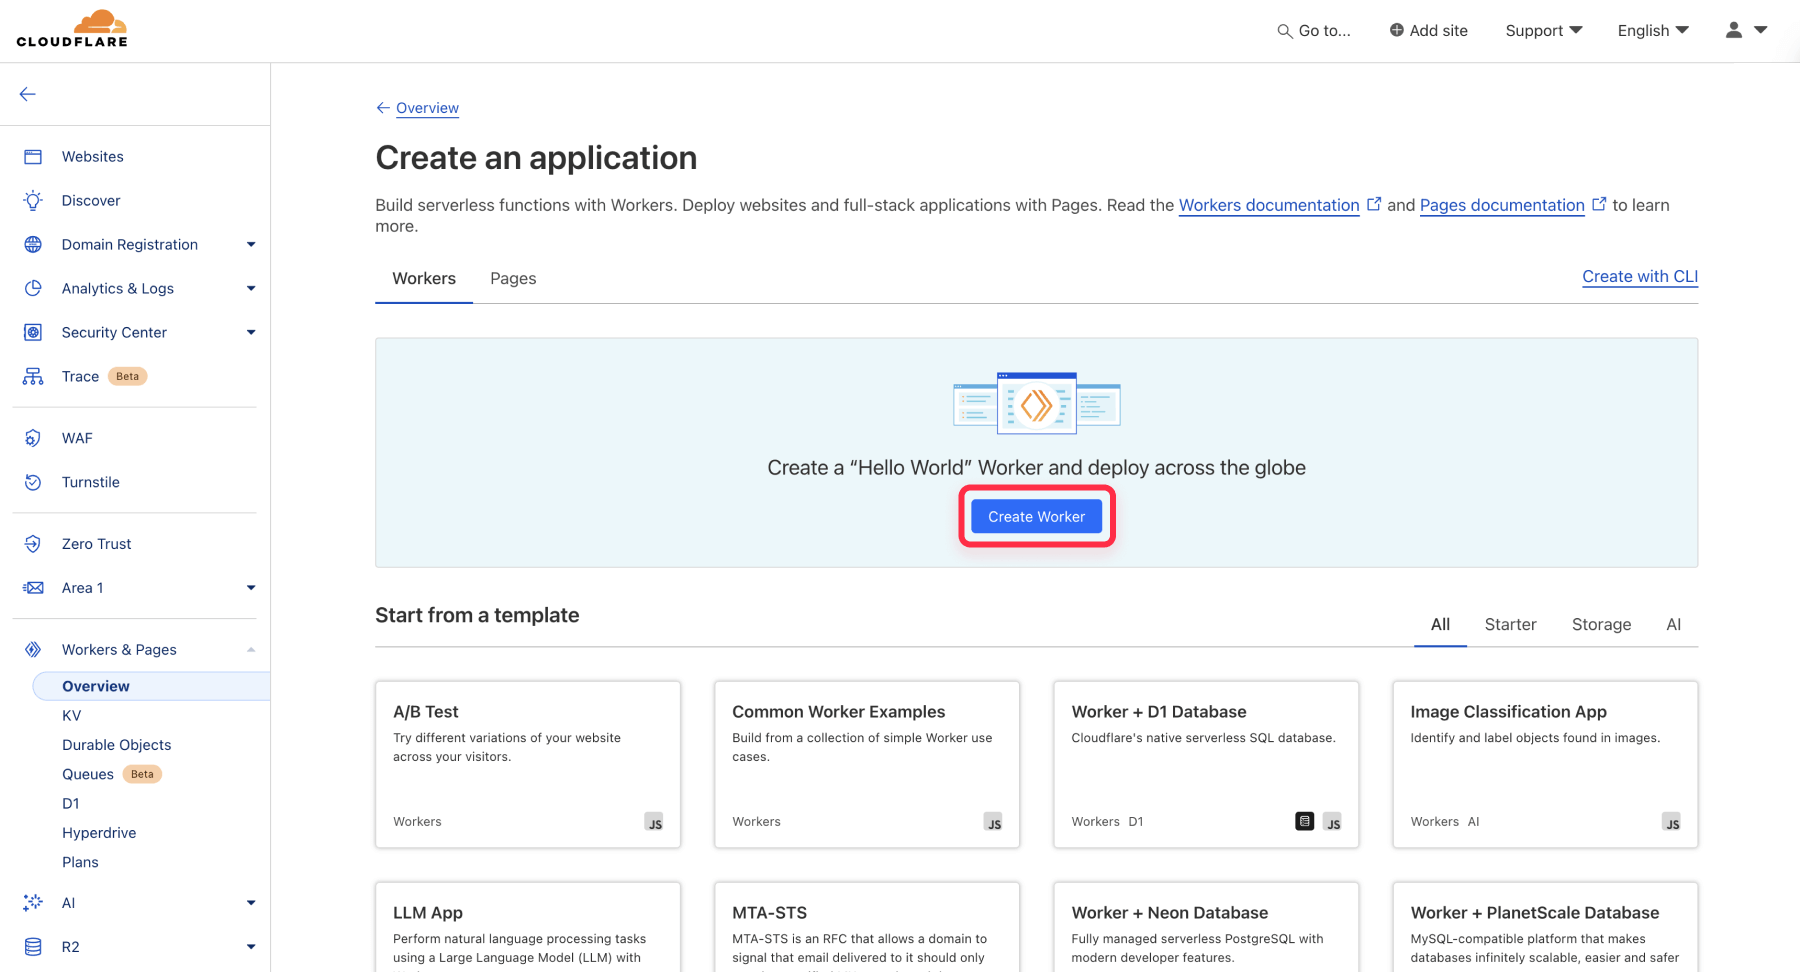
Step 3: Create a new worker
- In the Cloudflare dashboard, navigate to the "Workers & Pages" section.
- Click on "Create a Worker".
- When prompted, click "Create Worker" again (not "Start from template").
- Give your worker a name, such as "Webflow Reverse Proxy".
- Click "Deploy" to create the worker.
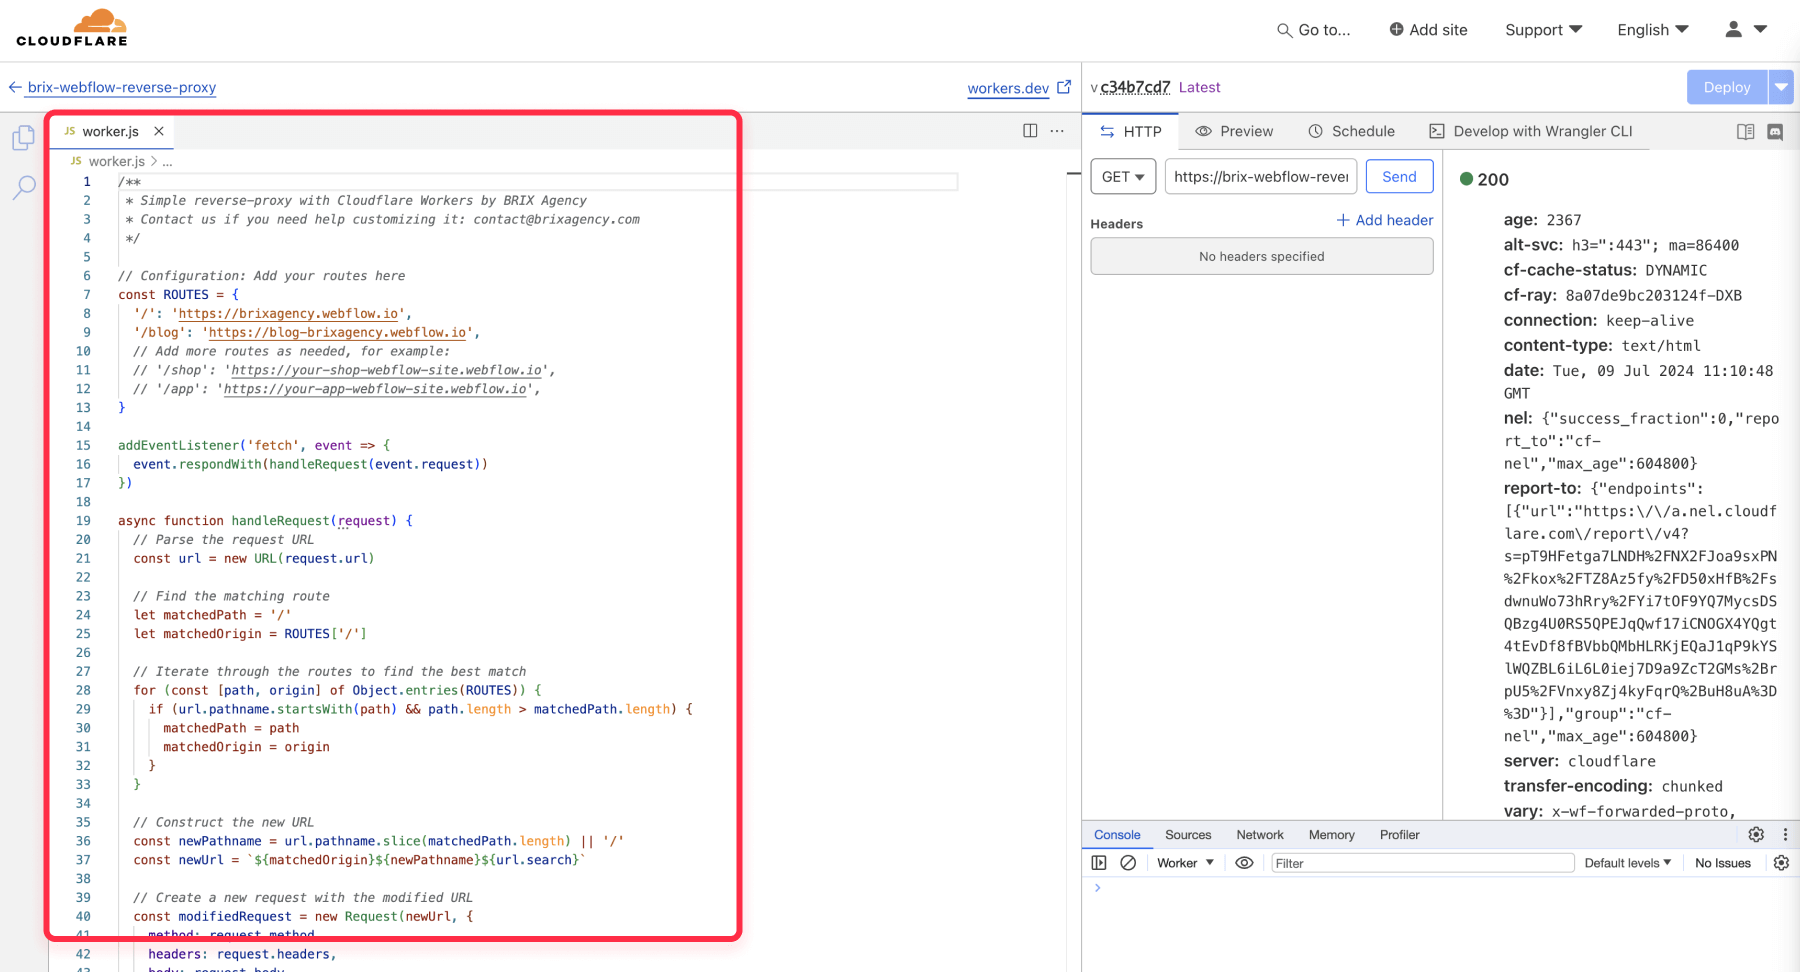
Step 4: Edit the worker code
- Once the worker is created, click the "Edit code" button in the top right corner.
- Delete any existing code in the editor.
- Copy and paste the following code into the editor:
/**
 * Simple reverse-proxy with Cloudflare Workers by BRIX Agency
 * Contact us if you need help customizing it: contact@brixagency.com
 */

// Configuration: Add your routes here
const ROUTES = {
  '/': 'https://your-main-webflow-site.webflow.io',
  '/blog': 'https://your-blog-webflow-site.webflow.io',
  // Add more routes as needed, for example:
  // '/shop': 'https://your-shop-webflow-site.webflow.io',
  // '/app': 'https://your-app-webflow-site.webflow.io',
}

addEventListener('fetch', event => {
  event.respondWith(handleRequest(event.request))
})

async function handleRequest(request) {
  // Parse the request URL
  const url = new URL(request.url)

  // Find the matching route
  let matchedPath = '/'
  let matchedOrigin = ROUTES['/']

  // Iterate through the routes to find the best match
  for (const [path, origin] of Object.entries(ROUTES)) {
    if (url.pathname.startsWith(path) && path.length > matchedPath.length) {
      matchedPath = path
      matchedOrigin = origin
    }
  }

  // Construct the new URL
  const newPathname = url.pathname.slice(matchedPath.length) || '/'
  const newUrl = `${matchedOrigin}${newPathname}${url.search}`

  // Create a new request with the modified URL
  const modifiedRequest = new Request(newUrl, {
    method: request.method,
    headers: request.headers,
    body: request.body
  })

  // Forward the modified request
  let response = await fetch(modifiedRequest)

  // Clone the response so that we can modify headers
  response = new Response(response.body, response)

  // Remove the Webflow-specific headers
  response.headers.delete('X-Powered-By')
  response.headers.delete('X-Generator')

  // Add our own header
  response.headers.set('X-Proxied-By', 'Cloudflare Workers')

  return response
}- In the code above, replace the example URLs with your actual Webflow project URLs. Add as many routes as needed for your projects.
- Click "Deploy" in the upper right corner to update the worker.
Step 5: Test your setup
- Go back to the worker's main page and click on the "Settings" section.
- In the "Routes" section, you'll see a URL ending with "workers.dev".
- Use this URL to test your different routes and ensure they're pointing to the correct Webflow projects.
- If everything works as expected, proceed to the next step to set up your custom domain.
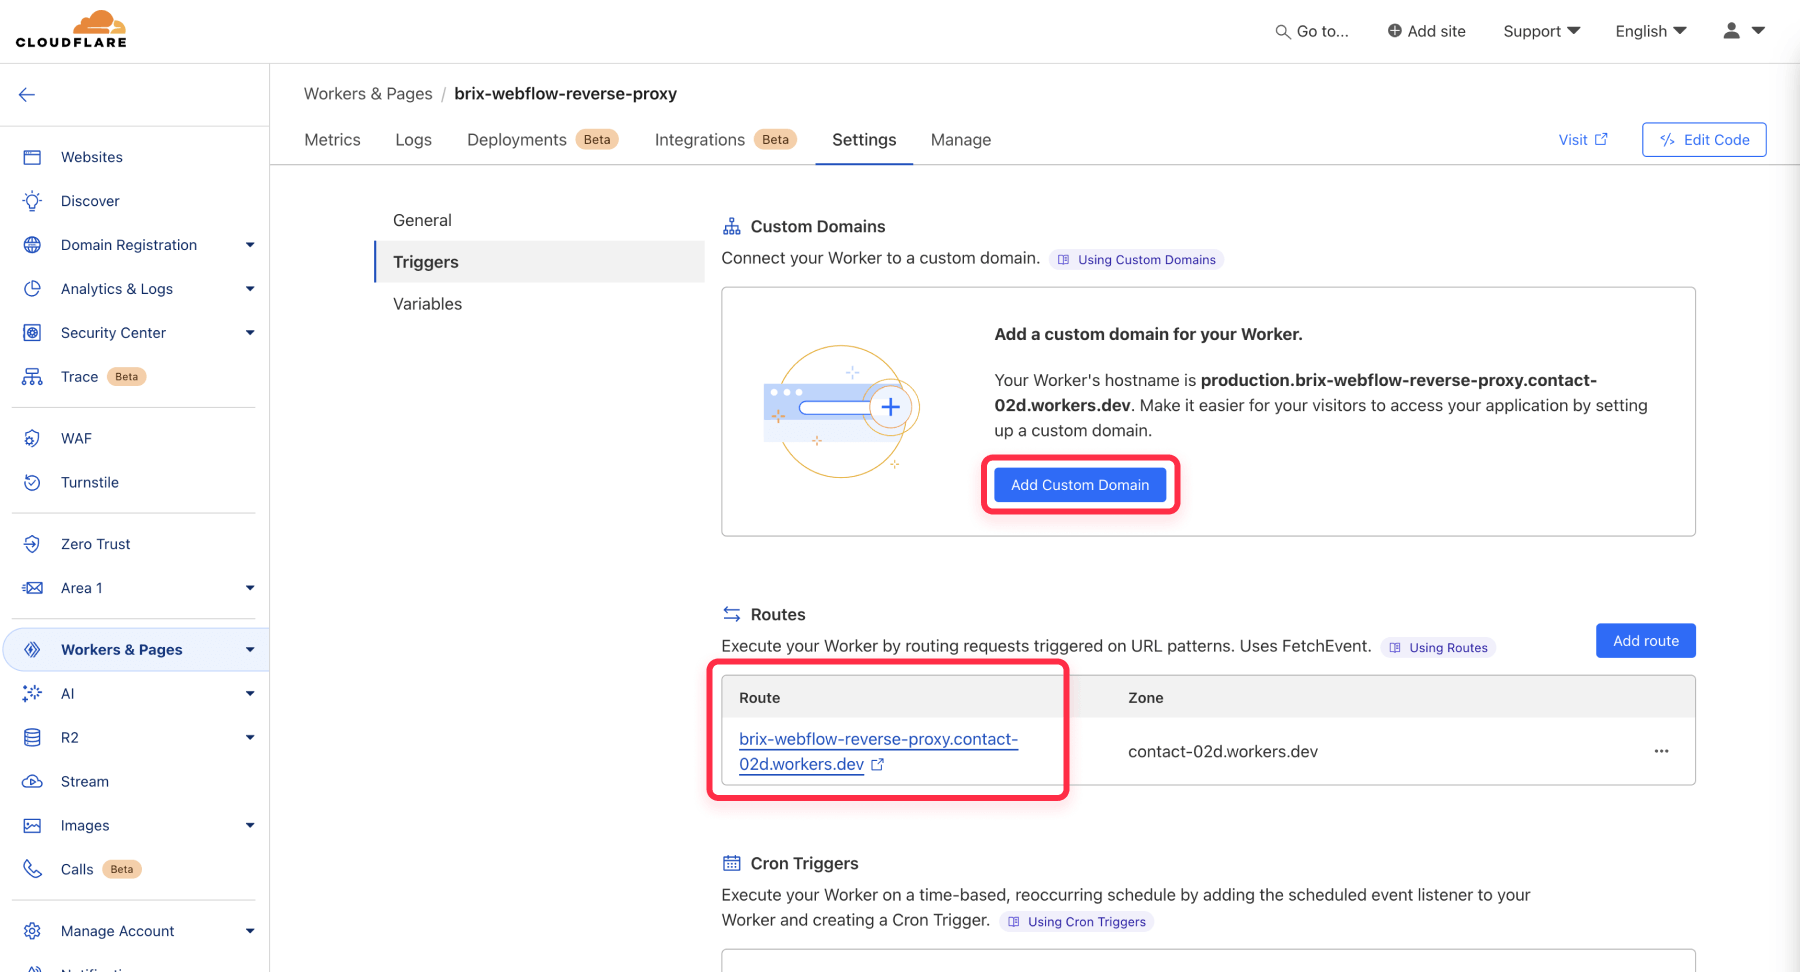
Step 6: Set up custom domain
- Now click on the "Triggers" tab inside the same "Settings" section.
- Scroll down to the "Triggers" section and click on "Add Custom Domain".
- Enter your domain name and click "Add Custom Domain".
- Voila! Your Cloudflare Worker is now live and you are now serving multiple Webflow projects within the same domain.
Additional notes on Cloudflare Workers
- Cloudflare offers a generous free plan that includes 100,000 requests per day.
- Monitor your usage in the "Billing" section to ensure you're not exceeding the free tier limits (Unless you have a site with a huge amount of traffic, you shouldn't even come close to the limits).
- For more advanced configurations, such as rewriting meta tags, implementing custom redirects, or adding server-side logic, you may need to modify the worker code further. If you need assistance with these advanced configurations, you can reach out to our Webflow development agency, and our team of experts will be happy to help.
Method 2: Using Subfold.io
Subfold.io is a platform that simplifies the process of creating reverse proxies. While it's easier to use than Cloudflare Workers, it does come with a higher cost. Here's how to set it up:
Step 1: Sign up for Subfold
- Go to Subfold.io and click on "Get Started".
- Create an account and log in to access the dashboard.
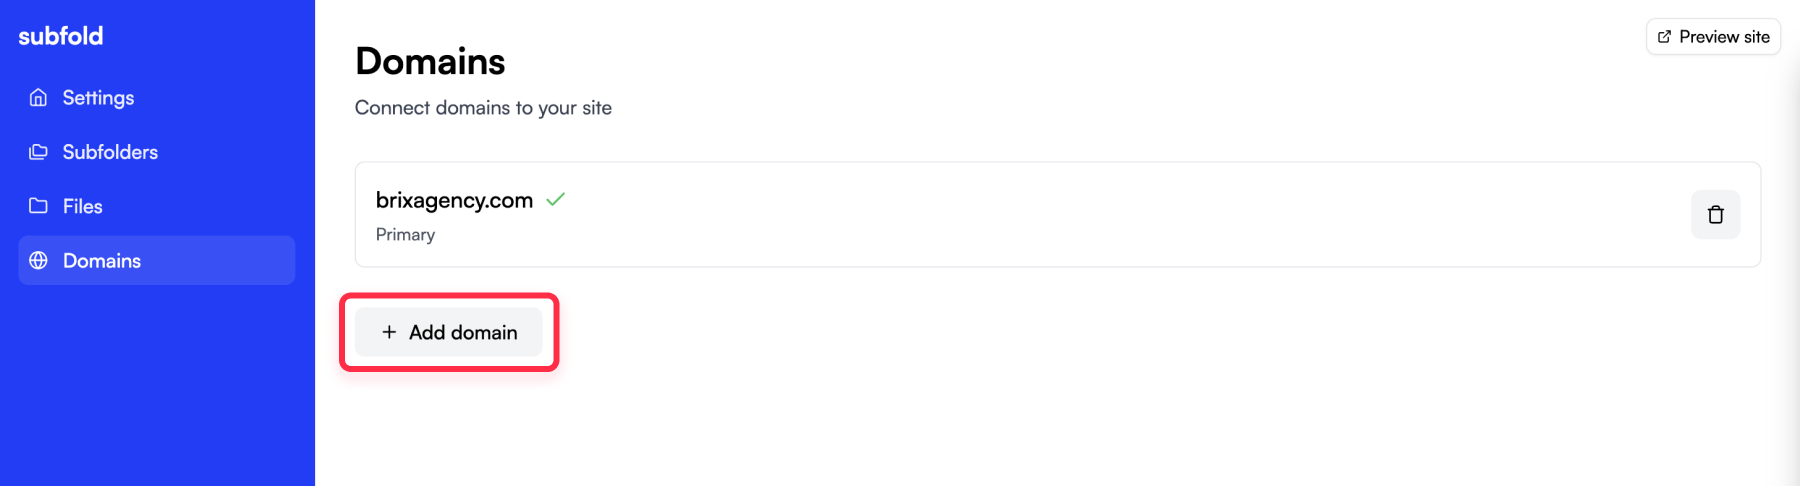
Step 2: Add your domain
- In the Subfold dashboard, go to the "Domains" section.
- Click on "Add Domain".
- Enter your domain name and select "Primary" as the route type (unless you want it to be a redirection).
- Subfold will provide you with two DNS records. Add these to your domain's DNS settings.
- Wait for your domain to be validated by Subfold.
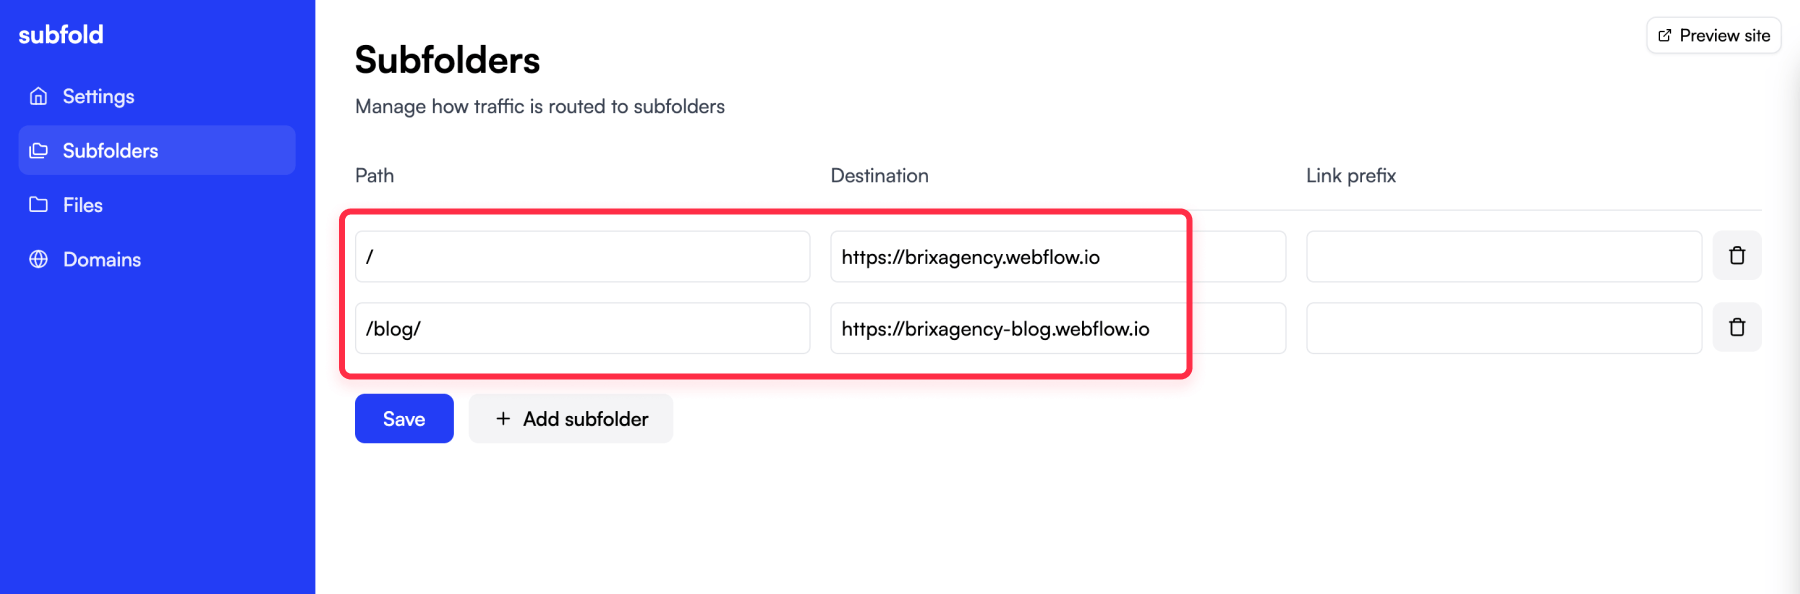
Step 3: Create subfolders
- Navigate to the "Subfolders" section in the Subfold dashboard.
- For each Webflow project you want to add:
- Click "Add Subfolder".
- In the "Path" field, enter the folder name (e.g., "/blog/").
- In the "Destination URL" field, enter the URL of your Webflow project.
- Click "Save".
- Repeat this process for all your Webflow projects.
Step 4: Test your setup
- Visit your domain and navigate to the different paths you've set up.
- Verify that each path loads the correct Webflow project.
Additional notes on Subfold
- Subfold's current pricing plan includes 100,000 monthly page views for $29 per month.
- While more expensive than Cloudflare Workers, Subfold offers a simpler interface and may be easier for non-technical users.
Conclusion
As we conclude this guide, it's clear that hosting multiple Webflow projects on a single domain is a powerful option for large-scale websites. This technique not only overcomes Webflow's 150 static page limit but also enables you to create a more organized, robust, and scalable web presence. While Webflow doesn't offer this functionality natively, you're now equipped with two effective methods - Cloudflare Workers and Subfold.io - to achieve this goal. Choose the method that best fits your technical expertise and budget.
As a final note, it's important to remember that setting up a reverse proxy can be complex if it's your first time doing it. If you encounter any difficulties or need assistance with implementation, don't hesitate to reach out to our specialized Webflow agency. Our team of Webflow experts is ready to help you set up and optimize your multi-project Webflow setup.