

If you're a Webflow user, you've likely run into an increasingly frustrating problem: spam submissions in your forms. Not only do these unwanted messages fill up your inbox, but they also make it hard to find and respond to real leads.
The impact of form spam can be significant:
- Wasted time sorting through irrelevant submissions
- Increased risk of missing important messages from real users
- Skewed conversion data and clutter in any tools connected to your forms
In this guide, we'll explore three current methods to combat spam in your Webflow forms. We'll start with Webflow's built-in protection and progress to dedicated external form handlers that can filter submissions before they ever reach your inbox or downstream tools. By the end, you'll have a practical toolbox of strategies to keep your forms clean and your leads real. Let's dive into it:
Method 1: Enable Webflow's native bot blocking and spam filtering
For most Webflow forms, this is the recommended starting point. Webflow's built-in spam protection is built around two separate controls — bot blocking and spam filtering — both available under Webflow's Cloudflare Turnstile spam protection settings, and it applies to any form that Webflow processes for you.
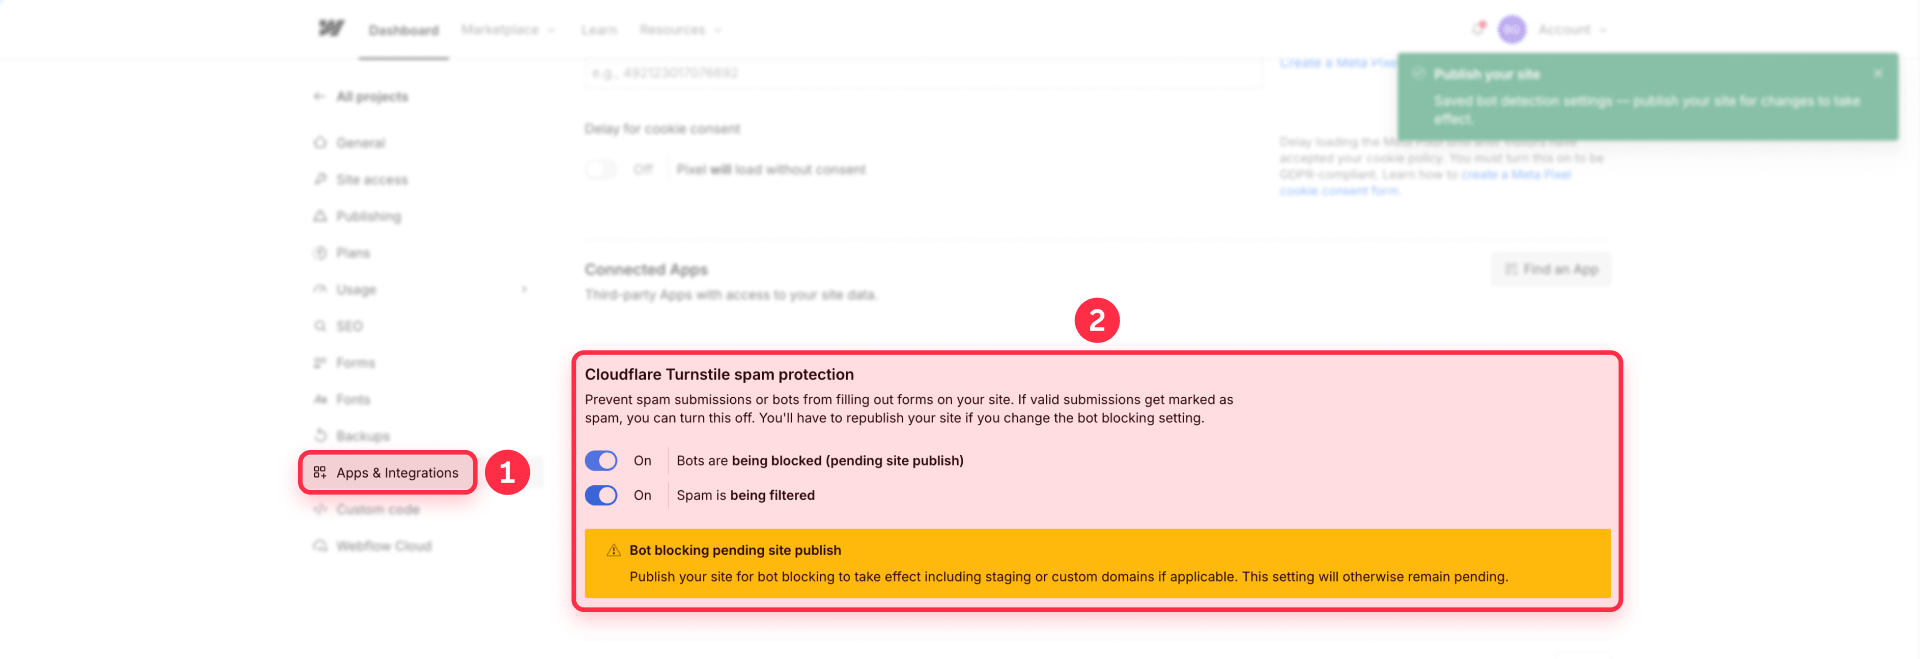
Bot blocking runs quietly in the background, analyzing visitor behavior to distinguish real people from automated scripts and block suspicious submissions before they're sent. Spam filtering, in turn, examines the actual content of each submission and separates out entries that look like spam. Because the two controls evaluate different signals, one can catch what the other misses.
This method is a great first line of defense because it adds no visible CAPTCHA challenge for your visitors and protects your forms from a single setting — no custom code or external accounts required.
Pros and cons of Webflow's native spam protection
Pros:
- Built into Webflow, with no custom code required
- No visible CAPTCHA for visitors to solve
- Applies to every form Webflow processes from one setting
- The best first step for most Webflow forms
Cons:
- Cannot guarantee that every unwanted submission will be blocked
- Won't stop promotional messages typed and submitted by a real person
- Only protects forms that Webflow processes
How to enable bot blocking and spam filtering in Webflow
- Open Site settings.
- Go to Apps & Integrations.
- Find Cloudflare Turnstile spam protection.
- Enable Bot blocking.
- Enable Spam filtering.
- Publish your site.
- Test your forms on a published staging or production domain.
A quick note on what to expect: while bot protection loads, Webflow may briefly disable the submit button and apply a .w-form-loading class to the submit input that you can style so the loading state doesn't read as an error. Submissions flagged as spam aren't deleted silently — they're held in a separate spam review area where you can check them for false positives.
Method 2: Add Google reCAPTCHA v2
reCAPTCHA is an optional second layer, not a replacement for native protection. It's worth considering when automated spam continues after you've enabled bot blocking and spam filtering, and when you're comfortable adding a visible verification step. Webflow supports reCAPTCHA v2 using the familiar "I'm not a robot" checkbox, and Webflow's reCAPTCHA guide walks through adding the element.
Keep in mind that reCAPTCHA adds visible friction and some accessibility considerations, and it can't guarantee zero spam — sophisticated bots and promotional messages submitted by real people can still get through.
Pros and cons of reCAPTCHA for Webflow forms
Pros:
- Native Webflow integration
- A verification step most visitors already recognize
- Adds an explicit challenge before a submission is accepted
Cons:
- Adds friction for legitimate visitors
- Limited styling options, with accessibility tradeoffs
- Must be added to every form individually
- Cannot guarantee that every unwanted submission will be blocked
How to set up reCAPTCHA v2 in Webflow
- Register your domains in the Google reCAPTCHA admin console.
- Select reCAPTCHA v2 and the "I'm not a robot" checkbox option.
- Add the reCAPTCHA element to every Webflow form from the Add panel.
- Go to Site settings → Apps & Integrations → reCAPTCHA validation.
- Add your Site key and Secret key.
- Enable validation.
- Save, publish, and test every form.
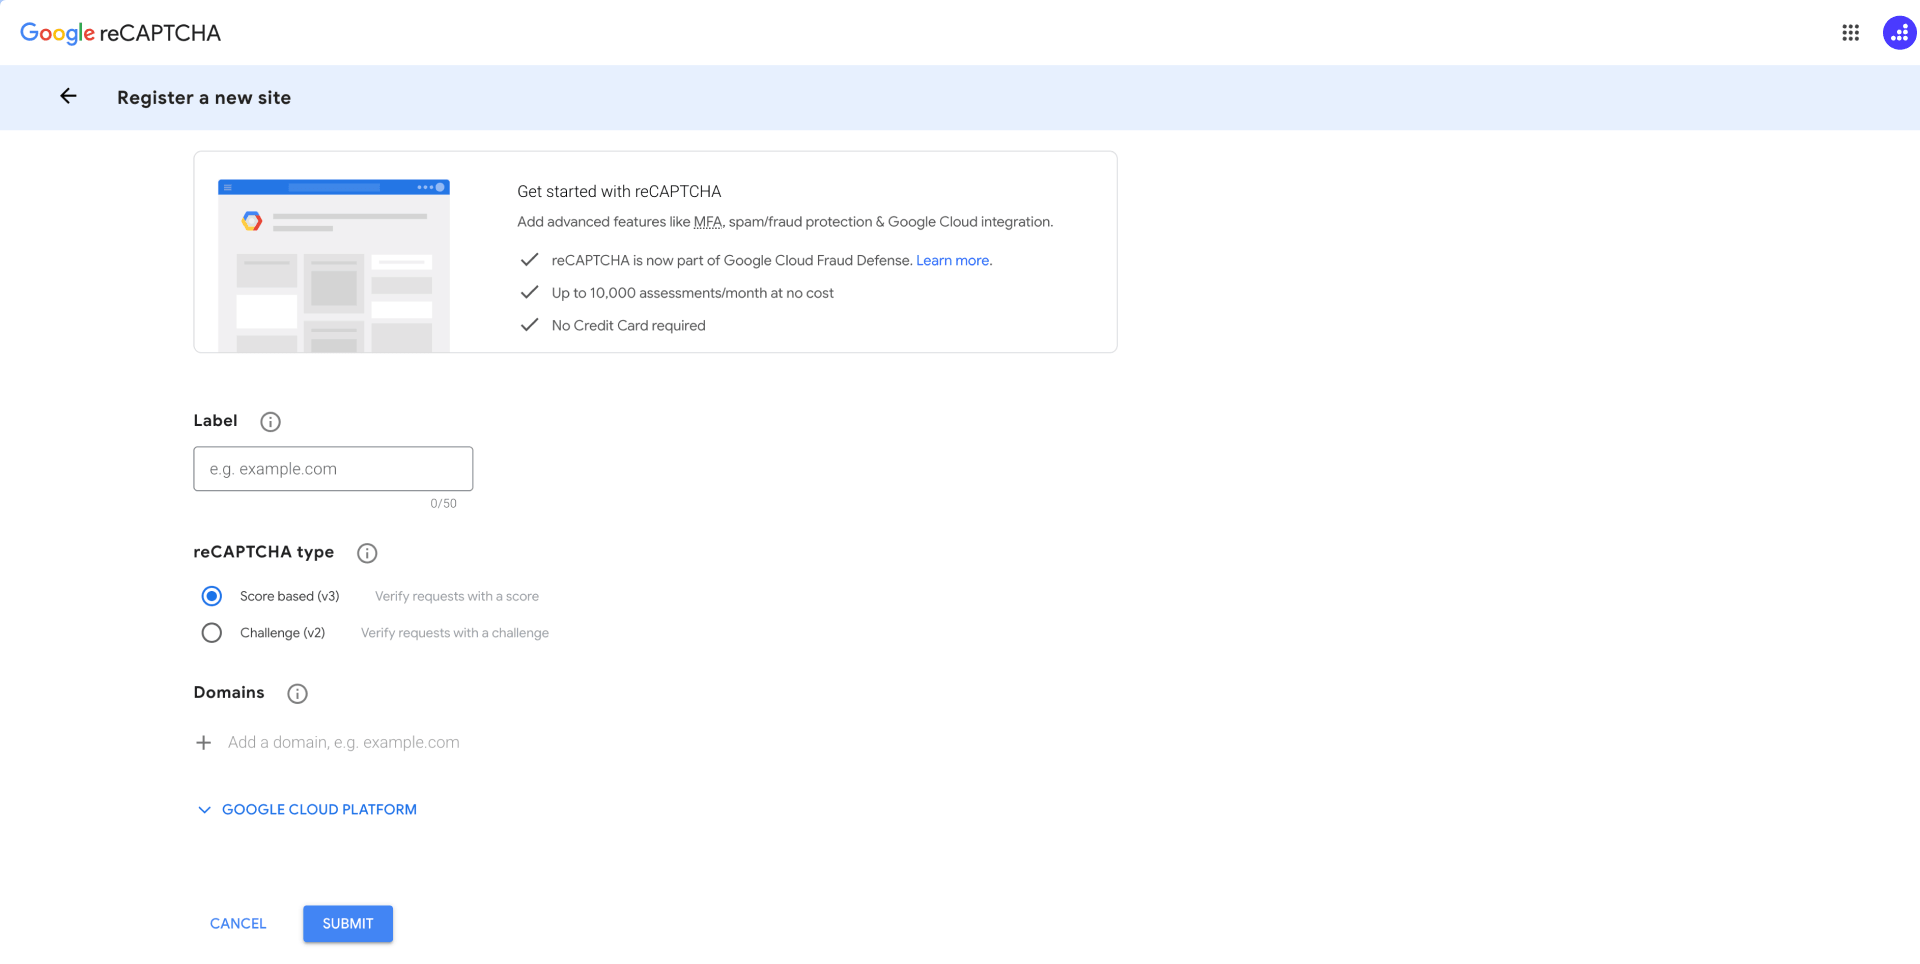

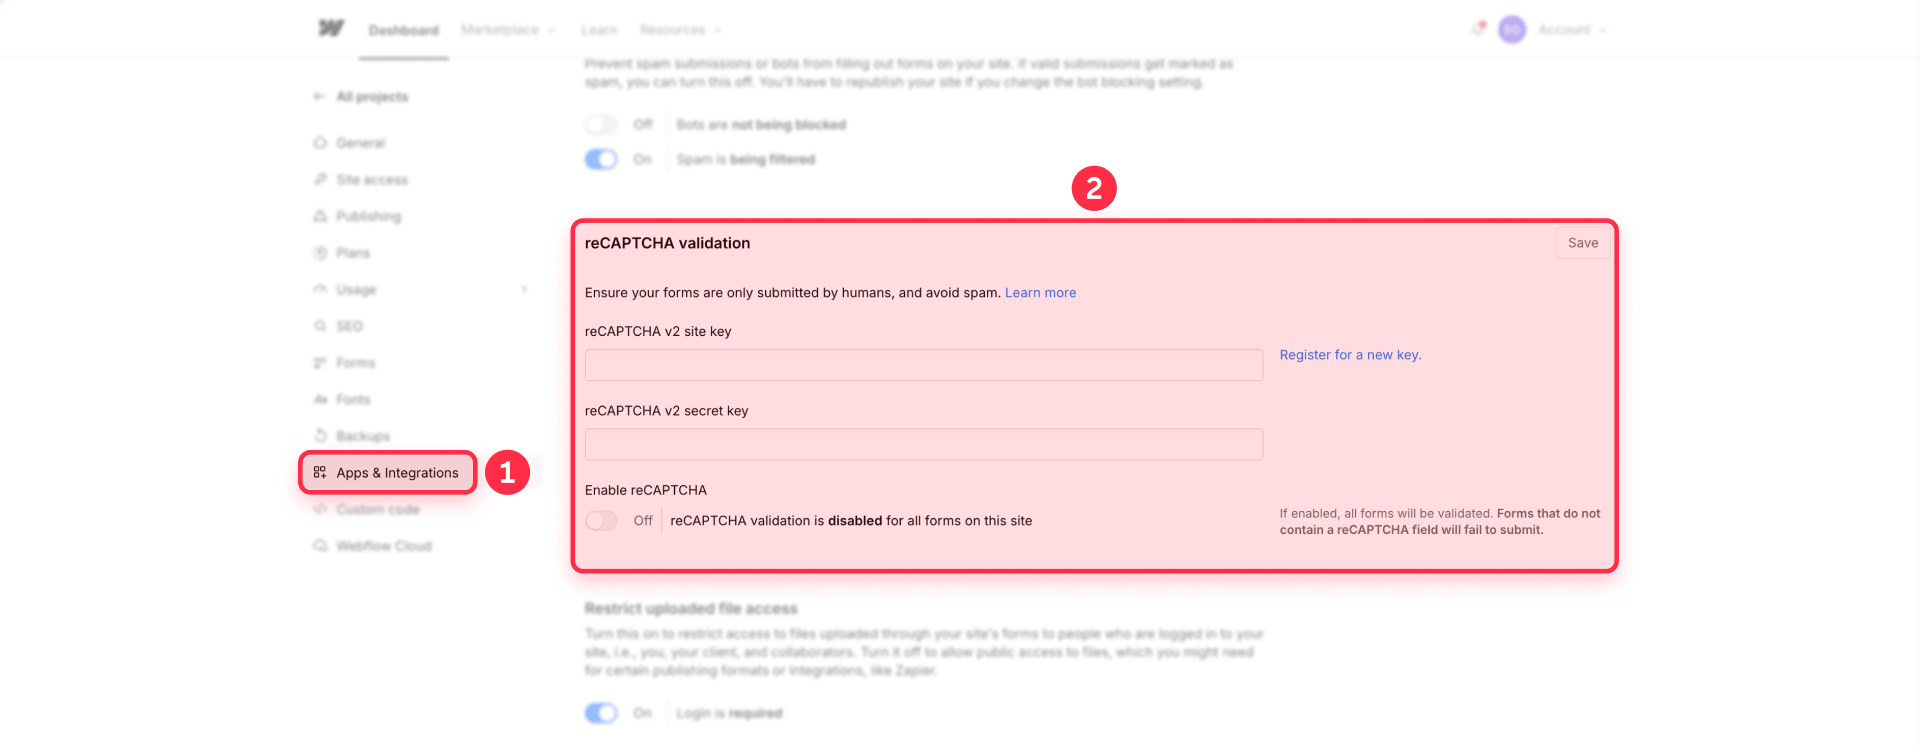
An important note: reCAPTCHA validation is a sitewide setting, so every form on your site must contain a reCAPTCHA element before you enable validation — any form without it will fail to submit, and the change takes effect as soon as you save, even before you republish. On exported sites, Webflow's native reCAPTCHA integration isn't available; Webflow's guidance on collecting form submissions on exported sites explains what works there.
Method 3: Use a dedicated form handler such as Formspark or Basin
When native protection and reCAPTCHA aren't enough — or when you need submissions filtered before they reach your email, a CRM, or an automation — the next step is to route your form through a dedicated form handler. Services like Formspark and Basin receive your submissions, filter out the spam, and forward only the legitimate ones onward.
This approach is also a natural fit for forms that already use a Custom action, since Webflow's built-in protections don't cover submissions sent that way. Rather than catalog every available service, we'll focus on Formspark and Basin, two options that come up often for Webflow.
Pros and cons of dedicated form handlers
Pros:
- Filtering happens before clean leads reach your downstream tools
- Better control over routing, notifications, and integrations
- Well suited to CRM and automation workflows
- Can stop spam from consuming tasks in connected tools
- More specialized form handling than Webflow's native forms
Cons:
- Requires an external account and another service to maintain
- Submission limits and pricing depend on the provider
- Moves form data outside Webflow
- Requires a privacy and data-retention review
How to connect a Webflow form to a dedicated handler
- Create a form endpoint in Formspark or Basin.
- Select the form in Webflow.
- Open its Settings panel.
- Under Send to, choose Custom action.
- Paste the endpoint URL and use the submission method required by the provider.
- Configure spam protection and notifications inside the handler.
- Publish and test with legitimate, suspicious, and failed submissions.
An important note: a Custom action bypasses Webflow's built-in form processing, so Webflow won't store those submissions or send its native email notifications. Spam filtering, storage, routing, notifications, privacy, and retention all become the external handler's responsibility. And remember that a CAPTCHA only protects the endpoint if the receiving service validates its token server-side — a widget on its own won't stop a bot from posting directly to the endpoint.
Choosing the right form spam prevention method for your Webflow site
As we've explored, there are several ways to combat spam in Webflow forms, each with its own strengths. Let's recap the methods we've covered:
- Enable Webflow's native bot blocking and spam filtering — the recommended starting point for most sites, with no visible challenge for visitors.
- Add reCAPTCHA v2 if automated spam continues after native protection and you're comfortable with a visible verification step.
- Use a dedicated handler like Formspark or Basin when you need stronger filtering before delivery or when your form uses a Custom action.
It's worth noting that combining methods can create a more robust defense — for example, starting with native protection and adding reCAPTCHA only if spam persists. Remember, too, that no method can stop every manually submitted promotional message; a real person who fills out your form will always get through, so the goal is to remove the automated flood, not to achieve perfection.
If you continue to face challenges with spam or need assistance implementing these solutions, don't hesitate to get in touch with our Webflow agency — our team of Webflow experts has a track record of fixing form-spam issues and will be happy to help you out as well.





Join readers commenting on this post!